CrochetKnittingMenScarvesHatsGlovesSweatersCardigansSocksOther clothingWomenScarvesHatsGlovesShawls and cover upSweatersCardigansSocksSlippersBagsOther clothingChildrenScarvesHatsGlovesSweatersCardigansSocksSlippersBagsOther clothingHomeBlankets and plaidsRugsHome decorationsPetsSchemesOther hand-madeChat
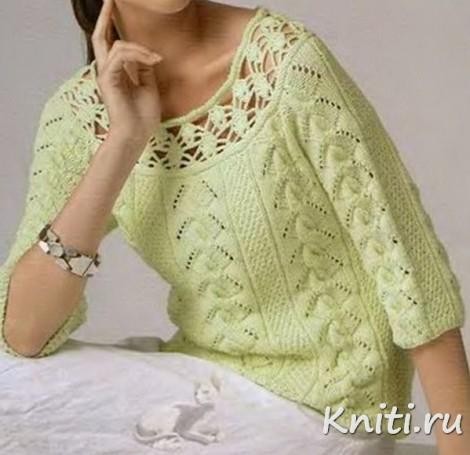
Knitting Instructions for Light-Green Sweater


You’ll Need:
500 (550, 600)g of light-green 100% cotton yarn (100m/50g);
Knitting needles 3.5 and 4;
Circle knitting needles 4, 80-100 cm long;
Crochet hook 3.5.
Size:
S (M, L).
Used Patterns:
Knot Pattern:
1 knit stitch, 1 purl by turn;Main Pattern:
1 knit stitch, 1 purl by turn, replace the pattern every 2 rows;Fancy Pattern:
Based on the scheme, which states only right-side rows, create wrong-side rows according to the ornament. Repeat rows 1st-12th.Stitches Control:
Main pattern, knitting needles 4: 22-23 stitches x 30 rows = 10 x 10 cm.Instructions:
Back:
Cast on 117 (125, 137) stitches with knitting needles 3.5 and make the first 3 rows with the knots pattern, starting with a wrong side row as follows: 1 selvage stitch, 1 knit stitch, 1 purl, etc., according to the ornament. Finish the row with 1 knit stitch and 1 selvage stitch. Then, switch to knitting needles 4: 1 selvage stitch, 7 (9, 13) stitches of the main pattern, * 29 stitches of the fancy pattern, 7 (9, 13) stitches of the main pattern*; repeat from * to * once. Continue with 29 stitches of fancy pattern, 7 (9, 13) stitches of the main pattern, 7 (9, 13) stitches of the main pattern, and finish with 1 selvage stitch. At a height of 31 (33, 31) cm, i.e., in 90 (96, 90) rows, increase 1 x 1 stitch from each side of the detail, and then, increase 3 x 1 stitch in every 4th row = 125 (133, 145) stitches. Include the increased stitches in the main pattern. At a height of 37 (39, 37) cm, i.e., in 108 (114, 108) rows, bind off 1 x 3 stitches, 2 x 1 stitch in every 2nd row from both sides for arm-holes and leave the rest 115 (123, 135) stitches; the height of this detail is 39 (41, 39) cm.
Front:
Make in the same way as the back.Sleeves:
Cast on 81 (83, 85) stitches with knitting needles 3.5 and make the first 3 rows with the knots pattern, starting with a wrong side row and working as follows: 1 selvage stitch, knit stitch, purl, according to the ornament. Finish the row with 1 knit stitch and 1 selvage stitch. Then, switch to knitting needles 4: 1 selvage stitch, 7 stitches of the main pattern, 29 stitches of the fancy pattern, 7 (9, 11) stitches of the main pattern, 29 stitches of the fancy pattern, 7 stitches of the main pattern, 1 selvage stitch. For sleeve widening, at a height of 19 (18.5, 11) cm, i.e., in 54 (52, 30) rows from fancy pattern, increase 1 x 1 stitch from both sides, then, 3 x 1 stitch (5 x 1 stitch, 9 x 1 stitch) in every 4th row = 89 (95, 105) stitches. Include the increased stitches in the main pattern. At a height of 25 (27, 25) cm, i.e., in 72 (78, 72) rows, bind off 1 x 3 stitches and 2 x 1 stitch in every 2nd row from both sides, leaving 79 (85, 95) stitches = 27 (29, 27) cm.Make the second sleeve in the same way.

Why have you classified this pattern as a crocheted sweater when the body of the sweater is knit. The only thing crocheted is the yoke. To me this is a knit sweater.
Sorry, my mistake, I'll correct it.
Thank you!