Crochet Pillow Cover Pattern: Step-by-Step Instructions


You’ll Need:
About 600 yards of Vanna’s Style yarn from Lion Brand. (Vanna’s Style is a #3 DK weight yarn: Red, Ecru, and Navy (less than 1 skein of each).
Crochet hook 3.5 mm.
Size: Fits a standard 12″ square pillow insert.
Stitches Control: 6 rows of 8 HRDC = 2″ square.
Instructions
Front Side, Red and White Striped Squares (Make 3)
Finished squares should measure 5.75″ across including edging.
To Begin
With red, CH24.
Rows
Row 1: HbDC in 3rd CH from hook and in each CH across. (22)
Row 2: CH2, turn. HbDC in each ST across. (22)
Row 3: CH2, turn. HbDC in each ST across. (22)
Row 4: CH2, turn. HbDC in each ST across. (22)
Switch to ecru.
Row 5-8: CH2, turn. HbDC in each ST across. (22)
Switch to red.
Rows 9-12: CH2, turn. HbDC in each ST across. (22)
Switch to ecru.
Rows 13-16: CH2, turn. HbDC in each ST across. (22)
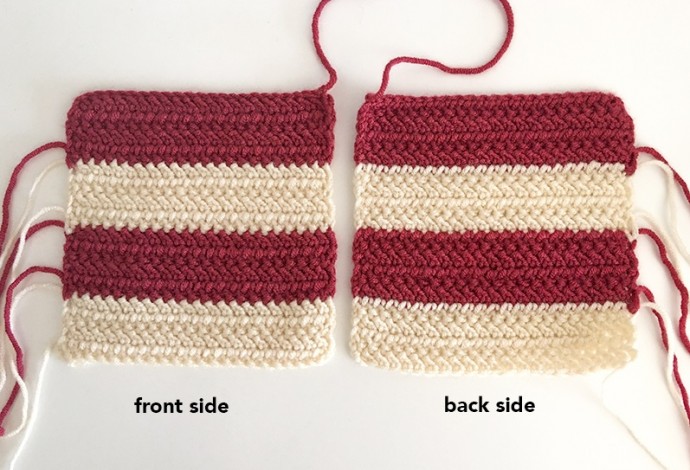
Fasten off. To weave in ends, let’s determine which side of the square will be the front. If you look at both sides of a square, you’ll notice they are slightly different at their color changes; one side will have a nice definitive color change (albeit slightly jagged), and the other side will show slight overlap at the color changes, where the Ecru may show through the Red stitches a bit or vice versa. Use the side with the nice clear color change as the front of your square, and weave your ends into the backside.
Edging
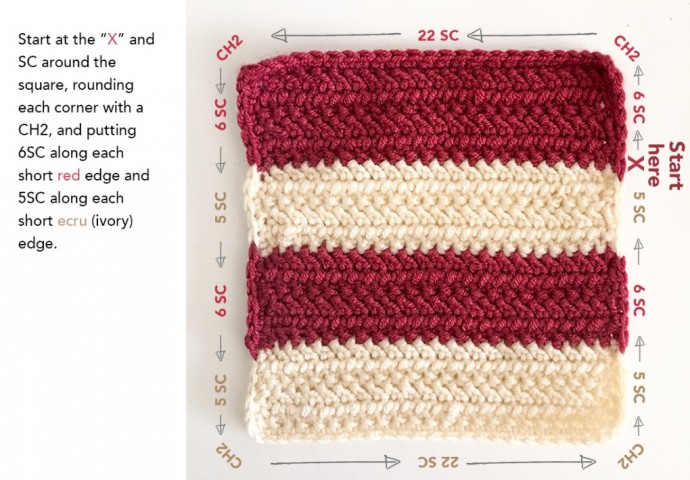
There are two important things to understand about edging these squares. This may sound a little confusing, but hang with me here and use the photo below to clarify what I’m saying. (1) We need to edge these squares nice and evenly, with 22SC around each side of the square. This is easy to do with the top and bottom of the square, but takes a little planning with the left and right edges since there are no evenly-placed stitches to work into. To get 22SC along those left and right edges, we’re going to put 6SC in each Red section, and 5SC in each Ecru section (6+5+6+5=22). (2) As mentioned in the Notes section above, we are edging these squares with alternating Red and Ecru, because the finished look will be much nicer. Yes, it means a few more ends to weave in, but trust me; it will look better.
So, keeping in mind the explanations above, we’re going to put a nice edging on these squares. We’ve already determined which side of the squares will be the front, so lay a square in front of you with the front side facing you. Attach red to the rightmost corner of the top Red stripe; CH1. Put 6SC along the short side of that stripe. CH2 (to turn the corner), and SC in each ST along the long side of the Red stripe (22SC). CH2 again, and put 6SC evenly along the remaining edge of that stripe. Switch to ecru and put 5SC along the short edge of that stripe. Switch back to red and put 6SC along the short edge of the next red stripe. Continue around the square, then join to the first SC with a SL ST.
Fasten off and weave in all ends.
Front Side, Blue Square (Make 1)
Finished square should measure 5.75″ across including edging.
To Begin
With navy, CH24.
Rows
Row 1: HbDC in 3rd CH from hook and in each CH across. (22)
Rows 2-16: CH2, turn. HbDC in each ST across. (22)
Edging
CH1, turn.
1st Side: SC evenly along the first edge (22SC); CH2 to round the corner.
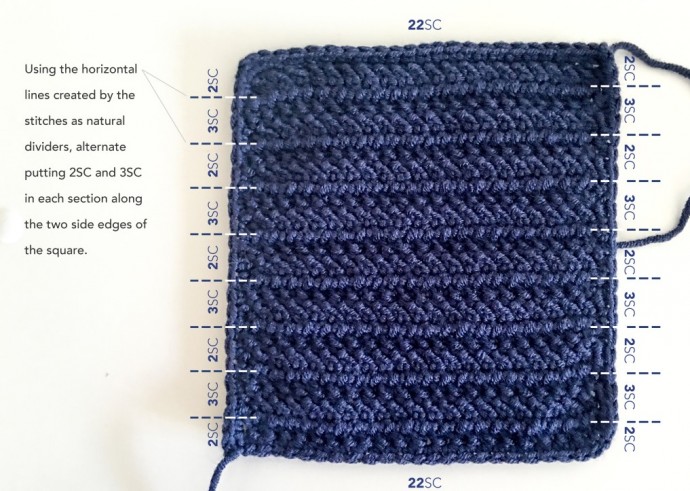
2nd Side: Notice the horizontal “lines” that were created naturally by the stitch we used; these lines divide the square up into 9 “strips”. To evenly crochet 22SC down this side of the square, place 2SC in the first strip, 3SC in the next, 2 in the next, 3 in the next, alternating all the way down the side for a total of 22SC (2+3+2+3+2+3+2+3+2=22). Use the photo below to guide you. CH2 to round the next corner.
3rd Side: SC evenly along the first edge (22SC); CH2 to round the corner.
4th Side: Follow instructions for 2nd side (22SC), and CH2 to round the final corner. Join with a SL ST to the first SC.
Fasten off and weave in ends.
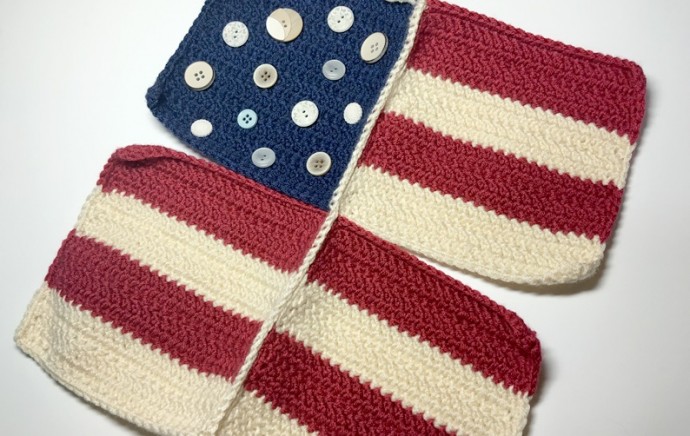
Buttons
Arrange your buttons on the front side of the blue square and sew them on with yarn and thread. I used a tiny dab of hot glue to affix each one to the square before I sewed any of them, so that they would stay in place during the sewing process. If you don’t have a glue gun handy, you could also snap a photo of the buttons in the layout you want so that you can refer to it as you sew.
Back Side (Make 1)
Finished square should measure 11.75″ across including edging.
To Begin
With red, CH48.
Rows
Row 1: HbDC in 3rd CH from hook and in each CH across. (46)
Row 2: CH2, turn. HbDC in each ST across. (46)
Switch to ecru.
Rows 3-4: CH2, turn. HbDC in each ST across. (46)
Switch to navy.
Rows 5-6: CH2, turn. HbDC in each ST across. (46)
Switch to red.
Rows 7-32: Continue this pattern, switching colors every 2 rows in a red, ecru, and navy repetition. (You will end on red.)
Switch to ecru.
Row 33: CH2, turn. HbDC in each ST across. Note that this is only a single row of HbDC. (46)
Fasten off red and navy. Leaving ecru attached, weave all loose ends into the backside of the square, then continue on to Edging (next).
Edging
CH1, do not turn.
1st Side: This pillow is divided into 17 stripes or color blocks (yes, we’re including that last row of HbDC in that final count, even though it’s smaller than the rest). We need to crochet 46SC evenly down this side, and we’ll do so by following a pattern of 2-3-3-3 (meaning 2SC in the first stripe, 3SC in the next, 3SC in the next, 3SC in the next, then repeat, all the way down the side). After repeating this sequence a total of 4 times, there will be 1 stripe remaining; we’ll put 2SC in that one. Use the photo below as a visual.
CH2 to round the corner.
2nd Side: SC in each ST across (46). CH2 to round the corner.
3rd Side: Follow the instructions for the 1st side (46). CH2 to round the corner.
4th Side: SC in each ST across (46). CH2 to round the corner. Join to the first SC of Side 1 with a SL ST. Fasten off and weave in.
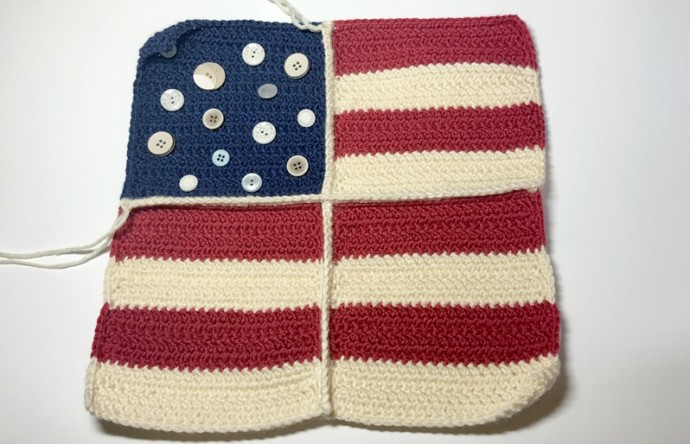
Assembling the Front of the Pillow
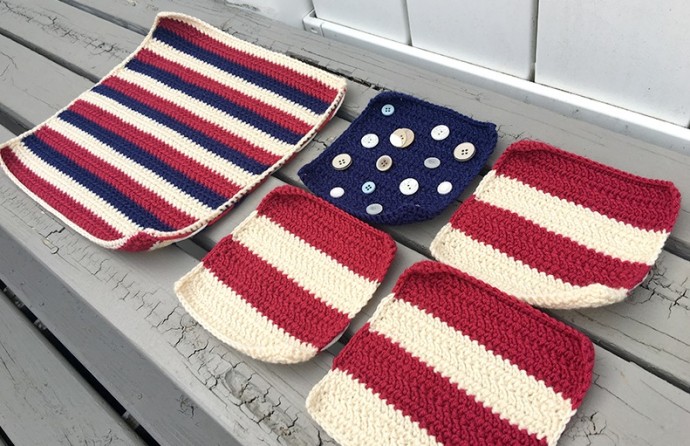
You should now have 5 squares:
It’s time to make them into a pillow cover!
We’ll start by assembling the front side of the pillow. Lay your squares out in front of you in the layout in which they’ll be sewn together:
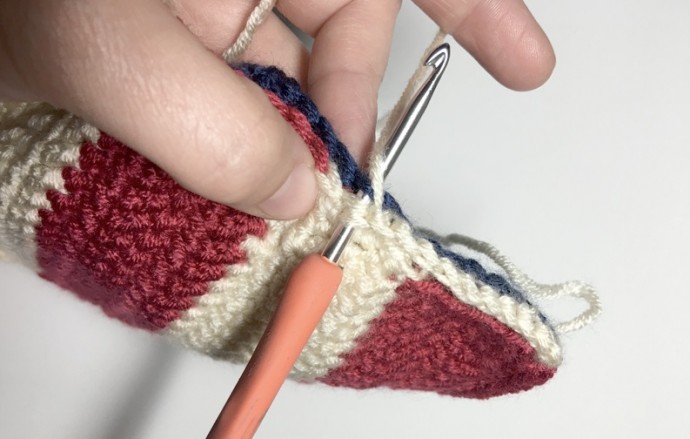
We’ll begin with the top two squares. Line up the right edge of the blue square with the left edge of the striped square, and put the squares together, wrong sides touching, right sides facing outward. Attach Ecru in the top corner CH2 spaces (going through both squares) and CH1. SC in the same space. SC in only the two inner loops (the ones that are touching each other) of the next ST, leaving the outer loop of each square unworked (see photo below). SC in only the two inner loops of each ST all the way across the edge of the squares. SC in last CH2 space. Do not remove your hook.
We’re going to muster up a little extra hand coordination now in order to attach the bottom two squares. Take the bottom two squares and line them up with each other in the same way you did for the top two squares. Holding the top two squares in your right hand and the bottom two in your left, SC in the top CH2 spaces of both bottom squares, essentially attaching the top two with the bottom two (see photo below).
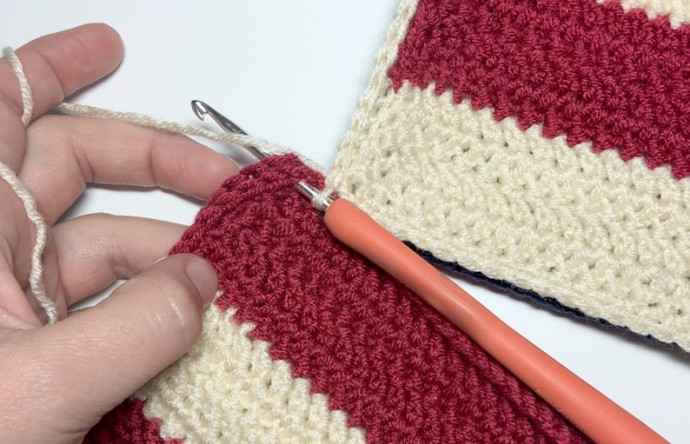
Continue to SC in only the two inner loops along the edge of the bottom two squares. SC in last CH2 space. All four of your squares should be attached now by a vertical seam, and they should look a little like a butterfly when laid out flat:
CH1, turn. Going back over the seam you just created, SC in the same stitches you did before. Note that you are not adding a new row; you are thickening the row you already did by going over it with a second layer (see photo below).
Fasten off your yarn and weave in the ends.
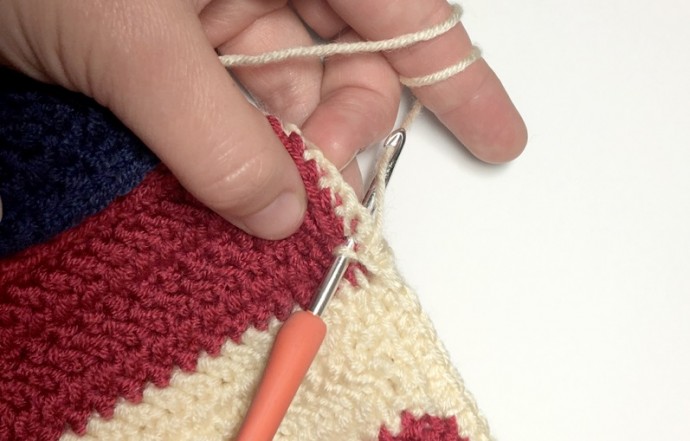
Next, fold the piece in half at the unseamed center, wrong sides touching, right sides facing out. Reattach Ecru in the CH2 spaces on the right edge, and follow the same instructions to seam the edges together (making sure to SC in each CH2 space, and also to SC in only the two inner loops of the rest of the stitches). Don’t forget to CH1, turn, and SC in the same stitches you did before to give the seam a 2nd layer.
Fasten off and weave in ends.
Final Assembly
Hold the front and back sides of the pillow cover together, wrong sides facing each other, right sides facing outward. Attach Ecru in the CH2 space of one of the corners, CH1, and SC in the same space. SC around 3 sides of the squares, putting (SC, CH1, SC) in each CH2 corner space. Place pillow insert inside cover and continue to SC along the 4th side, closing the pillow inside. When you get to the corner in which you started, SC and CH1, then SL ST to the very first SC you completed. Fasten off and weave in ends.