Crochet Checkered Coasters

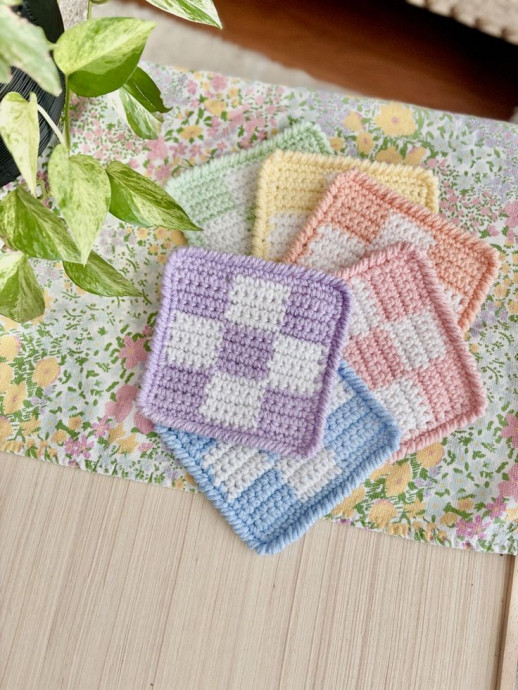
Crochet checkered coasters are the perfect addition to your home décor. These charming coasters not only protect your surfaces but also add a touch of handmade warmth to your space. The classic checkered pattern brings a timeless appeal, making them ideal for both everyday use and special occasions. Whether you're enjoying a cup of coffee in the morning or hosting a dinner party with friends, these crochet coasters will undoubtedly add a delightful touch to your home.
So, why not treat yourself to these adorable coasters and enjoy a touch of handmade charm with every sip or snack!Materials
Hook(s)
My all-time favorite hooks are Clover Amour hooks.
4.0 mm • US size G
Yarn
Cotton is recommended for coasters as it absorbs liquid well but other acrylic yarns would also work.
Weight: Worsted // 2 colors, <1 skein of each
Recommended Brands:
- Hobby Lobby, I Love This Cotton Yarn
- WeCrochet, Comfy or Dishie
- Lion Brand, 24/7 cotton
Notions
- Darning Needle
- Measuring Tape
- Scissors
- Stitch Marker (if desired)
Optional Supplies
- Blocking Board
- Cork Coaster Backing
- Stiffening Spray
Final Size
~4.25×4.25 inches
Special Stitches
Crab Stitch
Crab stitch is used on the final edging and is simply a single crochet stitch in reverse. You will naturally yarn under and then yarn over with this stitch.
Tapestry Crochet
These coasters use the tapestry crochet technique so you will need to change colors throughout your work. I recommend carrying your alternate color yarn as you work. When changing colors at the end of a row, I recommend switching colors before the ch 1 and turn. I use the yarn over (yo) method while crocheting the coasters but I use yarn under (yu) for the color changes.
Pattern
A 4.0 mm hook is recommended. Use a different size as desired, though it may change the final size of the coaster. Stitch counts are included at the end of each row. Ch 1 and turn at the end of each row.
Instructions
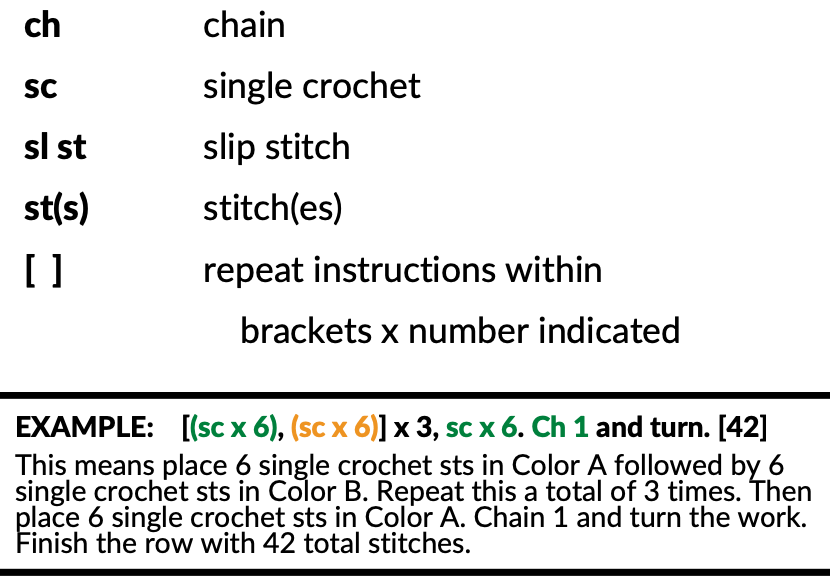
For written instructions, color switches are indicated by Color A, Color B.
Row 1: To begin, ch 19. Make sure to keep tension loose for the chain! Starting in the second ch from hook, sc x 6, sc x 6, sc x 6. Ch 1 and turn.
Rows 2-5: sc x 6, sc x 6, sc x 6. Ch 1 and turn. At the end of row 5, ch 1 and turn.
Rows 6-10: sc x 6, sc x 6, sc x 6. Ch 1 and turn. At the end of row 10, ch 1 and turn.
Rows 11-15: sc x 6, sc x 6, sc x 6. Ch 1 and turn. At the end of row 15, ch 1 and turn.
Ch 1 and work the edging. The edging can be done in either Color A or Color B.
Working down the left side, sc x 14. Place 2 sc in the corner.
Work sc x 16 across the bottom. Place 2 sc in the corner.
Work sc x 14 up the right side. Place 2 sc in the corner.
Work sc x 16 across the top. Sl st to the first st and ch 1.
Now, work the crab stitch in each stitch around the edge of the coaster. See this tutorial!
Once you’ve finished, you can use a blocking board and/or stiffening spray to help shape your coasters.