Create Your Own Crochet Pilgrim Boy Doll for Thanksgiving

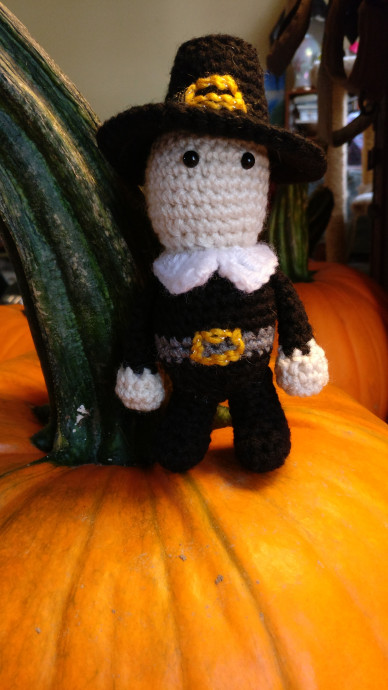
The Crochet Pilgrim Boy Doll is a charming handmade creation perfect for adding a touch of whimsy to your Thanksgiving decor. With its adorable outfit and attention to detail, this little doll brings a nostalgic and heartwarming feel to any space. Whether displayed on a mantel or as a centerpiece on your holiday table, this cute Pilgrim Boy Doll is sure to bring smiles and festive cheer to all who see it. Dive into the cozy world of crochet and add a sprinkle of holiday magic to your home with this delightful little companion.
Materials Needed
Using a G hook with some miscellaneous worsted weight yarn I had around and poly fil for stuffing. I went with 6mm safety eyes as well.
Assembly Instructions
Head
Start with skin color
- magic circle with 6st (6)
- 2sc in each st (12)
- 1sc then 2sc in next st (18)
- 1sc in next 2st then 2sc in next st (24)
- 1sc in next 5st then 2sc in next st (28)
- 1sc in each st for 6 rows (6-11)
- Go ahead and insert safety eyes roughly between rows 7 and 8 about 3 stitches apart.
- 1sc in next 5st then 2tog (24)
- 1sc in next 2st then 2tog (18)
- 1sc then 2tog (12)
- Switch to black.
- IN BLO, 1sc then 2sc in next st (18)
- 1sc in next 2st then 2sc in next st (24)
- 1sc in each st for 4 rows (17-20)
- Change to grey.
- 1sc in each st for 2 rows (21-22)
- Change back to black.
- 1sc in each st for 2 rows (23-24)
- *Stuff head, shape while stuffing.
- 1sc in next 2st then 2tog (18)
- 1sc then 2tog (12)
- *Stuff body, make sure to stuff more into the head and neck area as needed.
- 2tog around (6) bind off and sew opening closed.
Legs
Make two in black, stuff as you go and sew to the bottom of body.
- magic circle or an adjustable loop with 6st (6)
- 2sc in each st (12)
- 1sc in each st for 1 row.
- 2tog twice then 1sc in next 8st (10)
- 2tog twice then 1sc in next 6st (8)
- 1sc in each st for 3 rows (6-8)
- 1sc in next st, 2sc in next st.
- f/o leaving a tail for sewing.
Arms
Make two starting with skin color and lightly stuff in skin color part only. You will be sewing it to the sides of the body roughly between rows 16/17.
- magic circle or an adjustable loop with 6st (6)
- 2sc in each st (12)
- sc in each st.
- 2tog 6 times.
- Switch to black.
- 1sc in each st for 6 rows (5-10).
- Sc through both thickness for 3 sc, f/o and leave a tail for sewing.
Pilgrim Collar
So for this it is going to be a bit tricky at first. With the body of the pilgrim facing head down, attach your yarn in the FLO at the neck where you worked in the BLO. Your first st will be just to the right of the right eye (when the pilgrim is right side up).
- Ch 4 and 2 tc in the same st.
- Do 2dc in next st.
- 2hdc in each st until the last 2 st.
- Then 2 dc in next st.
- 3tc in the next st, bind off and weave in the end.
Pilgrim Hat
In black.
- magic circle or an adjustable loop with 6st (6)
- 2sc in each st (12)
- 1sc then 2sc in next st (18)
- In BLO sc around.
- sc around (5-6).
- 1 sc in next 2 then 2sc (24).
- sc around (8-9).
- In FLO 1sc in next 3 then 2sc (30).
- 1sc in next 4 then 2sc (36).
- 1sc in next 5 then 2sc (42).
- 1sc in next 6 then 2sc (48).
- sc around.
Bind off, leaving a tail for sewing. Weave the tail back to row 10 and sew on top of your Pilgrim’s head, making sure to stuff lightly before completely sewing close.
Lastly, go ahead and sew on a belt buckle and a buckle on the hat… then a nose and mouth if you wish.