How to Crochet a Charming Pilgrim Girl Doll

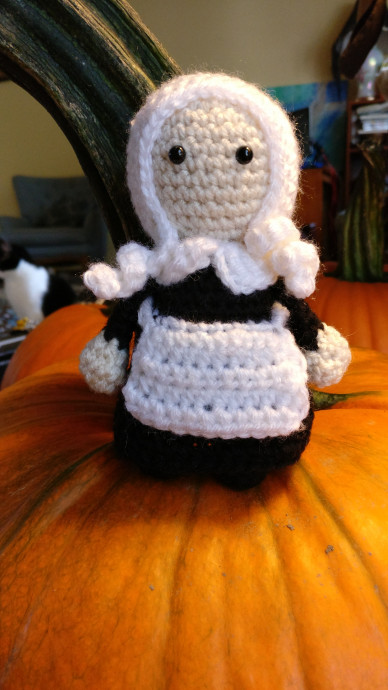
The Crochet Pilgrim Girl Doll is an adorable addition to any collection, embodying the charm and nostalgia of simpler times. With meticulous craftsmanship and attention to detail, this handcrafted doll brings a touch of whimsy and warmth to any space. Its intricate design and classic pilgrim attire make it a delightful conversation starter and a cherished keepsake for both young and old alike. Whether displayed proudly on a shelf or gifted with love, this charming doll is sure to bring a smile to anyone's face.
Using a G hook with some miscellaneous worsted weight yarn I had around and poly fil for stuffing. I went with 6mm safety eyes as well.
Materials Required
- G hook
- Miscellaneous worsted weight yarn
- Poly fill for stuffing
- 6mm safety eyes
Assembly Instructions
Head
Start with skin color:
- Magic circle with 6 st (6)
- 2 sc in each st (12)
- 1 sc then 2 sc in next st (18)
- 1 sc in next 2 st then 2 sc in next st (24)
- 1 sc in next 5 st then 2 sc in next st (28)
- 1 sc in each st for 6 rows (6-11)
Go ahead and insert safety eyes roughly between rows 7 and 8, about 3 stitches apart:
- 1 sc in next 5 st then 2 tog (24)
- 1 sc in next 2 st then 2 tog (18)
- 1 sc then 2 tog (12)
Switch to black:
- In BLO, 1 sc then 2 sc in next st (18)
- 1 sc in next 2 st then 2 sc in next st (24)
- In BLO 1 sc in each
- 1 sc in each st for 7 rows (18-24)
*Stuff head, shape while stuffing:
- 1 sc in next 2 st then 2 tog (18)
- 1 sc then 2 tog (12)
*Stuff body, make sure to stuff more into the head and neck area as needed:
- 2 tog around (6) bind off and sew opening closed.
Legs
Make two in black, stuff as you go and sew to the bottom of body:
- Magic circle or an adjustable loop with 6 st (6)
- 2 sc in each st (12)
- 1 sc in each st for 1 row
- 2 tog twice then 1 sc in next 8 st (10)
- 2 tog twice then 1 sc in next 6 st (8)
- 1 sc in each st for 3 rows (6-8)
- 1 sc in next st, 2 sc in next st
Finish off leaving a tail for sewing.
Arms
Make two starting with skin color and lightly stuff in skin color part only. You will be sewing it to the sides of the body roughly between rows 16/17:
- Magic circle or an adjustable loop with 6 st (6)
- 2 sc in each st (12)
- sc in each st
- 2 tog 6 times
Switch to black:
- 1 sc in each st for 6 rows (5-10)
Sc through both thickness for 3 sc, finish off and leave a tail for sewing.
Pilgrim Collar
For this, it is going to be a bit tricky at first. With the body of the pilgrim facing head down, attach your yarn in the FLO at the neck where you worked in the BLO. Your first st will be just to the right of the left eye (when the pilgrim is right side up), essentially in the middle:
- Ch 4 and 2 tc in the same st
- Do 1 tc and 1 dc in next st
- 2 hdc in each st until the last 2 st
- Then 2 dc and 1 tc in next st
- 3 tc in the next st, bind off and weave in the end.
Pilgrim Dress
With doll facing you, count 4 st to the left from the center of the FLO of row 17 and place a marker here. Now attach your black yarn at the back of the doll (doll now head down) in the FLO of the BLO only row from the body:
- Sc around, move your marker up to this row, Sl st to first hdc
- Hdc around until you get to your marker. At the marker hdc in BLO for the next 8 st (you don’t need the marker anymore unless you want to leave it so it is easier to find this spot again for the apron part). Hdc in the rest of the st using both loops around, Sl st to first hdc
- 3 hdc, 2 hdc in next st around. Sl st to first hdc.
- Hdc around for rows 4-7, Sl st to first hdc. Bind off and weave in ends.
Apron
- Ch 22, then attach your yarn to the FLO of the 2nd row of the dress and sc in the 8 st. Ch 1 and turn.
- 1 hdc, then 2 hdc in next across, ch 1 and turn.
- Hdc across for rows 3-6, ch 1 and turn. After the last row bind off and weave in ends. The beginning ch should be sewn around the back of the body to the other side of the apron.
Pilgrim Bonnet
Done in white:
- Magic circle with 6 st (6)
- 2 sc in each st (12)
- 1 sc then 2 sc in next st (18)
- 1 sc in next 2 st then 2 sc in next st (24)
- 1 sc in next 3 st then 2 sc in next st (30)
- 1 sc in next 24 st, ch 1 and turn
- Hdc in next 24 st for rows 7-10, ch 1 and turn
11) Ch 10 then starting in 2nd ch, 2 sc in each ch going back up to the bonnet. Sc around the bottom of the bonnet to the other side then ch 10, starting in 2nd ch, 2 sc in each ch going back up to the bonnet. Sc around the front to the other tie then bind off, leaving a tail to sew on to the Pilgrim head. Note: I designed the hat a little bigger than necessary in case I wanted to add hair, but I chose not to. Just know that it might be a little loose or you can add hair if you want.