Crochet Indian Boy Doll Instructions

Introduction
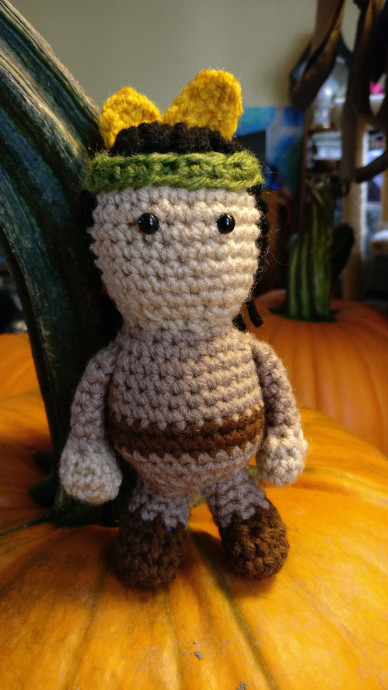
Meet the adorable Crochet Indian Boy Doll, a charming addition to any collection with his traditional Indian attire and intricate details. This little fellow is sure to bring smiles and warmth to your home with his handcrafted design and cheerful expression. Whether displayed on a shelf or hugged tightly, this doll is a delightful reminder of the beauty of handmade craftsmanship and the joy of treasuring unique pieces that tell a story. Add a touch of sweetness to your space with this lovable Crochet Indian Boy Doll.
Materials Needed
Using a G hook with some miscellaneous worsted weight yarn I had around and poly fil for stuffing. I went with 6mm safety eyes as well.
Head Instructions
Start with skin color
- magic circle with 6st (6)
- 2sc in each st (12)
- 1sc then 2sc in next st (18)
- 1sc in next 2st then 2sc in next st (24)
- 1sc in next 5st then 2sc in next st (28)
- 1sc in each st for 6 rows (6-11)
Go ahead and insert safety eyes roughly between rows 7 and 8 about 3 stitches apart.
- 1sc in next 5st then 2tog (24)
- 1sc in next 2st then 2tog (18)
- 1sc then 2tog (12)
Switch to medium brown
- 1sc then 2sc in next st (18)
- 1sc in next 2st then 2sc in next st (24)
- 1sc in each st for 4 rows (17-20)
Change to dark brown
- 1sc in each st for 2 rows (21-22)
Change back to medium brown
- 1sc in each st for 2 rows (23-24)
*Stuff head, shape while stuffing.
- 1sc in next 2st then 2tog (18)
- 1sc then 2tog (12)
*Stuff body, make sure to stuff more into the head and neck area as needed.
- 2tog around (6)
Bind off and sew opening closed.
Legs Instructions
Make two starting with the dark brown, stuff as you go and sew to bottom of body.
- magic circle or an adjustable loop with 6st (6)
- 2sc in each st (12)
- 1sc in each st for 1 row
- 2tog twice then 1sc in next 8st (10)
- 2tog twice then 1sc in next 6st (8)
Switch to light brown
- 1sc in each st for 3 rows (6-8)
Finish with 1sc in next st, 2sc in next st and f/o leaving a tail for sewing.
Arms Instructions
Make two starting with skin color and lightly stuff in skin color part only. You will be sewing it to the sides of the body roughly between rows 16/17.
- magic circle or an adjustable loop with 6st (6)
- 2sc in each st(12)
- sc in each st
- 2tog 6 times
Switch to medium brown
- 1sc in each st for 6 rows (5-10)
Sc through both thickness for 3 sc, f/o and leave a tail for sewing.
Hair Instructions
So I decided the hair was the next step. I simply cut some black yarn about 10-12 inches long and latch hooked them in the head just at the front hairline. I didn’t have a reason to do the whole head, but if you want, have fun. I then tied the hair at the nape of the neck with a piece of red yarn and gave him a slight trim.
Headdress Instructions
With a green yarn, I simply did a chainless sc foundation row (or if you want a chain then go back and sc the length of the chain) the length that would fit his head. This will depend slightly on how thick his hair is and your crochet style. For me, it was a total of 22.
Now for the feathers. This is really just like a simple leaf pattern. Make as many as you want to decorate the back of the headdress in your chosen colors.
- ch 7, then sc, sc, hdc, dc, hdc, sc
- Now working in the opposite side of the chain, sc, hdc, dc, hdc, sc, sl st. Leave a long tail, weave it back to the bottom of the feather (gives it more stability and helps to close up any spaces) and sew it to the beginning of the chainless sc foundation row. This is going to be the back of the headdress with the feathers against the hair when you sew it on the head.
Go ahead and finish sewing the headdress on around his head.