Crochet American Potholder: A Fun and Functional Project

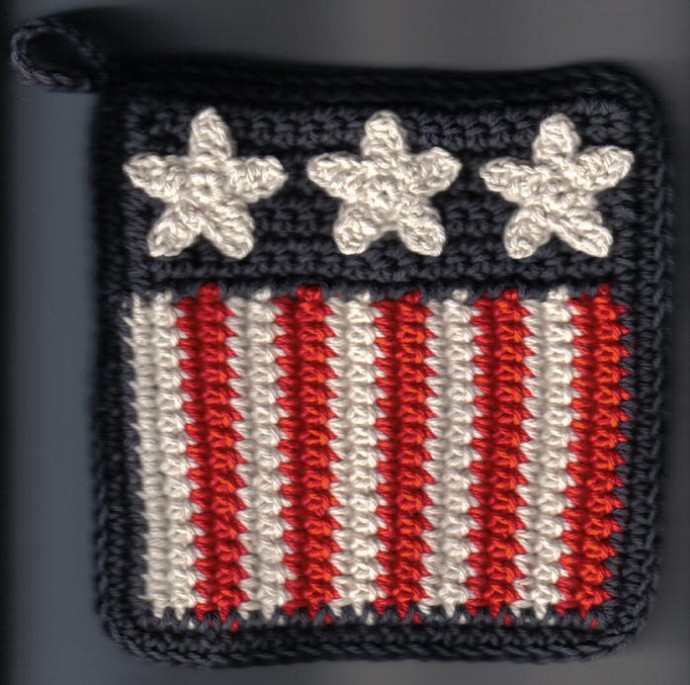
Discover the art of creating a unique and practical kitchen accessory with the Crochet American Potholder. This delightful project allows you to showcase your creativity while also serving a functional purpose. By using various crochet techniques, you can design a potholder that not only protects your hands from hot pots and pans but also adds a touch of charm to your kitchen decor. Whether you gift it to a loved one or proudly display it in your own kitchen, this potholder is sure to catch the eye and spark conversations about your creative prowess. So, grab your crochet hook, select your favorite yarn, and let your imagination run wild as you embark on the delightful journey of crafting the Crochet American Potholder.
Materials
- Worsted Weight Cotton Yarn (like peaches and cream in off white, red, and navy blue)
- Size F hook
- Tapestry Needle (for weaving in ends)
- Size D hook
Finish Size
About 7 ¼”h x 7”w
Gauge
- 4sc = 1”
- 4 rows of sc = about 1” and a tiny smidge more
- Star = point to point 1 ½”
Directions for Front Part
For Stripes
Row 1: With off white and size F hook chain 16, 1 sc in 2nd chain from hook and in each of the next 15 chains, ch1 and turn. (15sc)
Row 2: 1 sc in each st across, color changing to red yarn in last sc, ch1 and turn. (15sc)
Row 3: 1 sc in each st across, ch1 and turn. (15sc)
Row 4: 1 sc in each st across, color changing to off white in last sc, ch1 and turn. (15sc)
Row 5: 1 sc in each st across, ch1 and turn. (15sc)
Row 6: 1 sc in each st across, color changing to red in last sc, ch1 and turn. (15sc)
Row 7: 1 sc in each st across, ch1 and turn. (15sc)
Row 8: 1 sc in each st across, color changing to off white in last sc, ch1 and turn. (15sc)
Row 9-20: Repeat Rows 5 thru 8 for Rows 9 thru 20. (15sc)
Do not color change at the end of Row 20. Finish off and weave in ends.
You should have 2 rows off white alternating with 2 rows red. The sequence should end with 2 rows red. You should have 5 off white stripes and 5 red stripes. (10 rows off white and rows red)
Blue Part
Row 1: Join blue yarn with a sc to one of the end row ends, work 1 sc into each of the next 19 row ends, ch1 and turn. (20sc)
The stripes should be vertical to the blue part.
Row 2: 1 sc in each st across, ch1 and turn. (20sc)
Rows 3-8: Repeat Row 2 for Rows 3 thru 8. (20sc)
Row 9: Work 92 sc evenly around entire Front part, working 3 sc in each corner; join with a sl st to first sc. (92sc)
Finish off.
Stars (Make 3)
Rnd 1: With Size D hook, ch2, 5 sc in 2nd chain from hook, join with sl st to first sc. (5sc)
Rnd 2: [Ch4, 1 sc in 2nd chain from hook, 1 hdc in next chain, 1 dc in next chain, sl st in next st.] Do this 4 times, ch4, 1 sc in 2nd chain from hook, 1 hdc in next chain, 1 dc in next chain, sl st to joining sl st of Rnd 1. (5 points)
Finish off, leaving a very long tail for sewing.
Repeat instructions until you have 3 stars.
Notes
- The smaller you get the stars, the easier it will be to get them to all fit and sew them on, so try to crochet them tightly.
- If stars are coming out too big, try doing the points in just sc, or replace sc, hdc, and dc with sl st, sc, and hdc. Do whatever works for you.
- If this is for decoration only, try using felt or buttons for the stars.
Sew stars onto the Front part in the big blue area at top. I sewed the outside stars on first and then the middle star, to make sure they would all fit.
Set aside Front part.
Back Part
Row 1: With size F hook and blue yarn, ch21, 1 sc in 2nd chain from hook, 1 sc in each of the next 19 chains, ch1 and turn. (20sc)
Row 2: 1 sc in each st across, ch1 and turn. (20sc)
Row 3-23: Repeat Row 2 for Rows 3 thru 23. (20sc)
Row 24: Work 92 sc evenly around entire Back part, working 3 sc in each of the corners. (92sc)
Do not finish off!!!
Assembling
Line up the Front and Back parts together, the Front should be right side out, both of them should line up.
Rnd 1: Ch1, working through both thicknesses of Front and Back, work 1 sc in each st around, join with sl st to first sc and turn. Sl st in next st (or to corner), ch11, sl st in same st, sl st in each of the 11 chains and sl st in the same st again. (92sc + hanger)
Finish off and weave in ends.