


Make the Cozy Bernat Textured Life Crochet Blanket — Full Pattern & Step‑by‑Step Guide

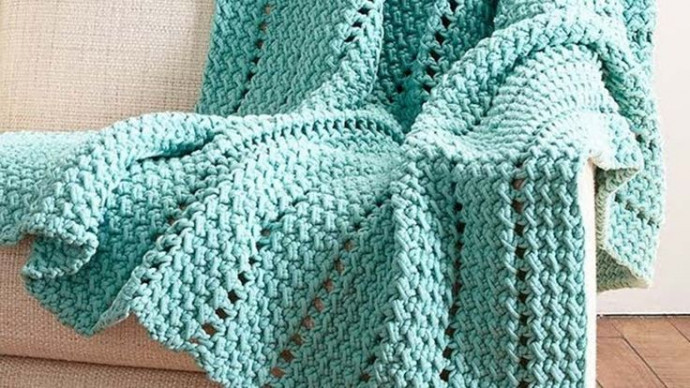
Create a warm, stylish addition to your home with the Bernat Textured Life Blanket. This crochet pattern combines simple repeats with front‑post stitches to produce a rich, tactile texture that looks and feels luxurious. The pattern alternates a main color (MC) with a secondary color (Color A) to add subtle visual interest. Suitable for crocheters comfortable with basic stitches and front‑post doubles, the finished blanket measures approximately 50" x 65" (127 x 165 cm).
Before you begin, check your gauge and make sure you are happy with the fabric created by the hook and yarn you choose. The pattern below includes materials, abbreviations, row‑by‑row instructions, color changes and edging notes to help you complete the blanket.
Materials Needed & Measurements
- Yarn: Main Color (MC) and Color A
- Crochet Hook: L/11 (8 mm)
- Scissors, yarn needle
Measurements
- Finished Size: 50" x 65" (127 x 165 cm)
- Gauge: 8 dc and 4 rows = 4" (10 cm)
Abbreviations Used
- Beg = Beginning
- Ch = Chain
- Dc = Double crochet
- Dcfp = Double crochet front post
- Hdc = Half double crochet
- RS = Right side
- Sc = Single crochet
- Sl st = Slip stitch
- St(s) = Stitch(es)
- WS = Wrong side
- Yoh = Yarn over hook
Stitching Instructions for Making the Bernat Textured Life Crochet Blanket Pattern
Foundation Row (WS)
- Chain 104: Begin by making a foundation chain of 104 stitches.
- Work 1 dc in 4th ch from hook: Skip the first 3 chains (this counts as your first double crochet). In the 4th chain from the hook, work 1 double crochet (dc). This counts as 2 dc since the ch-3 counts as a dc.
- Work 1 dc in each remaining chain: Now work 1 double crochet (dc) into each of the remaining chains across the foundation row (for a total of 102 dc).
- Turn: After completing the row, turn your work.
1st Row (RS)
- Ch 3: This acts as your first dc (the turning chain).
- Skip the next dc: Skip the next double crochet stitch.
- *2 dc in each of the next 2 dc: In the next 2 dc, work 2 double crochets into each (this increases the stitch count).
- Skip the next 2 dc: Skip the next 2 dc.
- Repeat the pattern (2 dc in each of the next 2 dc, skip next 2 dc) until 4 dc remain.
- 2 dc in each of the next 2 dc: In the last 2 dc, work 2 dc in each.
- Skip next dc: Skip the next dc.
- 1 dc in last dc: Work 1 dc in the last dc to complete the row.
- Turn: Turn your work.
2nd Row
- Repeat the 1st Row: Work exactly the same as the 1st row.
3rd Row (RS)
- Ch 3: Start with a turning chain of 3 (counts as dc).
- Work 1 dc in each dc: Work 1 double crochet in each of the double crochets across the row. This is a simple repeat of dc in each stitch.
- Turn: Once you’ve worked across the row, turn your work.
4th Row (WS)
- Ch 2: Ch 2 (does not count as a stitch).
- 1 hdc in first dc: Work 1 half double crochet (hdc) in the first dc.
- 1 dcfp around each dc: For each remaining double crochet (dc), work a dcfp (double crochet front post) around the dc.
- To make a dcfp: Yarn over (yoh), insert your hook around the post of the next dc (from front to back, right to left). Yarn over again and pull through (you will have 3 loops on the hook). Yarn over and pull through the first two loops, then yarn over and pull through the remaining two loops.
- 1 hdc in top of beg ch-3: Work 1 half double crochet in the top of the starting ch-3 (this ensures your row is even).
- Turn: After completing the row, turn your work.
5th Row (RS)
- Ch 3: Ch 3 (counts as dc).
- Skip the next hdc: Skip the next half double crochet (hdc).
- *2 dc in each of next 2 sts: In the next 2 sts (dc), work 2 dc into each.
- Skip the next 2 sts: Skip the next 2 stitches.
- Repeat the pattern (2 dc in each of next 2 sts, skip next 2 sts) until 4 sts remain.
- 2 dc in each of next 2 sts: Work 2 dc in each of the last 2 stitches.
- Skip the next st: Skip the next stitch.
- 1 dc in last hdc: Work 1 dc into the last half double crochet.
- Turn: After completing the row, turn your work.
6th Row
- Repeat the 1st Row: Work exactly the same as the 1st row.
7th Row (RS)
- Ch 3: Ch 3 (counts as dc).
- 1 dc in each dc: Work 1 double crochet in each of the dc across the row.
- Turn: After completing the row, turn your work.
Color Change: Adding Color A
- 8th Row:
- Ch 3: Ch 3 (counts as dc).
- 1 dc in each dc: Work 1 double crochet in each stitch across the row.
- Turn: After completing the row, turn your work.
- 9th to 15th Rows:
- Repeat Rows 1–7 with Color A: Continue working the same as the first 7 rows, but using Color A.
- Join MC: At the end of Row 15, join back to the main color (MC) and break Color A.
- 16th Row:
- Ch 3: Ch 3 (counts as dc).
- 1 dc in each dc: Work 1 dc in each dc across the row.
- Turn: After completing the row, turn your work.
Repeat the Pattern
- Repeat Rows 1–16 a total of 3 more times: Repeat the sequence of Rows 1–16 three more times, using the main color (MC).
- Repeat Rows 1–7: After the last set of color changes, repeat Rows 1–7 once more. Do not fasten off MC yet.
Edging Instructions
- Left Side Edging (RS):
- Ch 1: Start with a ch‑1.
- Work 1 row of sc: Work 1 single crochet in each stitch along the left side edge of the blanket, placing them evenly to cover the side.
- Fasten off: Once you reach the top, fasten off.
- Right Side Edging (RS):
- Join MC: Join MC with a slip stitch (sl st) at the bottom right corner.
- Ch 1: Ch 1 to begin.
- Work 1 row of sc: Work 1 single crochet in each stitch along the right side edge of the blanket.
- Fasten off: Once you’ve completed the row, fasten off.
Finishing tips: Weave in ends neatly with a yarn needle and gently block the blanket if desired to even out the edges and show off the textured stitches. If you need to adjust sizing, change hook size or add/subtract foundation chains in multiples that match the stitch repeats.
- Funny Pictures
-
 Weekly Treat of Funniest Parenting Memes for Good Laugh out Loud Right Now
-
 Really Funny Pics to End These Weekend Perfectly
-
 Incredibly Relatable Pics for Your Amusement
- Recipes
-
 Chewy Oatmeal Cookies
-
 Tomato Tuna Melt
-
 Instant Pot Broccoli Cheddar and Zucchini Soup
- Lifehacks
-
 Wide Half Double Crochet Stitch Photo Tutorial
-
 How to Crochet a Sunflower Stitch Photo Tutorial
-
 Lemon Peel Crochet Stitch Photo Tutorial
- Crochet Ideas
-
 DIY Crochet Mushroom Keychain — Easy Step-by-Step Pattern with Photos
-
 Make a Leafy Texture: Easy Crochet Sprig Stitch (Free UK Pattern)
-
 Free Crochet Sleep Mask Pattern — Cute DK Cotton Eye Mask (UK Terms, Advanced Beginner)
- DIY
-
 Cozy Crochet: Free Up-and-Down Stripe Cotton Washcloth Pattern (Quick & Easy)
-
 How to Make Realistic Crepe Paper Daffodils — Easy Step-by-Step DIY
-
 Make Adorable Easter Egg Bird Feeders — Easy DIY Seed Ornaments for Your Backyard
- Knitting Ideas
-
 Knit the Fish Scale Stitch: Easy 4-Row Pattern for a Textured, Scaly Look
-
 Knitted Camisole Party Frock — Vintage Pattern with Step-by-Step Instructions
-
 DIY Knitted Cuddly Cat Toy — Free Pattern & Step-by-Step Instructions