


Make a Cute Crochet Gnome Amigurumi — Full Pattern & Assembly Guide

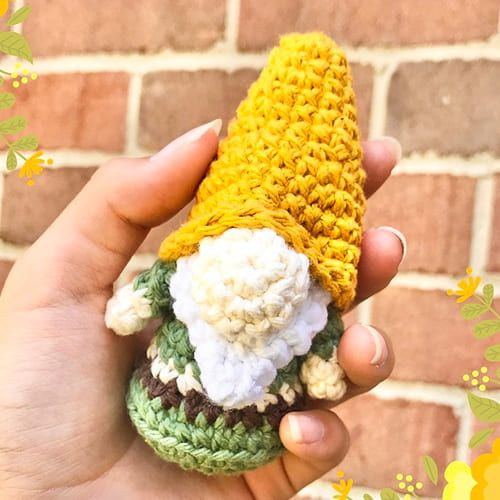
Create an adorable crochet gnome amigurumi with this complete round-by-round pattern. The pattern below includes materials, stitch abbreviations, and detailed instructions for the body, arms, beard, nose, hat, and assembly. Basic knowledge of single crochet, increases, decreases, and working in rounds is assumed. Keep a stitch marker handy to mark the beginning of rounds and a long yarn tail for sewing parts together.
Crochet Gnome Amigurumi Overview
Crochet Gnome Amigurumi is a delightful and charming craft project that brings a touch of whimsy and cuteness to any space. These adorable little gnomes, crocheted with love and attention to detail, make wonderful gifts or decorations. With their fuzzy hats, bushy beards, and rosy cheeks, they have a way of bringing smiles to people's faces. Whether you're a seasoned crocheter or just starting out, creating your own Crochet Gnome Amigurumi is a fun and rewarding experience that is sure to brighten up your day!
Materials
- Yarn color A (skin color - for hands and nose)
- Yarn color B (beard)
- Yarn color C (hat)
- Yarn color D (clothes/body)
- Optional: Yarn color E (for strips on clothes)
- Crochet hook that is suitable for the yarn you chose
- Stuffing
Abbreviations
Mr – Magic Ring
sc – single crochet
hdc – half double crochet
dc – double crochet
slst – slip stitch
ch – chain stitch
inc – increase
dec – decrease
BLO – Back loop only
Body Instructions
RND 1: Yarn D - 6 sc in MR
RND 2: 6 inc (12)
RND 3: (1 sc, inc) * 6 (18)
RND 4: (2 sc, inc) * 6 (24)
RND 5: (3 sc, inc) * 6 (30)
RND 6: BLO 30 sc
RND 7: Yarn E - (3 sc, dec) * 6 (24)
RND 8: Yarn A - (2 sc, dec) * 6 (18)
RND 9: Yarn D - 18 sc
RND 10: 18 sc
RND 11: Brown - 18 sc
RND 12: Green - (1 sc, dec) * 6 (12)
RND 13: 12 sc
Arms (Make 2)
RND 1: Yarn A - 5 sc in MR
RND 2: 5 sc
RND 3: Yarn D - 5 sc
RND 4-5: 5 sc
RND 6: 3 sc
Leave a long yarn for sewing.
Beard Instructions
RND 1: Yarn B - 4 sc in MR
RND 2: (1 sc, inc) * 2 (6)
RND 3: 6 sc
RND 4: 6 inc (12)
RND 5: (1 sc, inc) * 6 (18)
RND 6: 18 sc
Leave a long yarn for sewing.
Nose Instructions
RND 1: Yarn B - 4 sc in MR
RND 2: (1 sc, inc) * 2 (6)
RND 3: 6 sc
RND 4: 6 inc (12)
RND 5: (1 sc, inc) * 6 (18)
RND 6: 18 sc
Leave a long yarn for sewing.
Hat Instructions
RND 1: 6 sc in MR
RND 2: (1 sc, inc) * 3 (9)
RND 3: 9 sc
RND 4: (2 sc, inc) * 3 (12)
RND 5: 12 sc
RND 6: (2 sc, inc) * 4 (16)
RND 7: 16 sc
RND 8: (1 sc, inc) * 8 (24)
RND 9-11: 24 sc
Leave a long yarn for sewing.
Assembly Instructions
- Connect the beard and the nose with the yarn left (place the nose at the top middle of the beard).
- Sew them onto the top middle of the body.
- Sew on the arms to both sides of the body.
- Place the hat around the body, and slightly above the nose (it's gonna be tight) and angle the hat towards the back.
- Sew it on.
Tips
- Use a stitch marker to keep track of the beginning of each round when working in continuous rounds.
- Stuff firmly but not overstuffed so pieces hold their shape and sewing is easier.
- Leave long yarn tails for sewing parts together; use a yarn needle to attach pieces securely.
Enjoy personalizing your gnome with different hat colors, stripes, or small embellishments. Small changes to yarn colors and placement of the beard and hat will create a variety of charming gnome personalities.
- Funny Pictures
-
 Weekly Treat of Funniest Parenting Memes for Good Laugh out Loud Right Now
-
 Really Funny Pics to End These Weekend Perfectly
-
 Incredibly Relatable Pics for Your Amusement
- Recipes
-
 Baked Sweet Potato Parmesan Tater Tots
-
 Saffron Lemon Chicken With Persian Rice
-
 Croatian Plum Dumplings
- Lifehacks
-
 Silt Crochet Stitch Photo Tutorial
-
 Crochet Mesh Stitch in Corner to Corner! A Lacy C2C Stitch Photo Tutorial
-
 Woven Shell Crochet Stitch Photo Tutorial
- Crochet Ideas
-
 DIY Crochet Mushroom Keychain — Easy Step-by-Step Pattern with Photos
-
 Make a Leafy Texture: Easy Crochet Sprig Stitch (Free UK Pattern)
-
 Free Crochet Sleep Mask Pattern — Cute DK Cotton Eye Mask (UK Terms, Advanced Beginner)
- DIY
-
 Cozy Crochet: Free Up-and-Down Stripe Cotton Washcloth Pattern (Quick & Easy)
-
 How to Make Realistic Crepe Paper Daffodils — Easy Step-by-Step DIY
-
 Make Adorable Easter Egg Bird Feeders — Easy DIY Seed Ornaments for Your Backyard
- Knitting Ideas
-
 Knit the Fish Scale Stitch: Easy 4-Row Pattern for a Textured, Scaly Look
-
 Knitted Camisole Party Frock — Vintage Pattern with Step-by-Step Instructions
-
 DIY Knitted Cuddly Cat Toy — Free Pattern & Step-by-Step Instructions