How to Make Crochet Jar Candle Holders

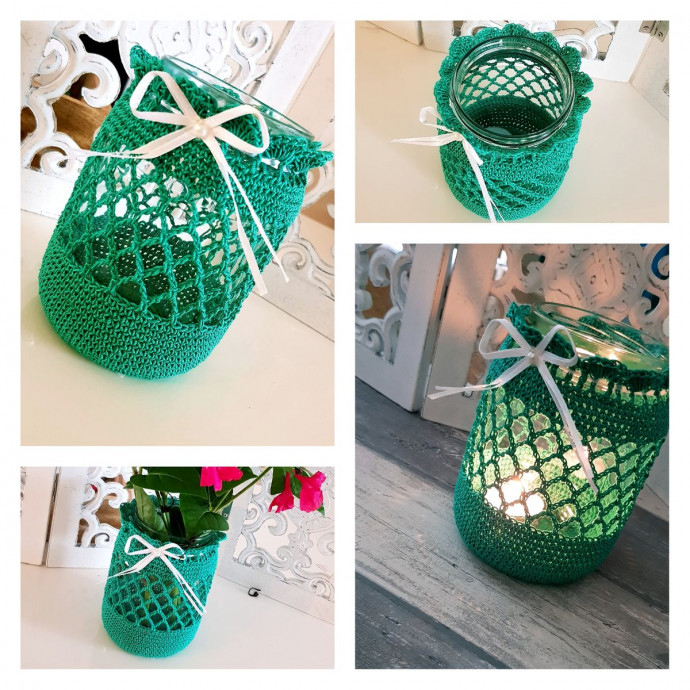
Crochet Jar Candle Holders
Crochet jar candle holders are a charming and versatile way to add coziness to your space. The delicate crochet work creates a lovely texture that softens the candle's glow, giving off a warm and inviting ambiance. These handmade creations are perfect for adding a touch of personality to your home decor or for giving as thoughtful gifts to loved ones. Whether you prefer a rustic chic look or a bohemian vibe, crochet jar candle holders can easily adapt to suit your style. Get creative with different yarn colors and patterns to make each piece unique and special. Embrace the cozy feeling of candlelight and handmade beauty with these adorable crochet creations!
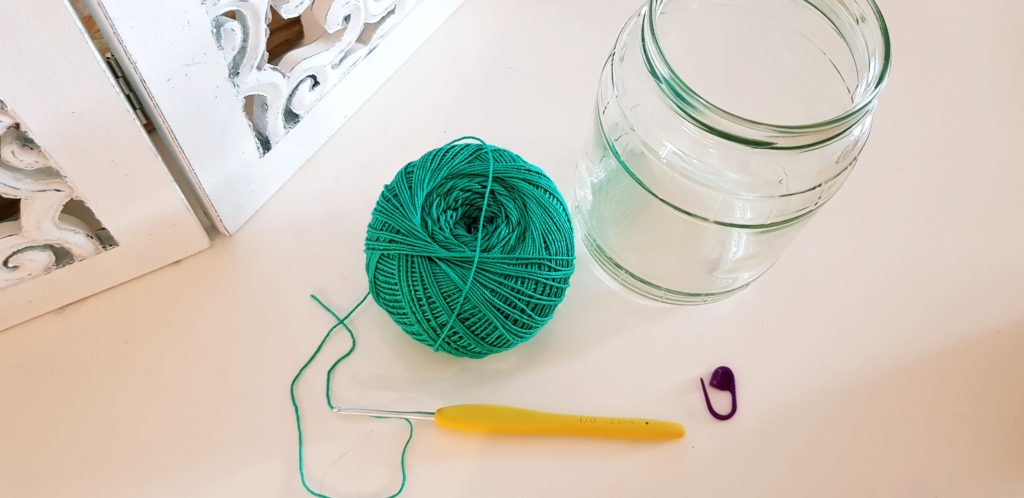
Materials Needed
But first, let’s see what do you need:
- A jar
- Yarn
- Appropriate hook size
- 1 stitch marker
- A ribbon or something to tie the crocheted cover on the top
- Other accessories if you want
Now, I made these Jar Candle Holders in 2 sizes using different yarn. The good part was, that the pattern worked for both.
I think that it is important for the top of the jar to be smaller than the bottom.
The bigger jar has 30 cm (12 “) circumference and 14 cm (5.5”) high.
For this one, I used a thicker mercerized cotton thread (the same one that I used for the Summer Crocheted vest) and a 2.5 mm (4/0) hook.
The smaller jar has 24 cm (9.5″) circumference and 11 cm (4.5″).
For this one, I used Scheepjes Maxi Thread, which is also mercerized cotton, but much thinner, so the hook size was 1.75 mm (0).
You can use any yarn you want. I recommend using thread or super fine weight yarn (everything that is between 1 ply and 3 ply), but you can try with another type of yarn too.
Gauge
I don’t know if this will help since you may not have the same jar size, but after 14 rounds in single crochet my circle had almost 30 cm (12″) circumference (worked with the thicker yarn) and 24 cm (9.5″) when working with the thinner yarn.

Abbreviations Used in This Pattern
- Ch – chain
- St (s) – stitch (es)
- Sc – single crochet
- Dc – double crochet
- Sl st – slip stitch
- Inc – increase (2 sc in the same stitch)
Making the Jar Candle Holder
Now we can start to make this beautiful Jar Candle Holder.
We will work in rounds. If you want for the bottom, you can work in continuous rounds.
Round 1
Make a magic circle, ch 1 and 6 sc inside the circle. Sl st to join.
Round 2
1 inc (2 sc) in each stitch (12 sts). Sl st to join.
Round 3
[1 inc, 1 sc] repeat 6 times (18 sts). Sl st to join.
Round 4
[1 inc, 1 sc in the next 2 st] repeat 6 times (24 sts). Sl st to join.
Round 5
[1 inc, 1 sc in next 3 sts] repeat 6 times (30 sts). Sl st to join.
Continue adding with each round 1 sc between increases until you get to the desired circumference. To be easier for everyone, no matter what jar or yarn you use, just put the jar over the circle, and when the edge of your circle is a little bigger than the jar bottom, then you have the right size.
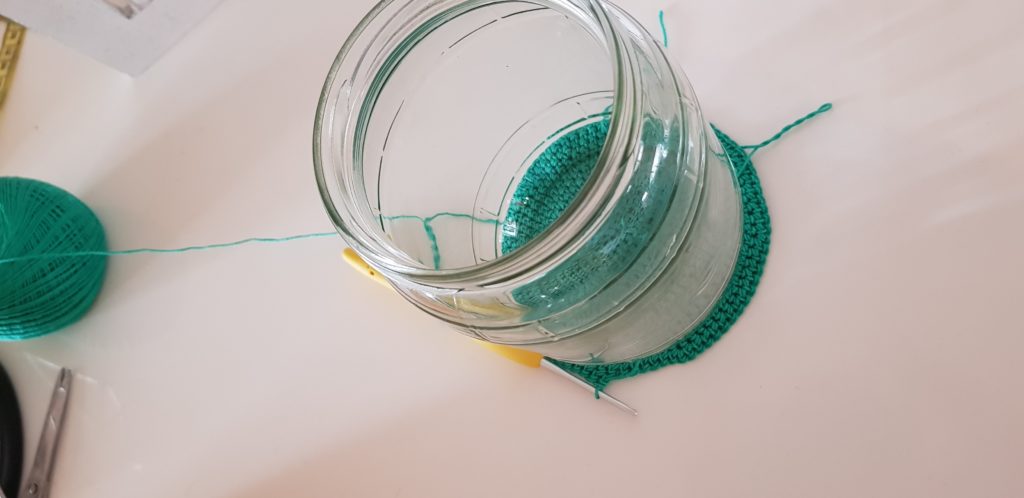
Don’t worry if the circle is a little bigger; at the end, when you tie the crochet cover, it will stretch out and fit perfectly.
I made 14 rounds in total to get the size of my jar.
After getting to the right size, we will stop increasing and work just in rounds.
Now, depending on your jar’s size you can adjust this pattern to have the desired look at the end.
I just measured the height of the jar before the top starts to be smaller and approximated the number of rounds that I would make. I wanted the mesh middle part to be bigger than the parts in single crochet.
So, I started with rounds in single crochet and made 1 sc in each stitch for 8 rounds. After stretching the work to fit the jar’s height, this part measured almost 3 cm (1″).
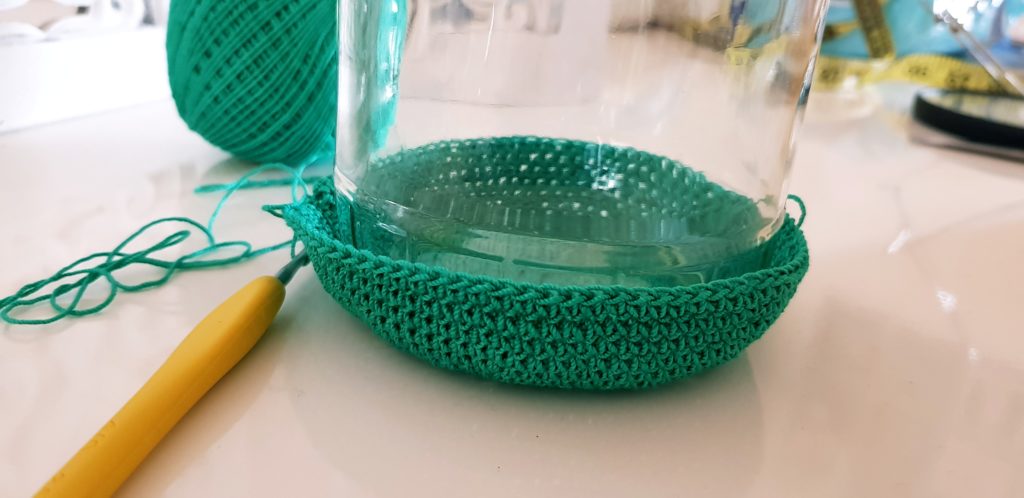
After these rounds, I started the mesh stitch.
Mesh Stitch Rounds
Round 1
Start the round with ch 1 and 1 sc in the same st. [Ch 5, skip 3 sts, 1 sc in the next] repeat this section to the end of the round. Finish the round with ch 5 and sl st with the 1st sc.
Round 2
2 sl st, 1 sc in the 3rd st. [Ch 5, 1 sc in the 3rd st of the next 5 sts chain] repeat this section to the end of the round, ending with ch 5 and sl st with the 1st sc.
Now repeat this round as many times as you want until you have the desired length with this stitch. Keep in mind that at the end you will have to stretch the work to fit the jar, so when you are trying your work on the jar, make sure you pull and stretch it.

I made 5 rounds with this stitch, and in the 6th round, I made it to make the top edge straight and instead of ch 5, I chained 3.
The mesh part was measuring after stretching 5.5 cm (2″).
After this round, I started again with sc and made 4 rounds (1.5 cm, 1″).
Final Rounds
Next Round
Ch 4, skip 1 st, 1 dc in next, [ch 1, skip 1, 1 dc in next] and repeat the section between [ ] to the end of the round.
We made this round to create some holes to insert the ribbon and tie the crocheted cover of the Jar Candle Holder.
The final round or rounds, if you want to make more than one round, we will do a shell stitch, just to add a beautiful edge to our piece.
Start the round with 1 sc in the 1st ch 1 space, [in the next one make 1 shell (7 dc in the same ch 1 space), skip the next space and 1 sc in the next one].
Repeat the section between [ ] to the end of the round.
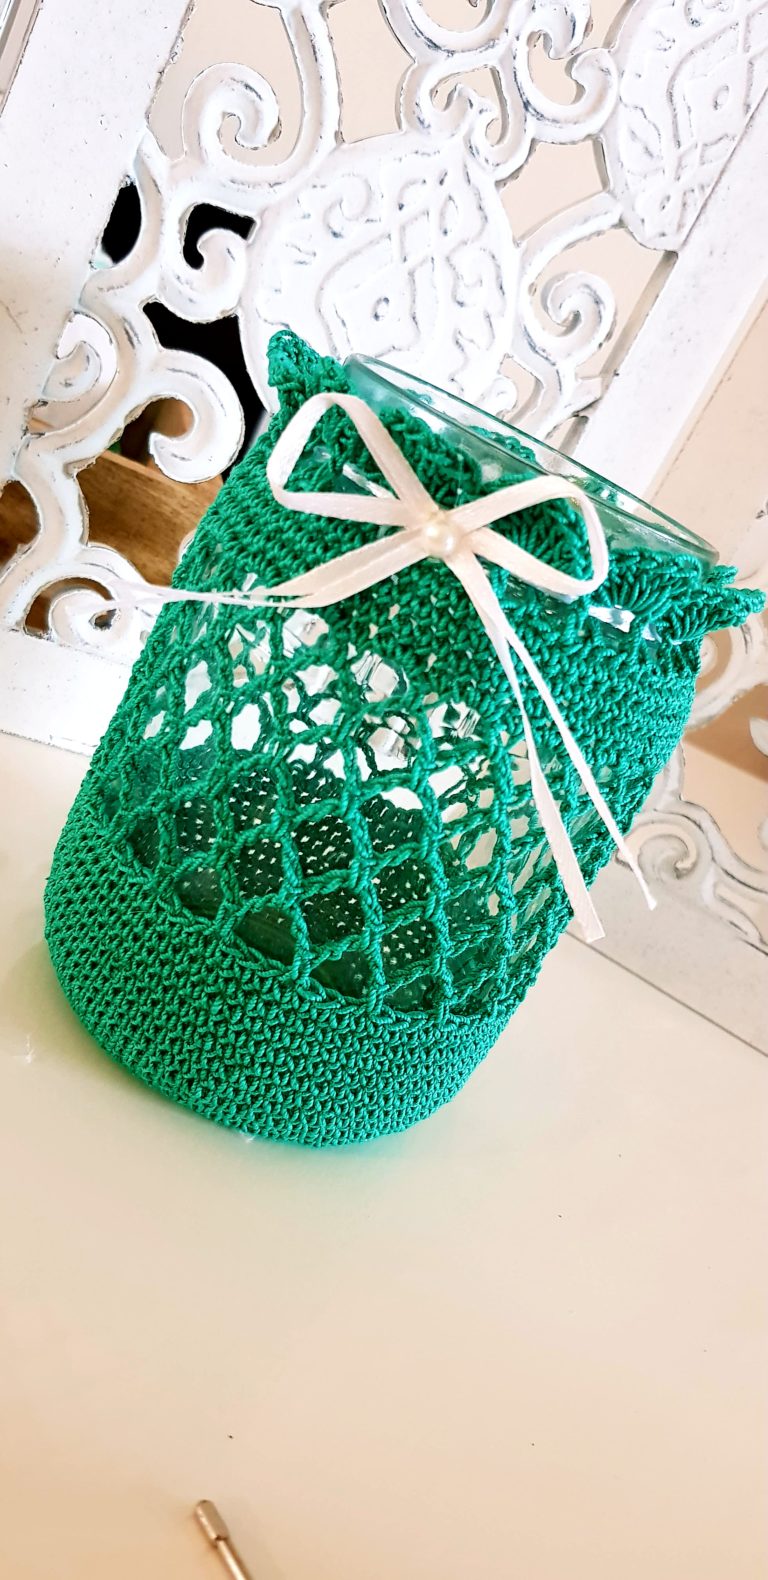
Now all you have to do is to insert a ribbon through the filet stitch round’s holes and tie. Stretch the work, pulling up until you notice that the cover fits well on the jar.
And done.
- Funny Pictures
-
 Cute Cat Memes That Will Make Your Day Brighter
-
 Spot-on and Funny Memes About Introverts Struggles
-
 Top Wonderful Cat Memes on Their Way to Better Your Day
- Recipes
-
 Creamy Old Fashioned Rice Pudding
-
 Russian Tea Cakes (Snowball Cookies)
-
 Rigatoni with Sausage, Tomatoes, and Zucchini
- Lifehacks
-
 How to Crochet a Harlequin Stitch
-
 Removing The Toughest Stains
-
 Crochet Basics: Crumpled Griddle Stitch
- Crochet Ideas
-
 Crochet Christmas Tree
-
 Crochet Goblet of Fire
-
 Crochet Adorable Ammonite
- DIY
-
 DIY Snowman Wreath
-
 Mini Santa Sleigh Ornament
-
 Crochet Gingerbread House Blanket
- Knitting Ideas
-
 Knitted Easter Bunny
-
 Knitted Mobile Phone/Glasses Case
-
 Knitted Cabled Wallet