Crochet Plaid Scarf

The Crochet Plaid Scarf is a charming and versatile accessory that adds a touch of warmth and style to any outfit.
With its cozy feel and eye-catching plaid pattern, this scarf is perfect for staying fashionable during the colder months. Whether you're heading out for a walk in the park or meeting friends for coffee, this scarf is sure to keep you looking fabulous and feeling snug.
Its handmade quality gives it a unique and special touch, making it a lovely gift for yourself or a loved one. Embrace the cozy vibes and trendy look that the Crochet Plaid Scarf brings to your wardrobe, and enjoy wrapping yourself in comfort and style all season long.
Supplies I Used
- 2 x 100g balls of Deramores Studio DK in sky
- 1 x 100g ball of Deramores Studio DK in white
- 1 x 100g ball of Deramores Studio DK in fuschia
- crochet hook size 4.5mm
- tapestry needle & scissors
- blocking board or interlocking foam mats
Size
Using the yarn weight and hook size suggested in this pattern will create a tartan plaid shawl that is 28cm wide. Make it as long as you like, mine was 150cm long.
Your size might differ based on the type of yarn that you’ll use and your personal crochet tension.
Gauge
Gauge is not very important in this pattern, but for your reference, a 10cm by 10cm area contains 7 rows by 14 stitches.
The Stitches
Pattern written in US terms using Craft Yarn Council abbreviations.
- ch – chain
- sl st – slip stitch
- yo – yarn over
- slip knot
- sk – skip
- sc – single crochet
- dc – double crochet
- surface sl st – surface slip stitch
Special Stitches
Surface Crochet – Surface crochet is a technique used to decorate the surface of previously crocheted work.
Tension control is very important when it comes to surface crochet. If your tension is too tight, the shawl will pucker, so try and keep your tension relaxed, and your slip stitch loops loose.
The working yarn will remain on the underside of your work at all times.
Plaid Scarf For Beginners – The Written Pattern
I split this pattern into three parts:
- the shawl base
- the vertical stripes
- the fringes
The Scarf Base

Chaining 3 at the beginning of the row counts as a double crochet stitch. Cut the yarn after each color change, and leave a long tail so you can weave it in easier.
The Vertical Stripes
The vertical stripes are made using the surface crochet technique by making surface slip stitches in the spaces created by the pattern.
TIP: Place a heavy object (a notebook or something similar) on the scarf to help you keep it straight while you work on your vertical lines. This way, you can pull the scarf straight and make your surface slip stitches with the right tension. The working yarn will always be at the back of your work.
Step 1: To surface slip stitch, start by making a loose slip knot, then take it off the hook.
Insert your hook into the first chain space, then place the slip knot back on the hook, and pull the slip knot through to the top.
Step 2: Insert your hook into the next chain space, yarn over, and pull a loop through the chain space and through the slip knot on your hook. Pay attention to the yarn tension and pull a loop long enough.
Step 3: Repeat Step 2 by inserting the hook into the following chain space, pulling up a loop through to the top of the work, and through the loop on the hook until you reach the other end of the shawl base.
The color pattern used to create the plaid pattern is as follows (from left to right):
- 3 lines in white
- 1 line in Fuschia
- 3 lines in white
- 1 line in Fuschia
- 3 lines in white
Before you continue with the fringes, block your shawl on a blocking board or interlocking foam boards. I forgot to take a picture of the blue scarf on the blocking board, but here is one from when I blocked the brown plaid shawl.
The Fringes
The fringes are made in the same color as the vertical lines. The spaces between the vertical lines are filled with fringes in sky color.
To make a fringe, cut strings of yarn 30cm in length.
Hold 2 strings of yarn together and fold them in half.
Insert the hook into the first stitch at the edge of the shawl and then into the loop created by the two strings folded in half.
Pull the loop through the stitch then remove the hook and pull all the ends through the loop.
Pull the ends to tighten the loop. Your fringe is complete.
The color pattern used to create the fringes (from left to right) is:
- 2 sky
- 3 white
- 4 sky
- 1 ruby
- 4 sky
- 3 white
- 4 sky
- 1 ruby
- 4 sky
- 3 white
- 2 sky
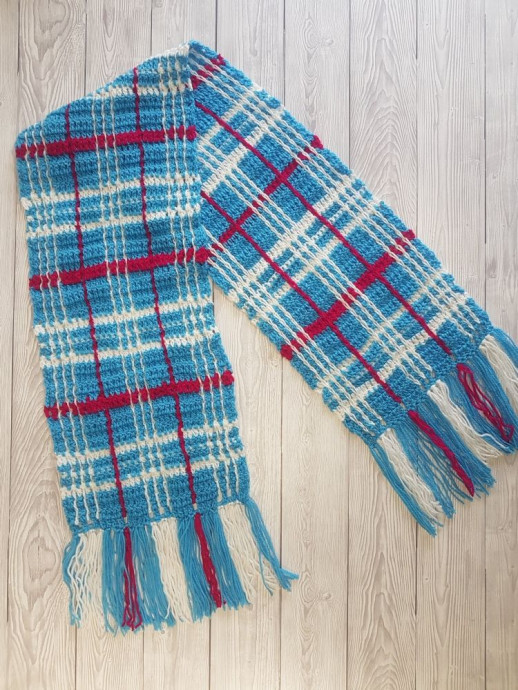
And this is what the completed plaid scarf for beginners looks like.
- Funny Pictures
-
 Hilarious Memes for Those Bored to Tears
-
 Weekly Treat of Funniest Parenting Memes for Good Laugh out Loud Right Now
-
 Really Funny Pics to End These Weekend Perfectly
- Recipes
-
 Crispy Baked Avocado Fries
-
 Scrambled Chickpea and Spinach Pitas
-
 Cinnamon Pancakes
- Lifehacks
-
 Crochet Basics: Aligned Cobble Stitch
-
 Brick Stitch Crochet Tutorial
-
 Crochet Basics: Wattle Stitch
- Crochet Ideas
-
 Crochet Snorlax Plushie Doll
-
 Crochet Beautiful Penguin Toy
-
 Crochet Tiny Snowman
- DIY
-
 DIY Santa Craft For Kids
-
 Paper Plate Angel Craft
-
 Upcycled Mason Jar Chicken Vase
- Knitting Ideas
-
 Knitted Bridger Cowl
-
 Knitted Keepsake Bag
-
 Knitted Cutie Cupcake Dolls