Crochet Ribbon Bookmarkers: A Step-by-Step Guide

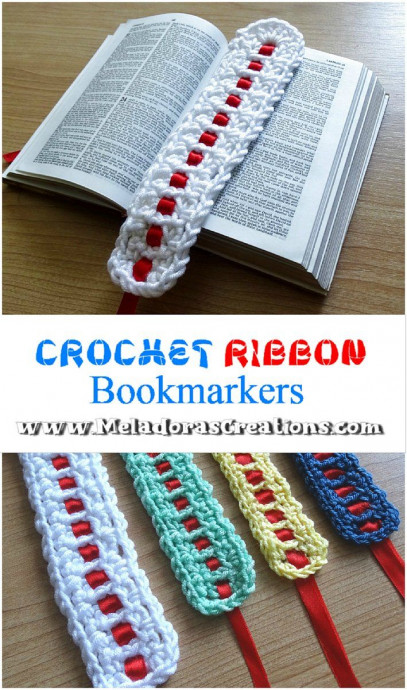
Crochet ribbon bookmarkers are a charming and practical way to keep your place in your favorite book. These cute accessories not only add a personalized touch to your reading experience but also make great gifts for bookworm friends. With an array of colorful yarns and ribbons to choose from, you can customize your bookmark to match your style or the theme of the book you're reading. Whether you're a seasoned crocheter or a beginner looking for a fun project, making these bookmarkers is a delightful way to spend your time. So grab your crochet hook and let's get crafting some adorable ribbon bookmarkers to make your reading adventures even more enjoyable!
Materials Needed
For this project you will need:
- HOOK: 4 mm hook or size G hook for the US
- YARN: I used 4ply to 3 ply yarn. Same size hook
- Tapestry Needle
- A strip of Ribbon 13 inches or 40 cms long. Or feel free to make extra long ribbon tips.
Abbreviations
- ch = Chain
- sl st = Slip Stitch
- st = Stitch
- sk = Skip
- beg = beginning
- YO = Yarn Over
- SC = Single Crochet
- DC = Double Crochet
Instructions
To Start
Ch 5
Row 1
- sc in 2nd ch from hook.
- Ch 2, sk 2, sc in last ch
- Ch 1 and turn
Row 2
- sc in 1st sc
- ch 2, sk 2, sc in last ch
- Ch 1 and turn
Repeat Row 2 until you have 22 rows or an even number of rows.
The Border
Take time after crocheting a few rows to test your size ribbon with your ch 2 spaces. Thread it through a few rows. It should thread through easily without bunching up or crunching up on the sides.
After your last sc on row 22, continue with the following:
- 1st row of border – We’ll no longer be crocheting in rows, but instead we’ll be crocheting along the outside of the bookmarker.
- NO NEED TO TURN for Rows anymore. We’ll be Pivoting our piece from now on.
- IMPORTANT to note about the corners: We’ll be making our corners in this bookmarker pattern by doing (sc, ch 1, sc) into the same stitch.
- Your SC at the end of row 22 counts as your first SC of the corner. Now CH 1 and SC into that same stitch. *Ch 2 and skipping a stitch and SC in next.*
Repeat what’s in between * for this side row. Make sure your last SC is crocheted in the very last st of the row.
Then CH 1 and SC into the same st and pivot your work to the bottom edge.
- Ch 2 and sc in last st. CH 1 and sc into the same st then pivot your work to the other side.
- *Ch 2 and skipping a st and sc in next.*
Repeat what’s in between * for this side row. Make sure your last SC is crocheted in the very last st of the row.
Then ch 1 and sc into the same st and pivot your work to the Top side.
- ch 1 and DC 5 into the ch 2 space to create the Shell.
- ch 1 and sc into the CH 1 space between the sc’s.
Ch 1 and cut your yarn leaving a long enough tail to be worked in with a tapestry needle.
We’ll be threading our ribbon through our ch 2 spaces in the middle.
Grab your ribbon and starting at the side with the shell enter from underneath and push it through the first space, then push the ribbon into the next space.
Pull the ribbon through until there is only a small amount left that can be hidden behind the shell.
Repeat what’s in between * for the rest of the round.
- Funny Pictures
-
 Hilarious Memes for Those Bored to Tears
-
 Weekly Treat of Funniest Parenting Memes for Good Laugh out Loud Right Now
-
 Really Funny Pics to End These Weekend Perfectly
- Recipes
-
 Crispy Baked Avocado Fries
-
 Baked Beans and Hot Dogs with Biscuit Topping
-
 Roasted Rosemary Lemon Chicken Breasts
- Lifehacks
-
 Crochet Basics: Twisted Fringe
-
 7 Crochet Tips And Tricks
-
 How To Work Crochet Into Denim
- Crochet Ideas
-
 Crochet Snorlax Plushie Doll
-
 Crochet Cat in 1 Row
-
 Crochet Beautiful Penguin Toy
- DIY
-
 Popsicle Stick and Jingle Bell Christmas Tree Ornament
-
 DIY Santa Craft For Kids
-
 Paper Plate Angel Craft
- Knitting Ideas
-
 Knitted Bridger Cowl
-
 Knitted Keepsake Bag
-
 Knitted Cutie Cupcake Dolls