Crochet Granny Bunting: A Step-By-Step Guide

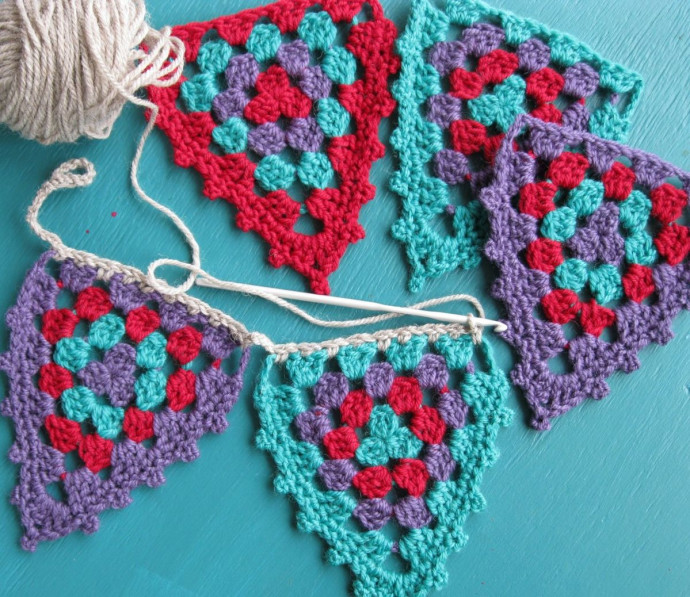
Crochet Granny Bunting is a delightful and charming way to add a touch of handmade beauty to any space. With its cozy and nostalgic vibe, this craft project brings warmth and joy to every corner it adorns. Whether you're celebrating a special occasion or simply want to brighten up your surroundings, the Crochet Granny Bunting is sure to bring smiles and cheer to all who see it. So grab your crochet hook and favorite yarn colors, and let's get crafting!
Materials You'll Need
You will need:
- 3 different colours of 8ply wool and one length of white/cream wool
- A 4mm crochet hook
- A wool needle for darning in ends
Instructions to Begin
To begin:
Make a magic ring and into the ring make 1slst, ch3 (counts as 1dc) 2dc, ch4, 3dc, ch4, 3dc, ch4, join with a slst to 3rd ch of original 3ch. Fasten off.
Continuing the Bunting
Join new colour into one of the 4ch spaces with a slst and ch3 (counts as 1dc) 2dc, ch4, into the same space 3dc, ch1, into the next 4ch space make 3dc, ch4, 3dc, ch1, into last corner space, 3dc, ch4, 3dc, ch1 and join with a slst to the 3rd ch of original 3ch. Fasten off.
Join new colour into corner space with a slst and ch3 (counts as 1dc) 2dc, ch4, into the same space 3dc, ch1, *into side 1ch space make 3dc, ch1, into next corner space 3dc, ch4, 3dc, ch1* repeat ** until the round is finished. Fasten off.
Join first colour into a corner space and repeat previous round, allowing for two sets of 3dc along each side. Fasten off.
Edging Details
Join the same colour with a slst into one corner space. Ch1, sc into each stitch along the side of the triangle, including 1ch spaces. When the 4ch space at next corner is reached, into the 4ch space, make 1hdc, 1dc, 1htr, ch1, 1htr, 1dc, 1hdc, sc into each stitch along next side. At the last corner space, make a slst, ch1, turn.
*Slst into next 3 st, ch3, slst into 3rd ch from hook (picot made)* repeat ** around both edges. At bottom corner, take care to ensure picot is made on very bottom stitch, if not, make an extra slst on either side. At last corner, slst into 4ch space and fasten off.
Blocking Your Bunting
When all 5 bunts are made, it is essential to block them. To block, dampen each bunt and pin them to a secure surface. Pull gently to stretch bunts to the shape you want them, taking care to pin bottom picot so it is nice and pointy, then spray gently with water. Leave until dry.
Assembling the Bunting
With white/cream wool, ch10, join with a slst to 1st ch, ch10, *attach bunt with right side facing in corner space with 1sc, ch1, skip 1 st sc into next stitch until end corner is made, ch5,* repeat until all five bunts are attached, ch20, slst into 10th ch from hook, fasten off.
- Funny Pictures
-
 Pics to Get the Excitement Today
-
 Funny Christmas Meme Dump
-
 Funniest Relatable Felines in the Form of Memes
- Recipes
-
 Cappuccino Brownies
-
 Chicken Mushroom Tortellini Bake
-
 Spinach Pie
- Lifehacks
-
 8 Necessary Tips for Baking Bread
-
 Tips & Hacks for Clean Carpets
-
 10 Uses For Old TV Armoires
- Crochet Ideas
-
 Crochet Watermelon Amigurumi
-
 Crochet Shark Applique
-
 Crochet Pineapple Amigurumi
- DIY
-
 Yarn Wrapped Christmas Wreath Ornaments
-
 Egg Carton Snowman Ornament
-
 Stick Peppermint Candy Ornament
- Knitting Ideas
-
 Knitted Star Square Dishcloth
-
 Knitted Free 2025 Year Dishcloth
-
 Knitted Ribbed Adult Hat