Crochet Astronaut Hand Puppet Tutorial


Embark on a space adventure with the charming Crochet Astronaut Hand Puppet! With its handcrafted details and whimsical design, this puppet is sure to spark creativity and imagination in both children and adults alike. Imagine the endless storytelling possibilities as this adorable astronaut puppet orbits galaxies and explores new frontiers right from the palm of your hand. Whether you're putting on a puppet show or simply enjoying some playful moments, this crochet creation is bound to bring a smile to everyone's face. So, grab your puppet and let the cosmic adventures begin!
Materials
- Lion Brand Vanna’s Choice, White – approximately 88 yds
- Lion Brand Vanna’s Choice, Linen – approximately 25 yds
- Lion Brand Vanna’s Choice, Scarlet – approximately 10 yds
- Small amounts of worsted weight yarn in other shades. I used a dark and light gray.
- Crochet hook size G – 4.25mm
- Tapestry needle
Terms and Abbreviations to Know
- Magic ring
- Rnd, rnds – round, rounds
- St, sts – stitch, stitches
- Ch, chs – chain, chains
- Sl st – slip stitch
- Sk – skip
- Sc – single crochet
- Dc – double crochet
- Inc – increase, 2 sc sts in same st
- Dec – decrease, combine 2 sc sts into 1 st
- Invsc2tog – invisible single crochet 2 together; this is essentially a decrease, but done in such a way as to make the continuous stitching smoother, and the decrease not as noticeable.
Insert hook into front loop only of next stitch, DO NOT yarn over.
Insert hook into front loop of second stitch.
Yarn over. Pull through 2 loops.
Yarn over and pull through last 2 loops.
Dc Bobble – Double Crochet Bobble
- Yarn over, and insert hook into designated st.
- Pull up a loop.
- Yarn over, and pull through 2 loops, leaving 2 loops left on hook.
- Yarn over, and insert hook into same st.
- Pull up a loop.
- Yarn over, and pull through 2 loops, leaving 3 loops left on hook.
- Yarn over, and insert hook into same st.
- Pull up a loop.
- Yarn over, and pull through 2 loops, leaving 4 loops left on hook.
- Yarn over, and insert hook into same st.
- Pull up a loop.
- Yarn over and pull through all 5 loops.
Notes
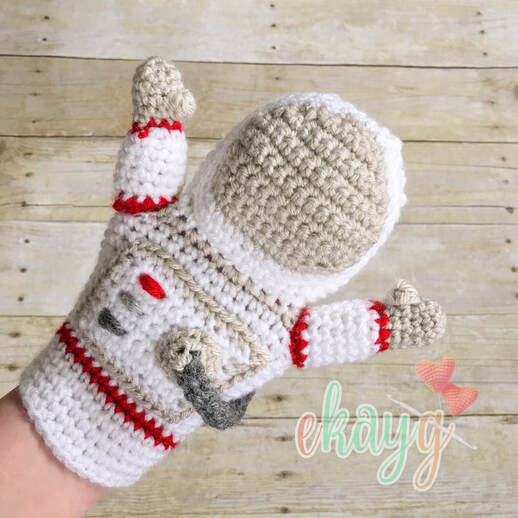
The body is worked from the top down, in the rnd, with no joining. The arms, front of the mask, and chest panel are made separately and sewn on. Pictures below can give more details into the process.
Size
This is one size, fitting child through adult, but if you wish to make it smaller for a smaller child to play with, simply tighten gauge or go down a hook size.
Gauge: 7 sts across and 8 rnds down = approximately 2 inches
Astronaut Hand Puppet
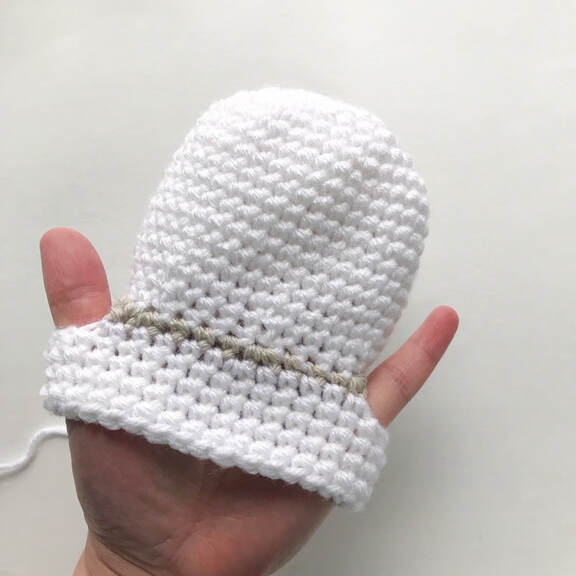
Body, Beginning with the Head, in White
- Begin with a magic ring.
- Rnd 1: 6 sc in magic ring; 6 sts
- Rnd 2: inc in each st around; 12 sts
- Rnd 3: (inc, sc in next st)6x; 18 sts
- Rnd 4: (inc, sc in next 2 sts)6x; 24 sts
- Rnd 5: (inc, sc in next 3 sts)6x; 30 sts
- Rnd 6: (inc, sc in next 4 sts)6x; 36 sts
- Rnds 7-15: sc in each st around; 36 sts
- Rnd 16: (invsc2tog, sc in next 4 sts)6x; 30 sts
- Rnd 17: (invsc2tog, sc in next 3 sts)6x; 24 sts
- Attach Linen for next rnd, but do not fasten off White.
- Rnd 18: in Linen (inc, sc in next 3 sts)6x; 30 sts
- Rnd 19: in Linen inc in first st, pulling white through to complete last st (fasten off Linen), continue in White, sc in next 4 sts, inc, ch 4, sk next 4 sts, (inc, sc in next 4 sts)2x, inc, ch 4, sk next 4 sts, inc, sc in next 4 sts; 28 sts and 2 ch-4 spaces for the arms
- Rnd 20: sc in next 8 sts, sc in each of the 4 chs, sc in next 14 sts, sc in each of the 4 chs, sc in next 6 sts; 36 sts (see picture)
- Rnds 21-30: sc in each st around; 36 sts
- Change to Scarlet for next rnd.
- Rnd 31: in Scarlet, sc in each st around; 36 sts
- Change back to White and fasten off Scarlet.
- Rnds 32-36: in White, sc in each st around; 36 sts
- Fasten off and weave in ends.
Arms, Beginning in Linen, Make 2
- Begin with magic ring.
- Rnd 1: 6 sc in magic ring; 6 sts
- Rnd 2: (inc, sc in next st)3x; 9 sts
- Rnds 3-4: sc in each st around; 9 sts
- Rnd 5: dc bobble, sc in next 8 sts; 9 sts (see pictures below, and description above, for dc bobble)
- Rnd 6: sc in each st around; 9 sts
- Attach Scarlet. Fasten off Linen.
- Rnd 7: sc in each st around; 9 sts
- Attach White. Fasten off Scarlet.
- Rnd 8: (inc, sc in next 2 sts)3x; 12 sts
- Rnds 9-13: sc in each st around; 12 sts
- Attach Scarlet. Fasten off White.
- Rnd 14: sc in each st around; 12 sts
- Fasten off, leaving long tail for sewing.
- Sew the arms onto the arm holes. I pulled the arms through from the inside of the body, with thumbs pointed toward the head, then sewed the sleeve INSIDE the body, to avoid seams.

Face Mask in Linen
- Ch 12
- Row 1: turn and sc in 2nd ch from hook, sc in each ch across; 11 sts
- Row 2: ch 1 and turn, inc, sc in next 9 sts, inc; 13 sts
- Row 3: ch 1 and turn, inc, sc in next 11 sts, inc; 15 sts
- Rows 4-6: ch 1 and turn, sc in each st across; 15 sts
- Row 7: ch 1 and turn, dec, sc in next 11 sts, dec; 13 sts
- Row 8: ch 1 and turn, dec, sc in next 9 sts, dec; 11 sts
- Row 9: ch 1 and turn, dec, sc in next 7 sts, dec; 9 sts
- Row 10: ch 1 and turn, dec, sc in next 5 sts, dec; 7 sts
- Row 11: ch 1 and turn, dec, sc in next 3 sts, dec; 5 sts
- Row 12: ch 1 and turn, dec, sc in next st, dec; 3 sts
- Do not turn, but sc around the edges.
Rnd 1: 11 sc down the side, 11 sc across the bottom, 11 sc up the other side, and 3 sc across the top; 36 sts
Attach White and fasten off Linen.
Rnd 2: (inc, sc in next 5 sts)6x; 42 sts
Rnd 3: sc in each st around; 42 sts
Fasten off leaving a long tail for sewing. Sew to the front of the face. Weave in ends.
Front Panel in White and Linen
- Begin with White.
- Ch 11
- Row 1: sc 2nd ch from hook, and in each ch across; 10 sts
- Rows 2-7: ch 1 and turn, sc in each st across; 10 sts
- Do NOT turn.
- Attach Linen and fasten off White. Sc Linen around the rectangle, putting (sc, ch 1, sc) in each corner to maintain shape. Fasten off leaving a long tail for sewing, but do not sew on, until after attaching the other parts of the panel.
- For the button, use 3 different colors (I used red, light gray, and dark gray), Sew them each around 2 sts, in 3 separate rows.
Oxygen Tube in Dark Gray and Linen
- *Note: I did not use a magic ring here, because it would have made the small number of sts too difficult. Also, do not crochet too tightly here, so as to make it easier on yourself.
- Begin with dark gray.
- Rnd 1: ch 2, 4 sc into 2nd ch from hook; 4 sts
- Rnds 2-14: sc in each st around; 4 sts
- Attach Linen and fasten off dark gray. Leave a long tail of dark grey for sewing later.
- Rnd 15: inc in each st around; 8 sts
- Rnd 16: (inc, sc in next st)4x; 12 sts
- Fasten off leaving a long tail for sewing.
Assembly
Sew the widest end of the tube onto the chest panel. Then, sew the panel onto the front of the puppet. Last, sew the dark gray end of the tube, back behind the arm of the puppet. (see picture below) Weave in all ends.
- Funny Pictures
-
 Cute Cat Memes That Will Make Your Day Brighter
-
 Spot-on and Funny Memes About Introverts Struggles
-
 Top Wonderful Cat Memes on Their Way to Better Your Day
- Recipes
-
 Creamy Old Fashioned Rice Pudding
-
 Russian Tea Cakes (Snowball Cookies)
-
 Rigatoni with Sausage, Tomatoes, and Zucchini
- Lifehacks
-
 How to Crochet a Harlequin Stitch
-
 Removing The Toughest Stains
-
 Crochet Basics: Crumpled Griddle Stitch
- Crochet Ideas
-
 Crochet Christmas Tree
-
 Crochet Goblet of Fire
-
 Crochet Adorable Ammonite
- DIY
-
 DIY Snowman Wreath
-
 Mini Santa Sleigh Ornament
-
 Crochet Gingerbread House Blanket
- Knitting Ideas
-
 Knitted Easter Bunny
-
 Knitted Mobile Phone/Glasses Case
-
 Knitted Cabled Wallet