Crochet The Boxy Blooms Cardigan


The Crochet The Boxy Blooms Cardigan is a lovely and stylish addition to any wardrobe, perfect for cozying up on cooler days or adding a touch of flair to your outfit. With its unique boxy design and delicate flower motifs, this cardigan is sure to turn heads and make you feel fabulous. Whether you're a seasoned crocheter looking for a fun new project or a beginner eager to take your skills to the next level, this pattern offers a wonderful opportunity to create something special. So grab your crochet hook and some yarn, and let's get crafting!
Materials
Light (3) Weight Yarn, Lion Brand Coboo in “Plume” 3(3, 4, 4, 4, 5) Skeins or 620(670, 750, 840, 900, 950) yards
G/4mm Crochet Hook
Needle
Scissors
Measuring Tape
Stitch Markers (3)
3 Buttons (1/2”)
Gauge
17 Sts by 7.5 rows= 4×4”
To make a gauge swatch, Ch 24 and follow rows 1-9 of the back panel. Your Swatch will be bigger than the required gauge. Measure 4×4” within that swatch to check gauge.
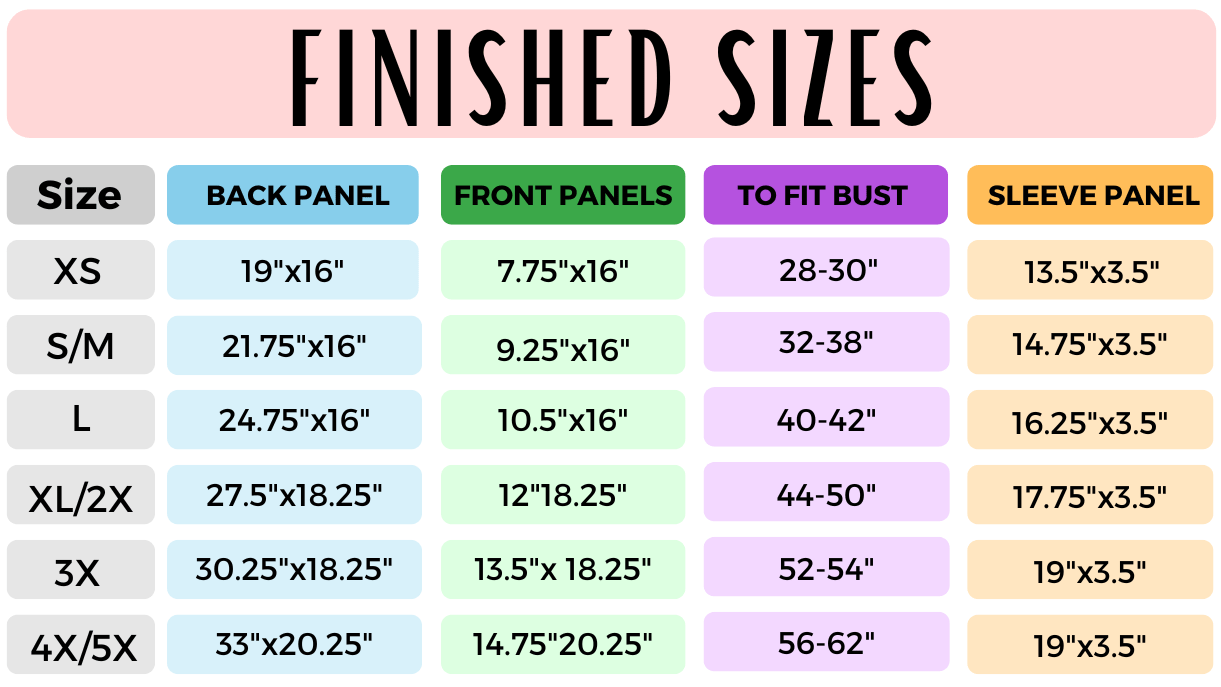
Sizes
XS(S/M, L, XL/2X, 3X, 4X/5X)
Notes
The Ch’s within the rows go towards your St count.
The Ch 3 at the start of the rows count as 1 Dc.
The Ch 5 at the start of the rows count as 1 Dc + 2 Chs.
When pattern instructs to work “in St from 2 rows below”, you will work your Dc around the Ch 3 from the previous row, with your St worked into the center St from the row before it. When you pull up your loop, pull it up a bit higher than normal to your current row, so that your St isn’t too tight. You will do this in Row 2 (working into the starting Ch) as well as Row 6 and all it's repeats.
Length Adjustment
To adjust the length of your cardigan you can add or remove rows in multiples of 4 to the back panel, before fastening off. Take into account this will adjust your yardage requirement from what is listed above. Add or remove the same amount of rows to your front panels, just before the neckline shaping.
Stitches and Abbreviations (US Terms)
- Ch(s): Chain(s)
- Dc: Double Crochet
- Sk: Skip
- St(s): Stitch(es)
- Sp: Space
- SM(s): Stitch Marker(s)
- Sl St: Slip Stitch
- RS: Right Side
- Fpdc: Front Post Double Crochet
- Hdc: Half Double Crochet
- Sc: Single Crochet
- Puff: *YO, insert hook in St, YO, pull up a loop* repeat from * to * 3 more times (9 loops on hook), YO, pull through 8 loops on hook, YO, pull through last 2 loops on hook.
- Mini Puff: *YO, insert hook in St, YO, pull up a loop* repeat from * to * 2 more times (7 loops on hook), YO, pull through 6 loops on hook, YO, pull through last 2 loops on hook.
- Picot: 1 Sc in indicated St, Ch 3, Sl St into the base of the Sc.
Pattern
Back Panel
Ch 84(96, 108, 120, 132, 144)
Row 1: 1 Dc in 5th Ch from hook (skipped Sts count as 1 Dc), 1 Dc in next Ch, *Ch 3, Sk 3, 3 Dc*, repeat from * to * to end of row, turn. (81(93, 105, 117, 129, 141) Sts)
Row 2(RS): Ch 3 (counts as 1 Dc), 1 Fpdc around next St, 1 Dc in following St, Ch 1, Sk 1, 1 Dc in the center Ch from the starting Ch (not from Row 1), Ch 1, Sk 1, *1 Dc, 1 Fpdc, 1 Dc, Ch 1, Sk 1, 1 Dc in next (the center Ch from the starting Ch, not from Row 1), Ch 1, Sk 1*, repeat from * to * across row until 3 Sts remain, 1 Dc, 1 Fpdc, 1 Dc in last St (the top of the starting Ch), turn. (81(93, 105, 117, 129, 141) Sts)
Row 3: Ch 5 (counts as 1 Dc and 2 Chs), Sk next 2 Sts, 1 Dc in first Ch Sp, 1 Dc in next St, 1 Dc in next Ch Sp, *Ch 3, Sk 3, 1 Dc in Ch Sp, 1 Dc in next St, 1 Dc in Ch Sp*, repeat from * to * across row until 3 Sts remain, Ch 2, Sk 2, 1 Dc in last St (top of Ch 3), turn. (81(93, 105, 117, 129, 141) Sts)
Row 4: Ch 3 (counts as 1 Dc), 1 Puff in next Ch, Ch 1, Sk 1, 1 Dc, 1 Fpdc, 1 Dc, *Ch 1, Sk 1, 1 Puff, Ch 1, Sk 1, 1 Dc, 1 Fpdc, 1 Dc*, repeat from * to * across row until 3 Sts remain, Ch 1, Sk 1, 1 Puff, 1 Dc in last (the 3rd Ch of the starting Ch 5), turn. (81(93, 105, 117, 129, 141) Sts)
Row 5: Ch 3 (counts as 1 Dc), 1 Dc in next St, 1 Dc in Ch Sp, Ch 3, Sk 3, *1 Dc in Ch Sp, 1 Dc in next St, 1 Dc in Ch Sp, Ch 3, Sk 3*, repeat from * to * across row until 3 Sts remain, 1 Dc in Ch Sp, 1 Dc in next St, 1 Dc in final St (top of Ch 3), turn. (81(93, 105, 117, 129, 141) Sts)
Row 6: Ch 3 (counts as 1 Dc), 1 Fpdc around next St, 1 Dc in following St, Ch 1, Sk 1, 1 Dc in the center St from 2 rows below, Ch 1, Sk 1, *1 Dc, 1 Fpdc, 1 Dc, Ch 1, Sk 1, 1 Dc in center St from 2 rows below, Ch 1, Sk 1*, repeat from * to * across row until 3 Sts remain, 1 Dc, 1 Fpdc, 1 Dc in last St (the top of Ch 3), turn. (81(93, 105, 117, 129, 141) Sts)
Rows 7-30(30, 30, 34, 34, 38): Repeat Rows 3-6.
Fasten off.
Left Front Panel (when worn)
Ch 36(42, 48, 54, 60, 66)
Repeat Rows 1-16(16, 16, 20, 20, 24) of the Back Panel. Your St count is 33(39, 45, 51, 57, 63) Sts.
We will now begin the neckline shaping.
Row 17(17, 17, 21, 21, 25): Ch 3 (counts as 1 Dc), 1 Dc in next St, 1 Dc in Ch Sp, Ch 3, Sk 3, 1 Dc in Ch Sp, 1 Dc in next St, 1 Dc in Ch Sp, *Ch 3, Sk 3, 1 Dc in Ch Sp, 1 Dc in next St, 1 Dc in Ch Sp*, repeat from * to * across row until 6 Sts remain, Ch 2, Sk 2, 1 Dc in next, leave remaining 3 Sts unworked, turn. (30(36, 42, 48, 54, 60) Sts)
Row 18(18, 18, 22, 22, 26): Ch 3 (counts as 1 Dc), 1 Dc in next St 2 rows below, Ch 1, Sk 1, 1 Dc, 1 Fpdc, 1 Dc, *Ch 1, Sk 1, 1 Dc in next St 2 rows below, Ch 1, Sk 1, 1 Dc, 1 Fpdc, 1 dc*, repeat from * to * across row, working your final St in the top of the Ch 3, turn. (30(36, 42, 48, 54, 60) Sts)
Row 19(19, 19, 23, 23, 27): Ch 5 (counts as 1 Dc and 2 Chs), Sk next 2 Sts, 1 Dc in first Ch Sp, 1 Dc in next St, 1 Dc in next Ch Sp, *Ch 3, Sk 3, 1 Dc in Ch Sp, 1 Dc in next St, 1 Dc in Ch Sp*, repeat from * to * across row until 6 Sts remain, Ch 2, Sk 2, 1 Dc in next, leave remaining 3 Sts unworked, turn. (27(33, 39, 45, 51, 57) Sts)
Row 20(20, 20, 24, 24, 28): Ch 3 (counts as 1 Dc), 1 Puff in next Ch, Ch 1, Sk 1, 1 Dc, 1 Fpdc, 1 Dc, *Ch 1, Sk 1, 1 Puff, Ch 1, Sk 1, 1 Dc, 1 Fpdc, 1 Dc*, repeat from * to * across row until 3 Sts remain, Ch 1, Sk 1, 1 Puff, 1 Dc in last (the 3rd Ch of the starting Ch 5), turn. (27(33, 39, 45, 51, 57) Sts)
Row 21(21, 21, 25, 25, 29): Repeat Row 17(17, 17, 21, 21, 25). (24(30, 36, 42, 48) Sts)
Row 22(22, 22, 26, 26, 30): Repeat Row 18(18, 18, 22, 22, 26). (24(30, 36, 42, 48) Sts)
Row 23(23, 23, 27, 27, 31): Repeat Row 19(19, 19, 23, 23, 27). (21(27, 33, 39, 45) Sts)
Row 24(24, 24, 28, 28, 32): Repeat Row 20(20, 20, 24, 24, 28). (21(27, 33, 39, 45) Sts)
Row 25(25, 25, 29, 29, 33): Repeat Row 17(17, 17, 21, 21, 25). (18(24, 30, 36, 42) Sts)
Row 26(26, 26, 30, 30, 34): Repeat Row 18(18, 18, 22, 22, 26). (18(24, 30, 36, 42) Sts)
Row 27(27, 27, 31, 31, 35): Repeat Row 19(19, 19, 23, 23, 27). (15(21, 27, 33, 39) Sts)
Row 28(28, 28, 32, 32, 36): Repeat Row 20(20, 20, 24, 24, 28). (15(21, 27, 33, 39) Sts)
Row 29(29, 29, 33, 33, 37): Repeat Row 5. (15(21, 27, 33, 39) Sts)
Row 30(30, 30, 34, 34, 38): Repeat Row 6. (15(21, 27, 33, 39) Sts)
Fasten off, leave a long tail for seaming the final row to the back panel.
Right Front Panel (when worn)
Ch 36(42, 48, 54, 60, 66)
Repeat Rows 1-16(16, 16, 20, 20, 24) of the Back Panel. Your St count is 33(39, 45, 51, 57, 63) Sts.
We will now begin the neckline shaping.
Row 17(17, 17, 21, 21, 25): 1 Sl St in first 4 Sts, Ch 5 (counts as 1 Dc and 2 Chs), Sk next 2 Sts, *1 Dc in Ch Sp, 1 Dc in next St, 1 Dc in Ch Sp, Ch 3, Sk 3*, repeat from * to * across until 3 Sts remain, 1 Dc in Ch Sp, 1 Dc in next St, 1 Dc in final St (top of Ch 3), turn. (30(36, 42, 48, 54, 60) Sts)
Row 18(18, 18, 22, 22, 26): Ch 3 (counts as 1 Dc), 1 Fpdc around next St, 1 Dc in following St, Ch 1, Sk 1, 1 Dc in the center St from 2 rows below, Ch 1, Sk 1, *1 Dc, 1 Fpdc, 1 Dc, Ch 1, Sk 1, 1 Dc in center St from 2 rows below, Ch 1, Sk 1*, repeat from * to * across row until 3 Sts remain, Ch 1, Sk 1, 1 Dc in next St from 2 rows below, 1 Dc in 3rd Ch of the starting Ch 5, turn. (30(36, 42, 48, 54, 60) Sts)
Row 19(19, 19, 23, 23, 27): 1 Sl St in first 4 Sts, Ch 5 (counts as 1 Dc and 2 Chs), Sk next 2 Sts, 1 Dc in first Ch Sp, 1 Dc in next St, 1 Dc in next Ch Sp, *Ch 3, Sk 3, 1 Dc in Ch Sp, 1 Dc in next St, 1 Dc in Ch Sp*, repeat from * to * across row until 3 Sts remain, Ch 2, Sk 2, 1 Dc in last St (top of Ch 3), turn. (27(33, 39, 45, 51, 57) Sts)
Row 20(20, 20, 24, 24, 28): Ch 3 (counts as 1 Dc), 1 Puff in next Ch, Ch 1, Sk 1, 1 Dc, 1 Fpdc, 1 Dc, *Ch 1, Sk 1, 1 Puff, Ch 1, Sk 1, 1 Dc, 1 Fpdc, 1 Dc*, repeat from * to * across row until 3 Sts remain, Ch 1, Sk 1, 1 Puff, 1 Dc in last (the 3rd Ch of the starting Ch 5), turn. (27(33, 39, 45, 51, 57) Sts)
Row 21(21, 21, 25, 25, 29): Repeat Row 17(17, 17, 21, 21, 25). (24(30, 36, 42, 48) Sts)
Row 22(22, 22, 26, 26, 30): Repeat Row 18(18, 18, 22, 22, 26). (24(30, 36, 42, 48) Sts)
Row 23(23, 23, 27, 27, 31): Repeat Row 19(19, 19, 23, 23, 27). (21(27, 33, 39, 45) Sts)
Row 24(24, 24, 28, 28, 32): Repeat Row 20(20, 20, 24, 24, 28). (21(27, 33, 39, 45) Sts)
Row 25(25, 25, 29, 29, 33): Repeat Row 17(17, 17, 21, 21, 25). (18(24, 30, 36, 42) Sts)
Row 26(26, 26, 30, 30, 34): Repeat Row 18(18, 18, 22, 22, 26). (18(24, 30, 36, 42) Sts)
Row 27(27, 27, 31, 31, 35): Repeat Row 19(19, 19, 23, 23, 27). (15(21, 27, 33, 39) Sts)
Row 28(28, 28, 32, 32, 36): Repeat Row 20(20, 20, 24, 24, 28). (15(21, 27, 33, 39) Sts)
Row 29(29, 29, 33, 33, 37): Repeat Row 5. (15(21, 27, 33, 39) Sts)
Row 30(30, 30, 34, 34, 38): Repeat Row 6. (15(21, 27, 33, 39) Sts)
Fasten off, leave a long tail for seaming the final row to the back panel.
Sleeves (make 2)
Ch 60(66, 72, 78, 84, 84) leaving a long starting tail to use for seaming the first row made to your front and back panel.
Repeat Rows 1-6 of back panel. Your St count is 57(63, 69, 75, 81, 81) Sts.
Row 7: Ch 2 (does not count), 1 Hdc in first 4 Sts, picot in next, *1 Hdc in next 5 Sts, picot in next*, repeat from * to * across until 4 Sts remain, 1 Hdc in each. (57(63, 69, 75, 81, 81)Sts)
Fasten off, leave a long tail for seaming across sleeve and down the side of your cardigan.
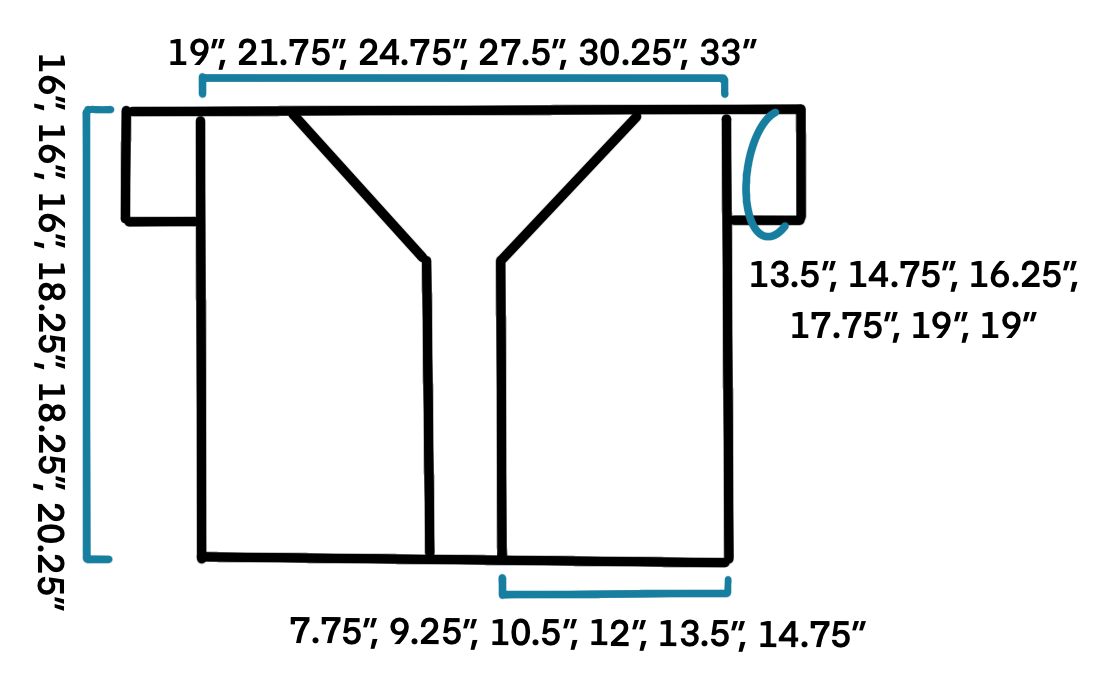
Assemble Panels
Block your panels to the measurements listed above. I did a light steam block.
Place your front and back panels together RS facing.
Using your preferred seaming method attach the front panels to the back panel at the shoulders (I used my needle and did the mattress stitch across). Be sure your panels are aligned and that you aren’t bunching or skipping stitches.
Next, using the same joining process as above, we will be attaching the sleeves to the cardigan. Make sure the center of the sleeve is aligned with the shoulder seam. Be sure to check that your sleeves are even on both the front and back panel as you go. It is helpful to use SM’s here to keep your sleeve in place as you join.
Finally, fold your cardigan so that the back and front panels are on top of each other, RS facing. Seam from the end of sleeve to the underarm and down the side of the cardigan. Repeat on the other side.

Trim
With your cardigan RS out, join yarn with a Sl St to the bottom left corner.
Row 1: Ch 1, Sc evenly up the side of your front panel, working approximately 2 Sc into the side of each row, when you reach the decrease rows, work a Sc into each of the 3 Sk Sts, continue in the same manner until you reach the back neckline, 1 Sc in each St along the back, repeat the same process down the second front panel, working about 2 Sc into the side of each row and 1 Sc into each of the 3 skipped Sts in the decrease rows until you reach the second bottom corner, turn. Note: Exact St count is not crucial here, just be sure to end with an odd number.
Row 2: Ch 4 (counts as 1 Dc and 1 Ch Sp), Sk next St, 1 Dc in following, *Ch 1, Sk 1, 1 Dc, repeat from * to * across row, turn.
Row 3: Ch 3 (counts as 1 Dc), 1 mini puff in next Ch, *Ch 1, Sk 1, 1 mini puff in next Ch*, repeat from * to * across row until 1 St remains, 1 Dc in final St (the third Ch of the starting Ch 4), turn.
Row 4: Ch 1, 1 Sc in each St and Ch Sp across, turn.
Row 5: Ch 1, 1 Sc in each St across, turn.
In the following row we will add button holes. With your cardigan RS out, mark off where you want your 3 button holes to be, on the left-hand side. For each button hole you will be chaining 2 and skipping 2 Sts. Take 2 St markers and place them in 2 Sts next to each other to mark off your first hole. Repeat 2 more times for your last 2 holes. I counted from the bottom left corner of my panel and placed my first button hole in the 4th and 5th St. Then, I placed my top button hole lined up with the first decrease row of the front panel and marked off 2 Sts. Finally, I split the Sts that are in between the top and bottom button hole evenly and marked off my center button with 2 SMs. Feel free to place your button holes wherever you desire. You can adjust placement or even add/remove button holes if you want more or less buttons.
Row 6: Ch 1, 1 Sc in each St across, when you reach the first set of SMs, remove the SMs, Ch 2, Sk 2, 1 Sc in each St until you reach the second set of SMs, Ch 2, Sk 2, 1 Sc in each St until you reach the last set of SMs, Ch 2 Sk 2, 1 Sc in each St to end.
Round 7: Ch 1, 1 Sc in each St across, when you reach the first button hole work 2 picot Sts into the Ch Sp, 1 Sc in each St until you reach the second button hole, 2 picot Sts into the Ch Sp, 1 Sc in each St until you reach the last button hole, 2 picot Sts into the Ch Sp, 1 Sc in each St until 1 St remains, 3 Sc in last St.
Do not turn or fasten off, we will now be working a row of Sc along the bottom of the cardigan.
Continue working Sc Stitches along the bottom of your cardigan. Evenly place them into the ends of the trim rows, when you reach the bottom of the front panel, work 1 Sc into each St across, 1 Sc into each St across the back panel, 1 Sc into each St across the second front panel and finally place Sc sts evenly into the ends of the trim rows. When you reach the corner, work 2 more Sc into the same St as the first Sc made in Round 7.
Fasten off.
Sew Buttons
With your cardigan RS out, place your buttons on the right-hand side in the same position as the button holes. Use your needle and yarn to sew buttons in place. Weave in all ends.
- Funny Pictures
-
 Relatable and Funny Memes to Distract You From the Routine
-
 Hilarious Cat Snapchats That Will Leave You With the Biggest Smile
-
 Today’s Top Funny Tweets to Scroll Before Bed
- Recipes
-
 Cappuccino Brownies
-
 Chicken Mushroom Tortellini Bake
-
 Spinach Pie
- Lifehacks
-
 8 Necessary Tips for Baking Bread
-
 Tips & Hacks for Clean Carpets
-
 10 Uses For Old TV Armoires
- Crochet Ideas
-
 Crochet Watermelon Amigurumi
-
 Crochet Flower Hat for your Pet
-
 Crochet Shark Applique
- DIY
-
 Yarn Wrapped Christmas Wreath Ornaments
-
 Egg Carton Snowman Ornament
-
 Stick Peppermint Candy Ornament
- Knitting Ideas
-
 Knitted Star Square Dishcloth
-
 Knitted Free 2025 Year Dishcloth
-
 Knitted Ribbed Adult Hat