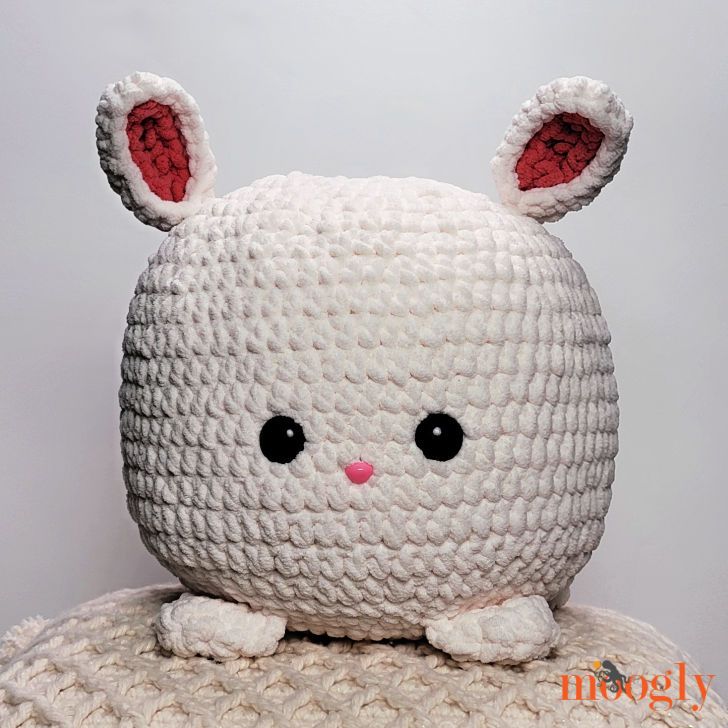
Crochet Bunny Squish: A Step-by-Step Guide


The Crochet Bunny Squish is absolutely adorable and oh so squishy! This little bunny design is perfect for adding a touch of sweetness to your space or making a heartfelt gift for someone special. With its cozy yarn and charming details, you can't help but fall in love with this soft plushie. Whether you're a seasoned crocheter or just starting out, creating your very own Crochet Bunny Squish will surely bring a big smile to your face. Who can resist those floppy ears and cute little tail? Get ready to spread some handmade happiness with this delightful crochet project!
Materials
- 7.0 mm or 8.0 mm hook, whichever gets you to gauge
- 250 yds Bernat Blanket (6 - Super Bulky/UK: 14-16 ply; 100% polyester; 300g/10.5 oz; 201 m/220 yds)
- Color A: Whipped Cream (2 balls)
- Color B: Terracotta (5 yards)
- 10" Round Microbead Pillow (pink)
- Fiberfill
- Safety Eyes - 24mm
- Safety Nose - 15mm
- Faux Fur Pom
- Stitch Markers
- Coats Sewing Thread - White
Specifications
Gauge: 4"/10cm across after Rnd 3.
Size: 10" across/tall excluding ears and feet.
Notes
- Rnds are worked in a spiral.
- Do not ch 1 at the beginning of a rnd or join any rnds with a sl st unless specifically directed in the pattern.
- Move a stitch marker along the first st of each rnd as you work to keep track of your progress.
- Please note that some pieces switch between Rows and Rounds.
Bunny Squish Instructions
Body - Color A
Rnd 1: Make a magic circle, ch 1, sc in the ring, 9 hdc in the ring. (10 sts)
Rnd 2: 2 hdc in each st around. (20 hdc)
Rnd 3: *Hdc in the next st, 2 hdc in the next st; rep from * around. (30 hdc)
Rnd 4: *2 hdc in the next st, hdc in the next 2 sts; rep from * around. (40 hdc)
Rnd 5: *Hdc in the next 3 sts, 2 hdc in the next st; rep from * around. (50 hdc)
Rnd 6: *Hdc in the next st, 2 hdc in the next st, hdc in the next 3 sts; rep from * around. (60 hdc)
Rnd 7: Hdc in the next 5 sts, 2 hdc in the next st, *hdc in the next 9 sts, 2 hdc in the next st; rep from * until 4 sts rem, hdc in last 4 sts. (66 hdc)
Rnd 8: *2 hdc in the next st, hdc in the next 10 sts; rep from * around. (72 hdc)
Rnd 9: Hdc in the next 8 sts, 2 hdc in the next st, *hdc in the next 17 sts, 2 hdc in the next st; rep from * until 9 sts rem, hdc in last 9 sts. (76 hdc)
Rnd 10 - 15: Hdc in each st around.
Rnd 16: *Hdc in next 17 sts, hdc2tog; rep from * around. (72 hdc)
Rnd 17: *Hdc in next 10 sts, hdc2tog; rep from * around. (66 sts)
Rnd 18: Hdc in next 5 sts, hdc2tog, *hdc in next 9 sts, hdc2tog; rep from * around until 4 sts rem, hdc in last 4 sts. (60 sts)
Rnd 19: Sc in next st, sl st in next st, break yarn and seamless join.
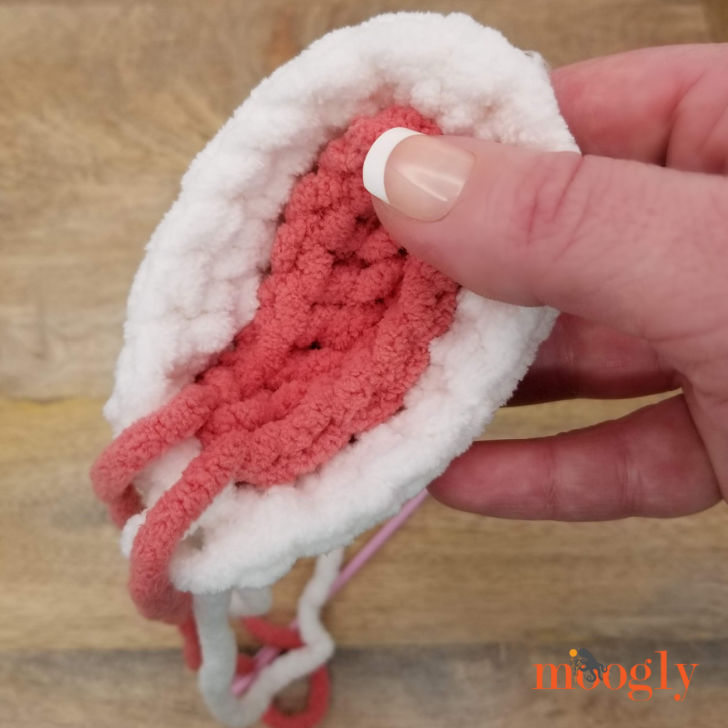
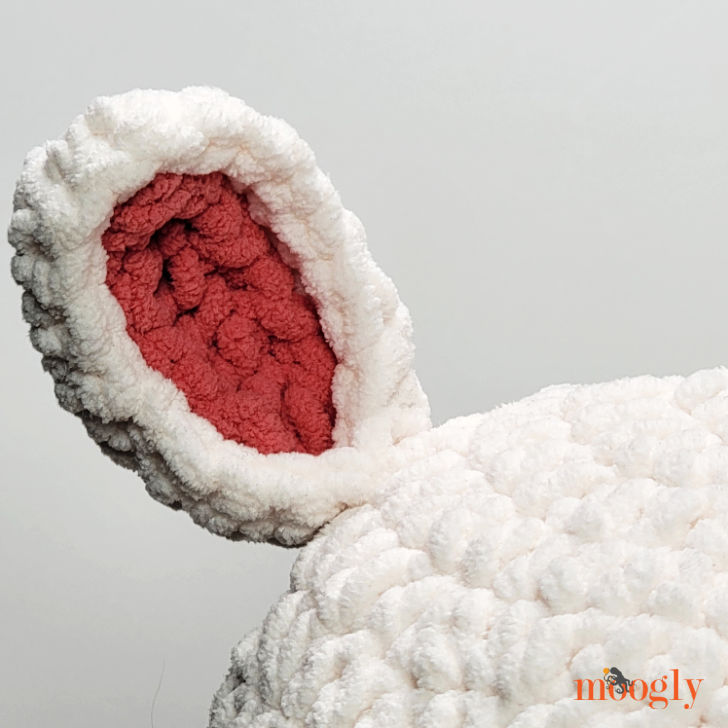
Ears (Make 2)
Piece #1 - Color A
Row 1: Ch 8, skip ch closest to hook, sc in next ch, dc in next 5 chs, sc in last ch; do NOT turn. (7 sts)
Rnd 2: Hdc in foundation chain of last st, hdc in next 6 foundation chains, 3 hdc in turning chain, hdc in next 7 sts. (17 sts)
Rnd 3: Sc in next 8 sts, 3 sc in next st, sc in next 8 sts, sl st in first sc; break yarn leaving long tail for sewing.
Piece #2 - Color B
Row 1: Ch 8, skip ch closest to hook, sc in next st, dc in next 5 sts, hdc in last st; break yarn leaving long tail for sewing. (7 sts)
Ear and Body Assembly
Step 1: Insert Ear Piece #2 into Piece #1, and use the long tail of Piece #2 to sew it on. Be sure to stitch so that Color B does not show on the other side of the ear.
Step 2: Use the long tails of Piece #1 to sew Ears to top of Body, between Rnds 5 and 6 or where desired.
Step 3: Add eyes and nose to face. As shown, the eyes are between Rnds 13 and 14, and the nose is between Rows 14 and 15.
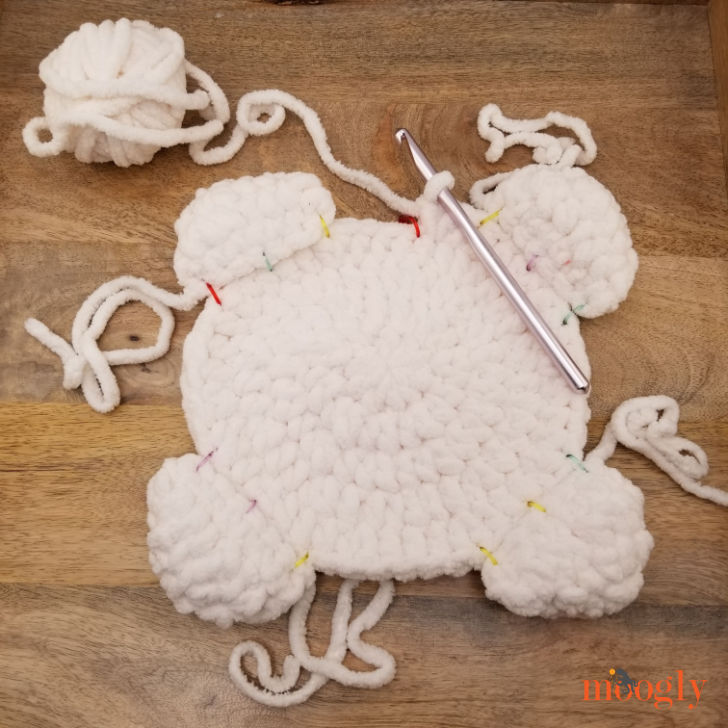
Feet (Make 4) - Color A
Rnd 1: Make a magic circle, ch 1, hdc, sc, 2 hdc, sc, hdc. (6 sts)
Rnd 2: 2 hdc in next st, sc in next st, 2 hdc in each of next 2 sts, sc in next st, 2 hdc in next st. (10 sts)
Rnd 3: 2 hdc in next st, hdc in next st, sc in next st, hdc in next st, 2 hdc in each of next 2 sts, hdc in next st, sc in next st, hdc in next st, 2 hdc in next st. (14 sts) Tip: Weave in your first end now.
Row 4: Fold piece flat, ch 1, sc through next st and last st, sc through next 6 sets of sts; break yarn and set aside.
Belly - Color A
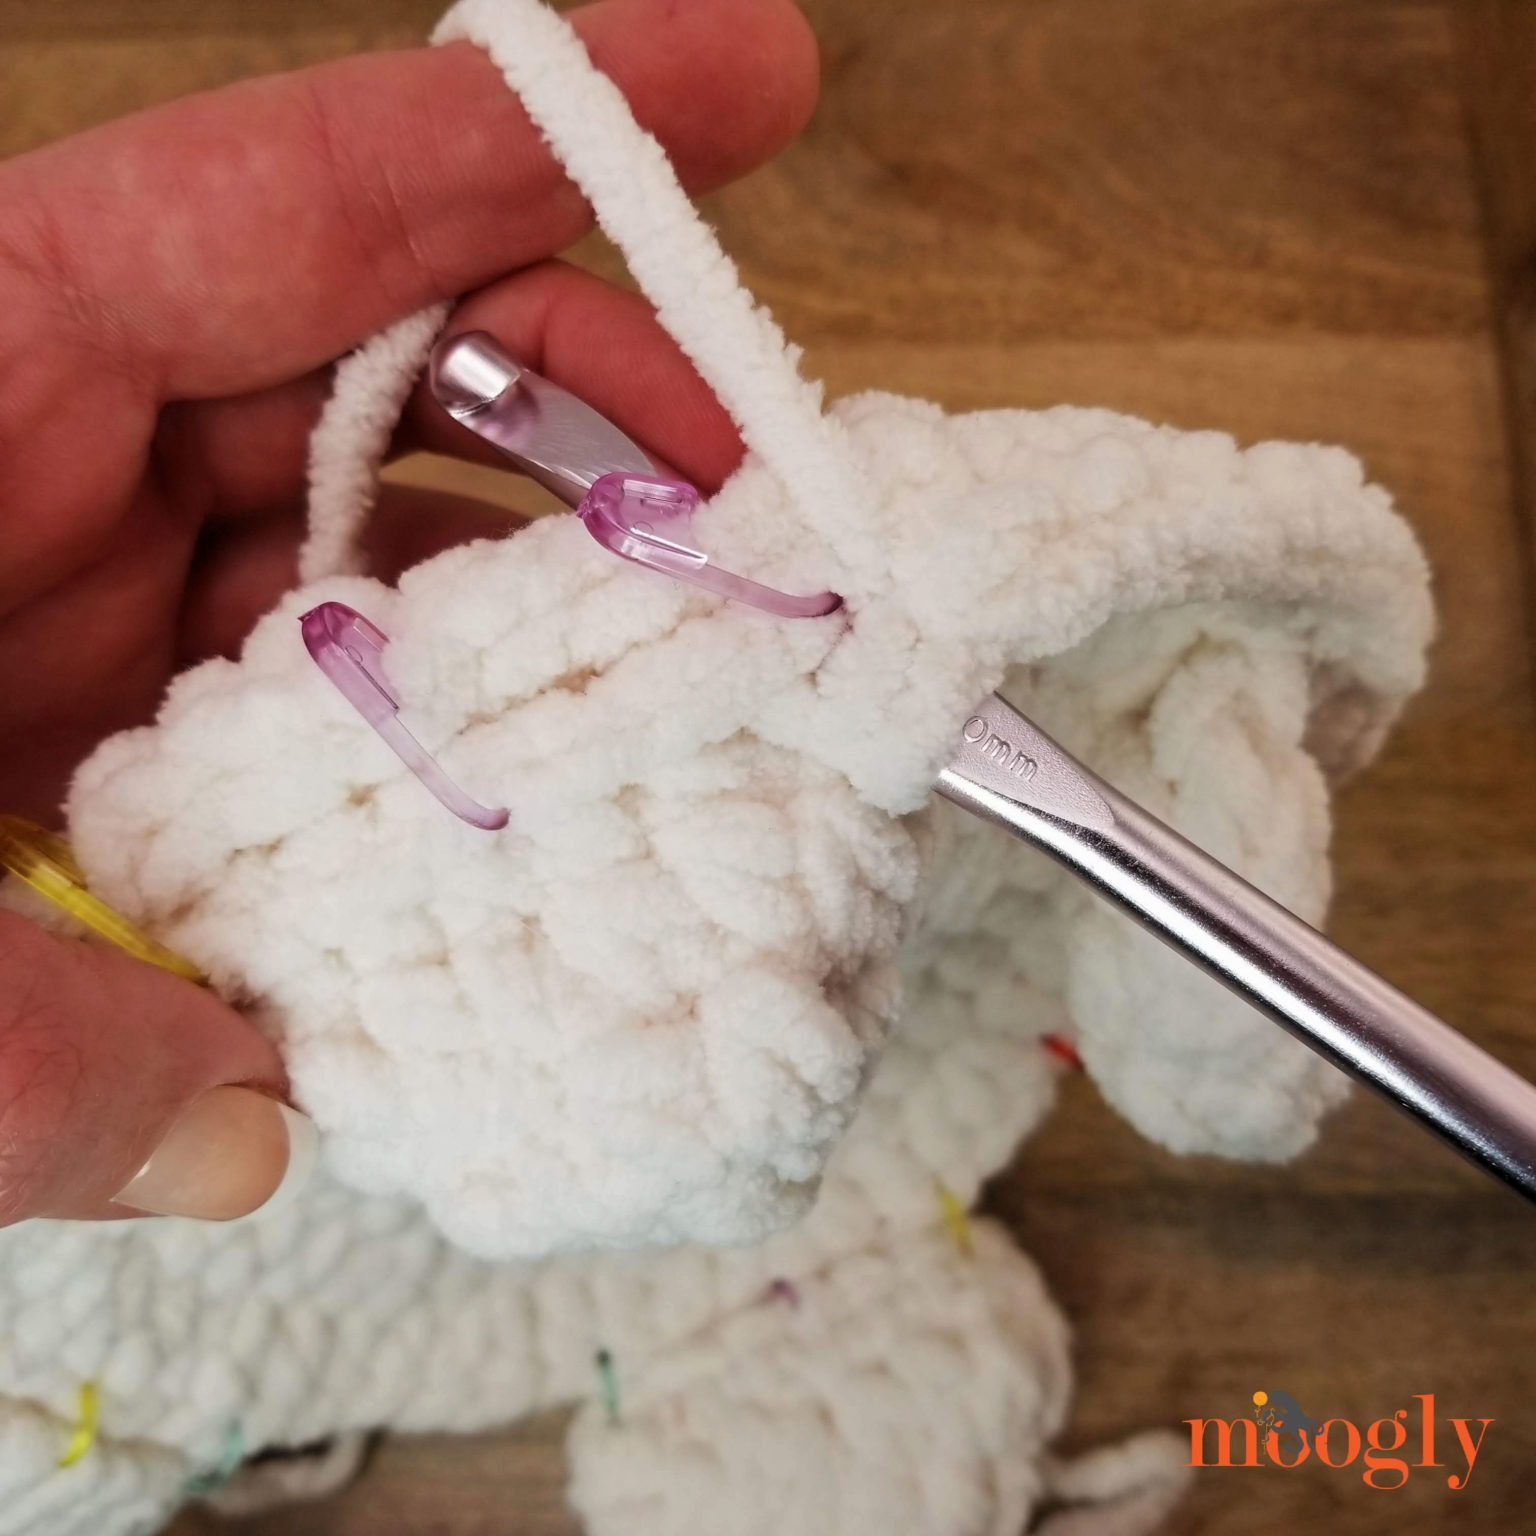
Rnd 1 - 5: With Color A, rep Rnd 1 - 5 of Body. (50 hdc) Use stitch markers to space Feet around RS of Rnd 5 - at sts #5-11, 17-23, 30-36, and 42-48.
Rnd 6: Working through both layers for those sts, *hdc in the next st, 2 hdc in the next st, hdc in the next 3 sts; rep from * around. (60 hdc)
Rnd 7: Sc in next st, sl st in next st, break yarn and seamless join leaving a long tail for sewing.
Final Bunny Squish Assembly
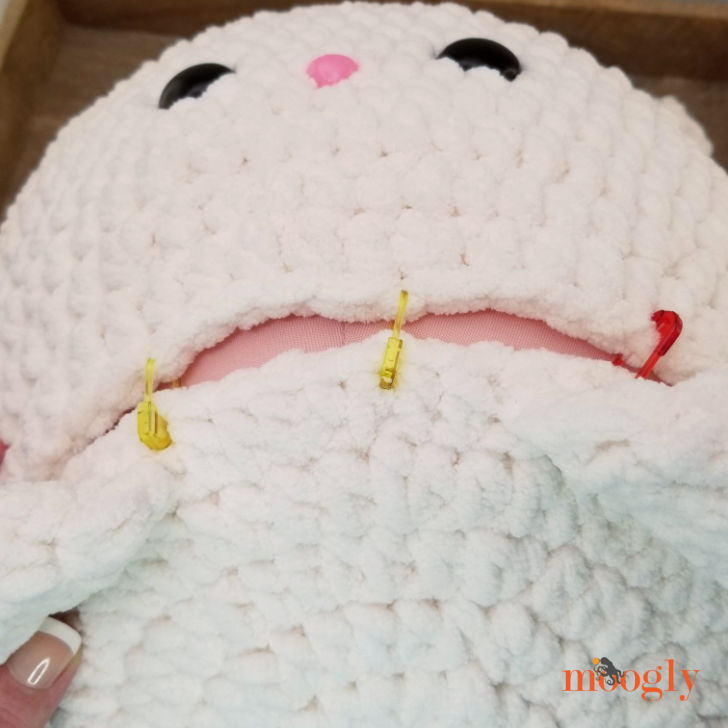
Step 1: Insert ball or stuffing into body.
Step 2: Use stitch markers to attach Belly to Body, with long tail at the back. Spin a bit to adjust for foot placement as needed.
Step 3: Using long tail of Belly, sew Belly to Body with whip stitch.
- Funny Pictures
-
 These are the Pics That Simply Describe Your Life
-
 Hilariously Accurate Parenting Memes That Show the Other Side of Parenthood
-
 Great Pics That Just Depict Our Lives
- Recipes
-
 Crispy Baked Avocado Fries
-
 Baked Beans and Hot Dogs with Biscuit Topping
-
 Roasted Rosemary Lemon Chicken Breasts
- Lifehacks
-
 Crochet Basics: Twisted Fringe
-
 7 Crochet Tips And Tricks
-
 How To Work Crochet Into Denim
- Crochet Ideas
-
 Crochet Snorlax Plushie Doll
-
 Crochet Cat in 1 Row
-
 Crochet Beautiful Penguin Toy
- DIY
-
 Popsicle Stick and Jingle Bell Christmas Tree Ornament
-
 Upcycled Mason Jar Chicken Vase
-
 Crochet Namaste Stephanie Doll
- Knitting Ideas
-
 Knitted Keepsake Bag
-
 Knitted Textured Heart Dishcloth
-
 Knitted Snowfall Dishcloth