Crochet Maeve Pullover


The Crochet Maeve Pullover is a delightful piece that adds a touch of charm and coziness to your wardrobe. With its intricate crochet details and flattering fit, it's the perfect combination of style and comfort. Whether you're lounging at home or heading out with friends, this pullover is sure to keep you feeling warm and looking fabulous. Embrace the cozy vibes and stylish flair of the Crochet Maeve Pullover – it's a must-have for any fashion-forward individual!
Materials
- Worsted (4) Weight Yarn, Lion Brand Heartland in Great Smoky Mountains: 5(5, 6, 6, 6, 7, 7, 7, 8) skeins or 1160(1200, 1280, 1350, 1440, 1530, 1650, 1720, 1800) yards
- I/5.5mm Crochet Hook
- Needle
- Scissors
- Measuring Tape
- Stitch Markers (3)
Gauge
13 Sts by 8 rows= 4×4” (blocked)
To make a gauge swatch, work 17 Hdc Sts and then crochet rows 2-10 of the main body of the front panel. Your swatch will be larger than the required gauge. Measure 4×4” within that swatch to check gauge.
Finished Measurements
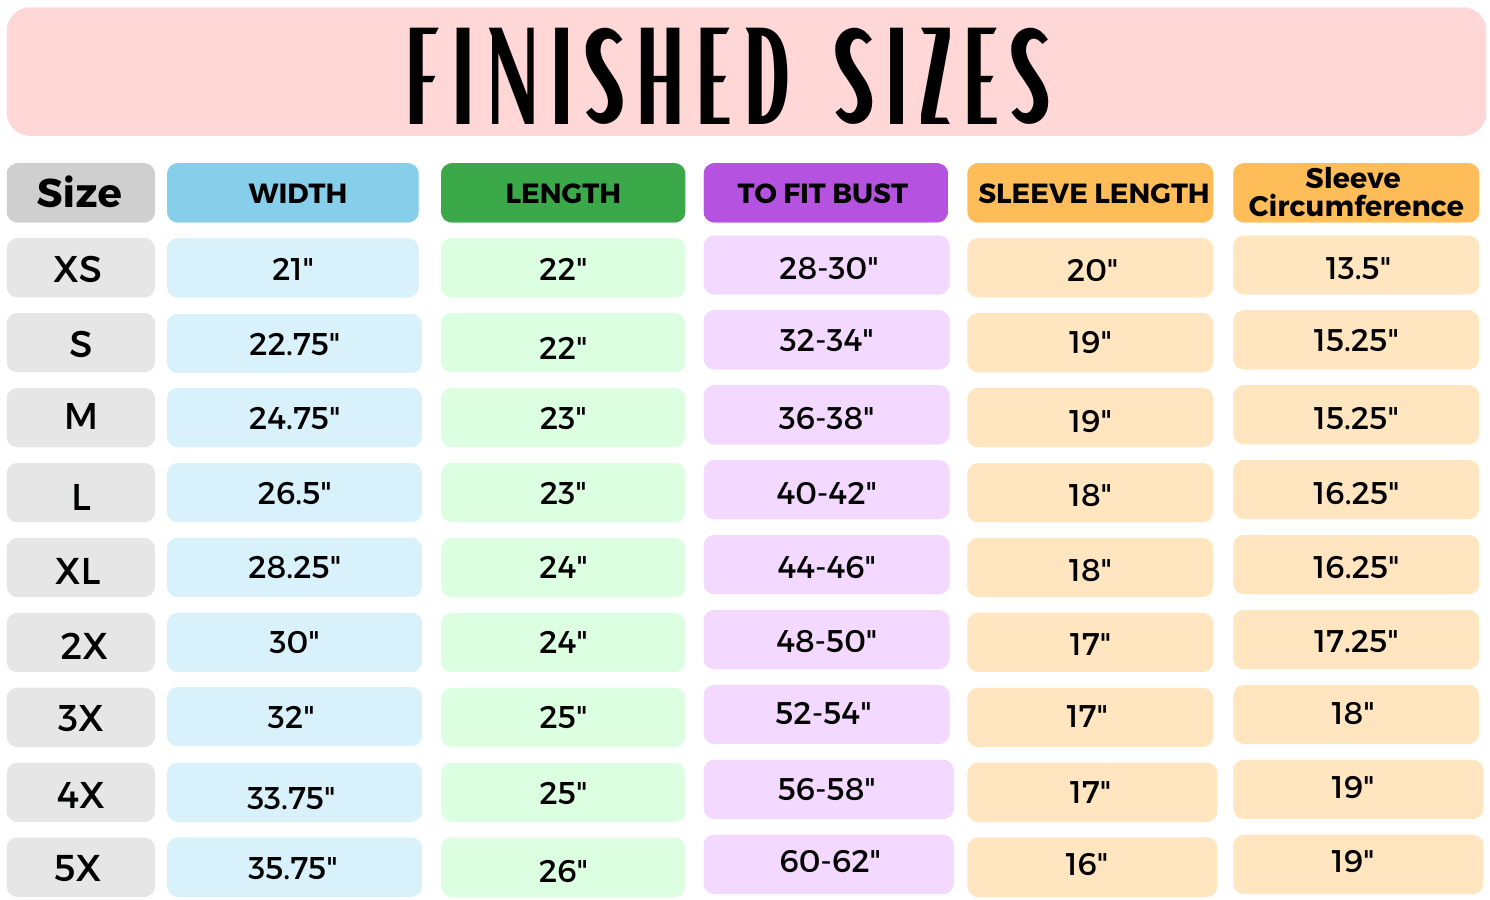
Sizes:
XS(S, M, L, XL, 2X, 3X, 4X, 5X)
Notes
- This sweater is made in separate panels from the bottom up.
- The Ch 1 and Ch 2 at the start of the rows do not count as a stitch.
- The Ch 3 at the start of the row counts as 1 Double Crochet.
- You can make your sweater longer or shorter by adding or removing rows in multiples of 2 just before the neckline shaping on both the back panel and front panel. Take into account your yardage requirement will change.
- You can make your sleeves longer or shorter by adding or removing rows in multiples of 2. Again, take into account your yardage requirement will change.
- The numbers in parenthesis at the beginning of the row are the row counts for all sizes. The numbers in parenthesis at the end of the rows are your stitch counts for all sizes. The numbers in parenthesis within the row are your instructions for all sizes.
Stitches and Abbreviations (US Terms)
- Ch(s) - Chain(s)
- St(s) - Stitch(es)
- Sc - Single Crochet
- BLO - Back Loop Only
- RS - Right Side
- WS - Wrong Side
- Hdc - Half Double Crochet
- Tr - Treble Crochet
- Dc - Double Crochet
- Sk - Skip
- Sl St - Slip Stitch
- Hdc2tog - Half Double Crochet 2 Together (decrease)
- SM - Stitch Marker
Pattern
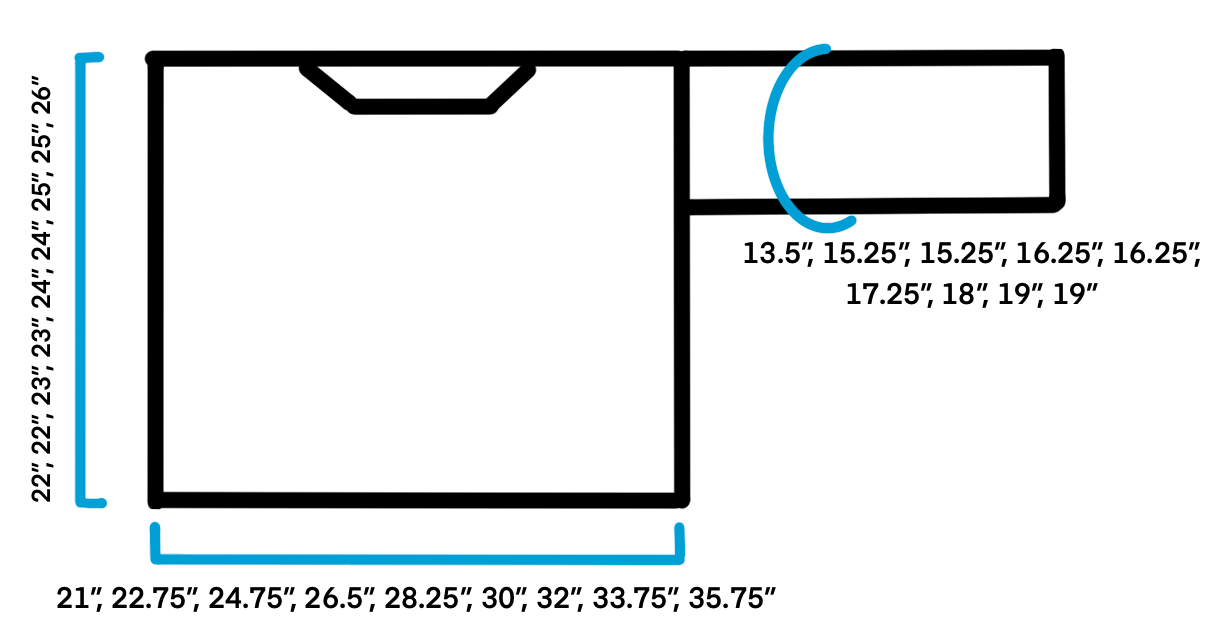
Front Panel
Ch 11
Row 1: 1 Sc in the second Ch from the hook and each across, turn. (10 Sc)
Rows 2-68(74, 80, 86, 92, 98, 104, 110, 116): Ch 1, 1 Sc in first St, 1 Sc (BLO) in each St across until 1 remains, 1 Sc in last St, turn. (10 Sc)
Do not turn after the last row made. We will now be working Row 1 of the main body into the ends of the ribbing rows.
Row 1(WS): Ch 2 (does not count as a St here and throughout), 1 Hdc into the end of each row across, turn. (68(74, 80, 86, 92, 98, 104, 110, 116) Hdc)
Row 2(RS): Ch 3 (counts as 1 Dc here and throughout), *Sk the next 2 Sts, 1 Tr in following St, working your St behind the Tr, go back and work 1 Dc into the first skipped St, work 1 Dc into the second skipped St*, repeat from * to * across the row until 1 St remains, work 1 Dc in final St, turn. (68(74, 80, 86, 92, 98, 104, 110, 116) Sts)
Row 3: Ch 2, 1 Hdc in each St across (your last St made will be in the top of the Ch 3), turn. (68(74, 80, 86, 92, 98, 104, 110, 116) Hdc)
Rows 4-34(34, 36, 36, 38, 38, 40, 40, 42): Repeat Rows 2 & 3. The last row will end on a Row 2 repeat.
Shaping the Neckline
Right Shoulder
Row 35(35, 37, 37, 39, 39, 41, 41, 43): Ch 2, 23(26, 29, 32, 35, 38, 41, 44, 47) Hdc, leave remaining Sts unworked, turn. (23(26, 29, 32, 35, 38, 41, 44, 47) Hdc)
Row 36(36, 38, 38, 40, 40, 42, 42, 44): Repeat Row 2.
Row 37(37, 39, 39, 41, 41, 43, 43, 45): Ch 2, 1 Hdc in each St across until 5 Sts remain, Hdc2tog twice, leave remaining St unworked (the top of the Ch 3), turn. (20(23, 26, 29, 32, 35, 38, 41, 44) Hdc)
Row 38(38, 40, 40, 42, 42, 44, 44, 46): Repeat Row 2.
Row 39(39, 41, 41, 43, 43, 45, 45, 47): Repeat Row 3. (20(23, 26, 29, 32, 35, 38, 41, 44) Hdc)
Fasten off, leave a long tail for seaming the last row to the back panel.
Left Shoulder
With the finished shoulder on the right hand side and your work WS up, count in (23(26, 29, 32, 35, 38, 41, 44, 47) Sts from the left towards the center of the panel and join into that St with a Sl St.
Row 35(35, 37, 37, 39, 39, 41, 41, 43): Ch 2, 1 Hdc in each St across, turn. (23(26, 29, 32, 35, 38, 41, 44, 47) Hdc)
Row 36(36, 38, 38, 40, 40, 42, 42, 44): Repeat Row 2.
Row 37(37, 39, 39, 41, 41, 43, 43, 45): Do not Ch 2, Sk over the first St, leaving it unworked, Hdc2tog twice, 1 Hdc in each remaining St across, turn. (20(23, 26, 29, 32, 35, 38, 41, 44) Hdc)
Row 38(38, 40, 40, 42, 42, 44, 44, 46): Repeat Row 2.
Row 39(39, 41, 41, 43, 43, 45, 45, 47): Repeat Row 3. (20(23, 26, 29, 32, 35, 38, 41, 44) Hdc)
Fasten off, leave a long tail for seaming the last row to the back panel.
Back Panel
Ch 11
Row 1: 1 Sc in the second Ch from the hook and each across, turn. (10 Sc)
Rows 2-68(74, 80, 86, 92, 98, 104, 110, 116): Ch 1, 1 Sc in first St, 1 Sc (BLO) in each St across until 1 remains, 1 Sc in last St, turn. (10 Sc)
Do not turn after the last row made. We will now be working Row 1 of the main body into the ends of the ribbing rows.
Row 1(WS): Ch 2 (does not count as a St here and throughout), 1 Hdc into the end of each row across, turn. (68(74, 80, 86, 92, 98, 104, 110, 116) Hdc)
Row 2(RS): Ch 3 (counts as 1 Dc here and throughout), *Sk the next 2 Sts, 1 Tr in following St, working your St behind the Tr, go back and work 1 Dc into the first skipped St, work 1 Dc into the second skipped St*, repeat from * to * across the row until 1 St remains, work 1 Dc in final St, turn. (68(74, 80, 86, 92, 98, 104, 110, 116) Sts)
Row 3: Ch 2, 1 Hdc in each St across (your last St made will be in the top of the Ch 3), turn. (68(74, 80, 86, 92, 98, 104, 110, 116) Hdc)
Rows 4-37(37, 39, 39, 41, 41, 43, 43, 45): Repeat Rows 2 & 3.
Shaping the Neckline
Left Shoulder
Row 38(38, 40, 40, 42, 42, 44, 44, 46): Ch 3 (counts as 1 Dc here and throughout), *Sk the next 2 Sts, 1 Tr in following St, working your St behind the Tr, go back and work 1 Dc into the first skipped St, work 1 Dc into the second skipped St*, repeat from * to * 5(6, 7, 8, 9, 10, 11, 12, 13) more times, 1 Dc in next St, leave remaining Sts unworked, turn. (20(23, 26, 29, 32, 35, 38, 41, 44) Sts)
Row 39(39, 41, 41, 43, 43, 45, 45, 47): Repeat Row 3. (20(23, 26, 29, 32, 35, 38, 41, 44) Hdc)
Fasten off.
Right Shoulder
With your finished shoulder on the right hand side and your work RS up, count in (20(23, 26, 29, 32, 35, 38, 41, 44) Sts) from the left towards the center of the panel and join into that St with a Sl St.
Row 38(38, 40, 40, 42, 42, 44, 44, 46): Repeat Row 2.
Row 39(39, 41, 41, 43, 43, 45, 45, 47): Repeat Row 3.
Fasten off.
Sleeves (Make 2)
Ch 11
Row 1: 1 Sc in the second Ch from the hook and each across, turn. (10 Sc)
Rows 2-22(25, 25, 27, 27, 28, 30, 31, 31): Ch 1, 1 Sc in first St, 1 Sc (BLO) in each St across until 1 remains, 1 Sc in last St, turn. (10 Sc)
Do not turn after the last row made. We will now be working Row 1 of the main body into the ends of the ribbing rows.
Row 1(WS): Ch 2, 2 Hdc into the end of each row across until 1 St remains, 2(2, 2, 1, 1, 2, 1, 2, 2) Hdc into last St, turn. (44(50, 50, 53, 53, 56, 59, 62, 62) Hdc)
Your sleeve is going to look wavy and crazy at this point. Don’t worry, that’s normal!
Row 2(RS): Ch 3, *Sk the next 2 Sts, 1 Tr in following St, working your St behind the Tr, go back and work 1 Dc into the first skipped St, work 1 Dc into the second skipped St*, repeat from * to * across the row until 1 St remains, work 1 Dc in final St, turn. (44(50, 50, 53, 53, 56, 59, 62, 62) Sts)
Row 3: Ch 2, 1 Hdc in each St across (your last St made will be in the top of the Ch 3), turn. (44(50, 50, 53, 53, 56, 59, 62, 62) Hdc)
Rows 4-35(33, 33, 31, 31, 29, 29, 29, 27): Repeat Rows 2 & 3.
Fasten off, leave a long tail for seaming last row to sweater.
Note - This is a drop-shoulder style sweater. The wider the front/back panels are, the shorter the sleeve needs to be because they join further down your bicep. That’s why the smaller sizes have more rows than the larger. You can easily adjust your sleeve length by adding or taking away as many rows as needed.
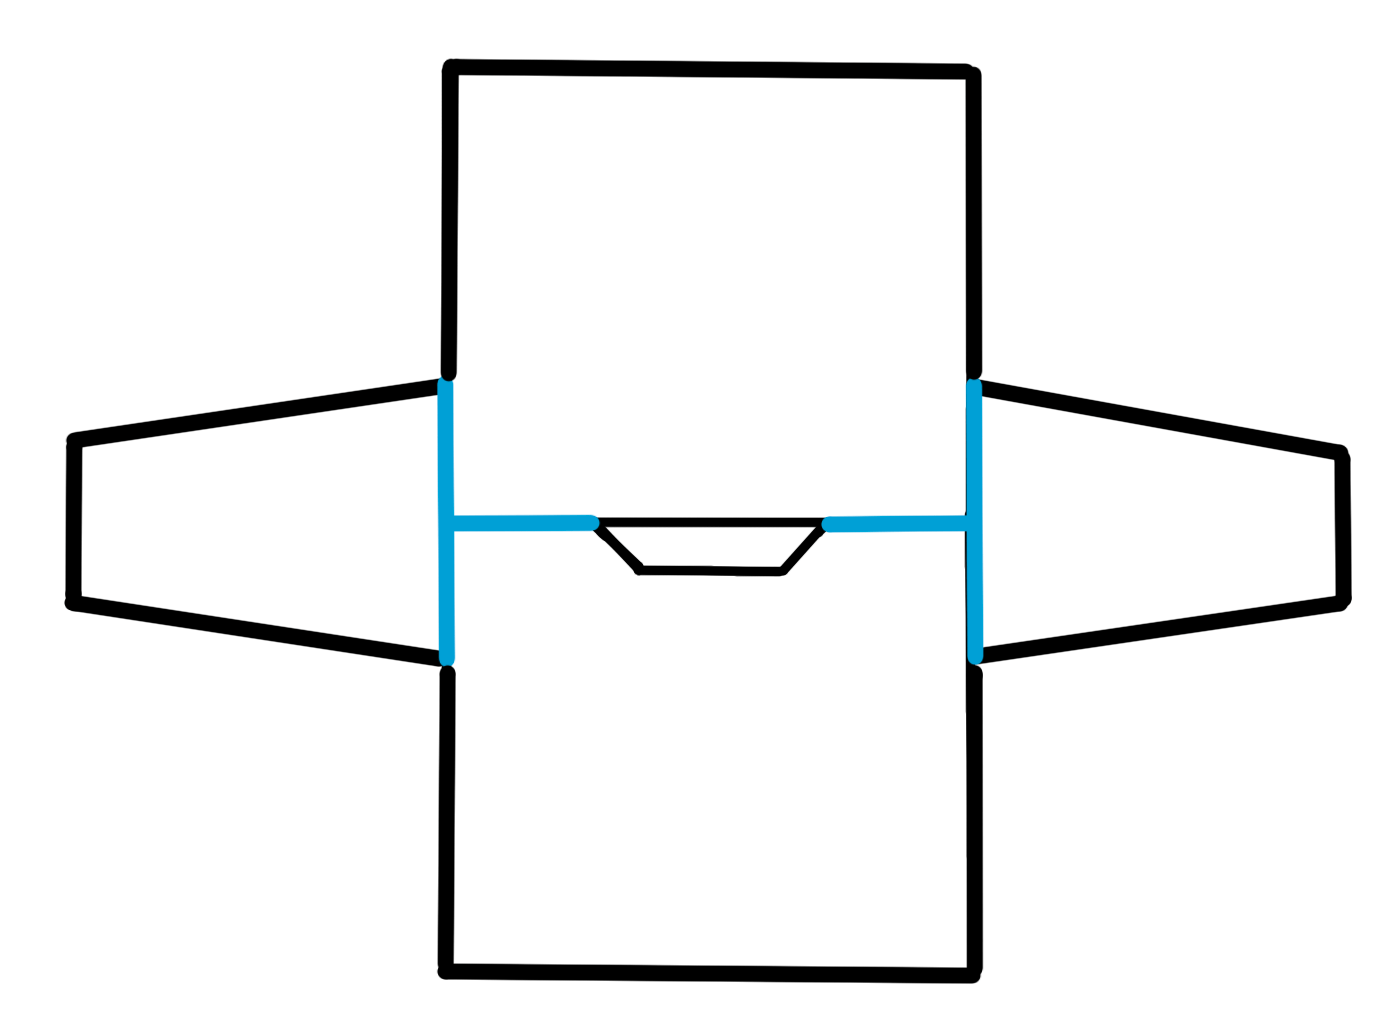
Assembly
Block your panels to the measurements listed above. I recommend a steam block.
Place your front and back panels together RS facing.
Using your preferred seaming method, attach the front panel to the back panel at the shoulders. I used my needle and mattress stitch, but you can use any preferred seaming method. Be sure your panels are aligned and that you aren’t bunching or skipping stitches.
Next, using the same joining process as above, we will be attaching the sleeves to the sweater. Make sure the center of the sleeve is aligned with the shoulder seam. Be sure to check that your sleeves are even on both the front and back panel as you go. It is helpful to use SM’s here to keep your sleeve in place as you join.
Finally, fold your pullover so that the back and front panels are on top of each other, RS facing. Seam from the cuffs to the underarm and down the side of the pullover.

Neckline Ribbing
With your pullover RS out, join yarn with a Sl St to the left of one of the shoulder seams.
Round 1: Ch 1, Sc evenly around the opening of the neckline, Sl St to first Sc to join, do not turn. Exact St count is not crucial here, work 1 Sc into each of the Sts. When you reach the sides of the rows where you did the shaping, you will work approximately 1 Sc into each Hdc row and 2 Sc into each Dc/Ch 3 row. I also like to work 1 Sc into each shoulder seam. Feel free to make small St adjustments if you feel you need a couple more or less to complete around.
Ch 5
Row 1: Work 1 Sc into the second Ch from the hook and each Ch across back towards the sweater for a total of 4 Sc. Sl St 1 time to the next unworked St of Round 1, turn. (4 Sc)
Row 2: (do not start with a Ch) 1 Sc (BLO) in first 3 Sts, 1 Sc in last, turn. (4 Sc)
Row 3: Ch 1, 1 Sc in first St, 1 Sc (BLO) in next 3 Sts, 1 Sl St into the next unworked St of the neckline, then work 1 more Sl St into the next St after that, turn. (4 Sc, 2 Sl St)
Repeat Rows 2 & 3 around Round 1 of the neckline. Depending on if you had an odd or even Sc St count in Round 1 you will either have 1 or 2 Sc remaining after you work your way around. If 2 remain, Sl St twice like normal and complete your last 2 rows. If 1 St remains, Sl St once into the remaining St and complete 1 more ribbing row. Fold the collar together, RS facing, Sl St the first and last row together to seam shut. Fasten off, weave in any remaining ends.
- Funny Pictures
-
 Relatable and Funny Memes to Distract You From the Routine
-
 Hilarious Cat Snapchats That Will Leave You With the Biggest Smile
-
 Today’s Top Funny Tweets to Scroll Before Bed
- Recipes
-
 Cappuccino Brownies
-
 Chicken Mushroom Tortellini Bake
-
 Spinach Pie
- Lifehacks
-
 8 Necessary Tips for Baking Bread
-
 Tips & Hacks for Clean Carpets
-
 10 Uses For Old TV Armoires
- Crochet Ideas
-
 Crochet Watermelon Amigurumi
-
 Crochet Flower Hat for your Pet
-
 Crochet Shark Applique
- DIY
-
 Crochet Titus the Barn Owl
-
 Crochet Rainbow Bunny
-
 DIY Washer Ornaments
- Knitting Ideas
-
 Knitted Star Square Dishcloth
-
 Knitted Free 2025 Year Dishcloth
-
 Knitted Ribbed Adult Hat