Crochet Dinosaur Triceratops: A Whimsical DIY Project

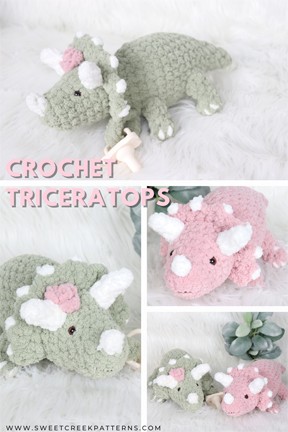
Introducing the Crochet Dinosaur Triceratops, a delightful and charming creation that will transport you back to the prehistoric era. This handmade masterpiece is meticulously crafted using the art of crochet, ensuring every detail is captured with precision and care. From its distinctive three horns to its sturdy legs and tail, this Triceratops is a true work of art that will captivate both children and adults alike. Created with love and passion, this adorable creature brings the ancient past to life in a unique and whimsical way. Made from soft and durable yarn, it is perfect for cuddling and playtime adventures. Whether you're a dinosaur enthusiast or simply looking for a one-of-a-kind gift, the Crochet Dinosaur Triceratops is sure to bring joy and wonder to anyone who lays eyes on it. Let your imagination run wild as you embark on a journey through time with this enchanting crochet creation.
Materials
Hooks
- 4.5 mm
- 7 mm (or hook to obtain gauge)
Yarn
- Color A (Head, body, and legs) #6 Super Bulky • Approx 75 yds
- Color B (Horns) #6 Super Bulky • Approx 3 yds
- Color C (Rose) #6 Super Bulky • Approx 2 yds
Notions
- Scissors
- Stitch marker
- Darning needle
- Poly-fil
- 10 mm safety eyes
- Hot glue to secure safety eyes
- Embroidery floss
Gauge
(4″ x 4″), 7 mm hook with color A
10 sts x 8 rows sc in ea st
Final Size
6″W x 12″L x 5″H
Yarn Used
- Head, body, and legs: Big Twist Plush color: Sage
- Horns: Bernat Blanket Yarn color: White
- Rose (optional): Premier Basix Chenille color: Blush
Abbreviations
- ch - chain
- sc - single crochet
- hdc - half double crochet
- dc - double crochet
- st - stitch
- ea - each
- sp - space
- sk - skip stitch
- sl st - slip stitch
- mc - magic circle
- inc - 2 single crochet in same stitch
- hdc-inc - 2 half double crochet into stitch
- dec - single crochet 2 together
- hdc-dec - half double crochet 2 together
- sp - space
** repeat instructions inside asterisk
Special Stitches
sc2tog
** Insert hook, yarn over pull through, repeat in next st, yarn over and pull through all 3 loops. **
Head
Using color A, 7 mm hook:
*Note* You will be working in the round.
Rnd 1: Make a MC and sc 6 into the ring. (6)
Rnd 2: Inc x6. (12)
Rnds 3-4: Sc in ea st (2 rnds) (12)
Rnd 5: Sc 4, inc x4, sc 4. (16)
Rnd 6: Sc in ea st. (16)
Rnd 7: Sc 4, *inc, sc,* x4, inc, sc 3. (21)
Rnds 8-9: Sc in ea st. (2 rnds) (21)
Rnd 10: *sc, dec,* x7. (14)
*Note* At this point you’ll weave in your tails, and add the eyes on rnd 5, 5 sts apart. I use hot glue on the backs for security. Stuff head with poly-fil.
Do NOT tie off, continue to the body.
Body
Using color A, 7 mm hook:
Rnd 1: Sc in ea st. (14)
Rnd 2: Inc x4, sc 10. (18)
Rnd 3: *Inc, sc,* x3, sc 12. (21)
Rnd 4: Sc 14, inc x5, sc 2. (26)
Rnds 5-9: Sc in ea st. (5 rnds) (26)
Rnd 10: Sc 2, dec x5, sc 14. (21)
Rnd 11: Sc in ea st. (21)
*Note* At this point, add stuffing to desired firmness.
Rnd 12: *dec, sc,* x7. (14)
Rnd 13: Sc in ea st. (14)
Rnd 14: *dec, sc,* x2, dec, *hdc, hdc-dec,* x2. (9)
Rnd 15: Sc 4, hdc 5. (9)
*Note* At this point, add stuffing to desired firmness.
Rnd 16: *dec, sc,* x2, hdc-dec, hdc. (6)
Rnds 17-18: Hdc, sc 3, hdc 2. (6)
Rnd 19: Dec x3. (3)
Rnd 20: Dec, sl st. (1)
Tie off and weave in ends.
Head Plate
Using color A, 7 mm hook:
You will crochet the plate onto the head on rnd 9, there should be 6 sts across the bottom of head that do NOT have the plate.
Row 1: Attach your hook to the 7th stitch across the bottom of the head, ch 2, dc-inc in first st (same st as the ch 2), then dc in next 13 sts, dc-inc in last st, you should end with only 6 sts apart from the bottom of the head. (17)
Row 2: Ch 1, turn, (working into dc’s you just created) *sl st in first st, ch 1, dc in next st, ch 1, repeat from* to end of row, sl st in last st.
Tie off, and weave in tails.
White Tops
Using color B, 7 mm hook:
You will do the following on the top of each “peak”:
Row 1: Ch 1, sl st.
Tie off, and weave in tails.
Legs
Using color A, 7 mm hook:
You are going to make the legs and then attach them to the body.
Back Legs
Rnd 1: Make a MC and sc 8 into ring. (8)
*Note* At this point, weave in your MC tail.
Rnd 2: dec x4. (4)
Rnd 3: Sc in ea st. (4)
Rnd 4: *Sc, inc,* x2. (6)
Rnd 5: Sc in ea st. (6)
On right leg sc 3 after Rnd 5.
Tie off, leaving a long tail to sew leg onto body. STUFF the legs. The front of the back legs goes on Rnd 10, 6 sts apart across the bottom.
Front Legs
Repeat Rnds 1-4 of Back Legs. STUFF the legs. Do the same for Right Leg. The front part of the front leg goes on Rnd 4, 7 sts apart.
Back Horns
Using color A, 4.5 mm hook, make 2:
*Note* Leave a long tail on your magic circle as you will make a knot with that at the end of making the horn.
Rnd 1: Make a magic circle, sc 4 into magic circle. (4)
Rnd 2: Do NOT ch 1 as you will begin working in the round, sc-inc in first st, sc in last 3 sts. (5)
Rnds 3-4: Sc in ea st around (2 rnds). (5)
Rnd 5: *Inc, sc* x2, sc in last st. (7)
Rnd 6: Sc in each st around, sl st. (7)
Tie off, leaving long tail to sew onto Head.
Stuff the Horn with poly-fil (making sure to hold the long tail you left on your Magic circle) and once you have stuffed the horn pull the magic circle tail to form a little bit of a curved horn, then make several knots with the long tails. Then whip stitch onto head on Rnd 7 and 8, 4 sts apart.
Front Horn
Using color A, 4.5 mm hook, make 1:
Follow the first 2 rnds of the Back Horns.
Whip stitch the horn on the center of the head, rnd 2.
Toe Nails
Using 1 strand color B:
Cut 12″ strand of yarn and wrap around the center of the foot, going 1 rnd up, then wrap on each side of the center nail for a total of 3 nails.
Mouth
(Optional) Using 2 strands of embroidery floss:
Cut 2 (both strands on the darning needle), 12″ strand of embroidery floss, and create a mouth.
- Funny Pictures
-
 Relatable and Funny Memes to Distract You From the Routine
-
 Hilarious Cat Snapchats That Will Leave You With the Biggest Smile
-
 Today’s Top Funny Tweets to Scroll Before Bed
- Recipes
-
 Cappuccino Brownies
-
 Chicken Mushroom Tortellini Bake
-
 Spinach Pie
- Lifehacks
-
 8 Necessary Tips for Baking Bread
-
 Tips & Hacks for Clean Carpets
-
 10 Uses For Old TV Armoires
- Crochet Ideas
-
 Crochet Watermelon Amigurumi
-
 Crochet Shark Applique
-
 Crochet Pineapple Amigurumi
- DIY
-
 Yarn Wrapped Christmas Wreath Ornaments
-
 Egg Carton Snowman Ornament
-
 Stick Peppermint Candy Ornament
- Knitting Ideas
-
 Knitted Star Square Dishcloth
-
 Knitted Free 2025 Year Dishcloth
-
 Knitted Ribbed Adult Hat