Crochet Page the Baby Unicorn: A Step-by-Step Guide

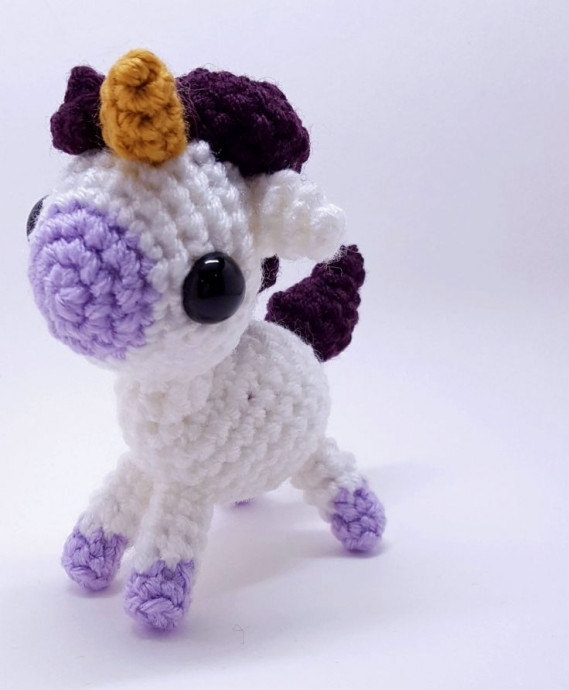
Meet Crochet Page the Baby Unicorn, a delightful little creature whose rainbow mane and sparkling horn bring magic wherever she goes. With her cuddly soft yarn and whimsical charm, Crochet Page loves to spread joy and happiness to everyone she meets. This enchanting baby unicorn is the perfect companion for anyone looking for a sprinkle of fantasy in their day. So, grab your hook and yarn, and let Crochet Page bring a touch of magic into your life!
Supplies
To create your own Crochet Page the Baby Unicorn, you will need the following materials:
- 2.25mm Crochet hook
- Worsted weight yarn in four different colors: horn color, main color, accent color, hair color
- Safety eyes 12mm
- Yarn needle
- Fiberfill
- Stitch marker
- Dowel
Abbreviations
Familiarize yourself with these crochet abbreviations:
- MC = Magic Circle
- SC = Single Crochet
- Sl st = Slip Stitch
- CC = Yarn Color Change (Counts as first stitch of the round and is followed by a sl st)
- Sc rnd = Sc in every stitch around
- Inc = Increase, 2 sc in same stitch
- Dec = Decrease, next 2 stitches crocheted together
- Ch = Chain
- Sts = Stitches
- B. Lps = Back loops of the stitch
- […] = Repeat instructions for entire round or as specified
Techniques
Magic Circle
Essential to the start of most amigurumi projects.
Invisible Decrease
This technique is good for preventing gaps and giving a more uniform look to your single crochets.
Working in Front Loops
For this pattern, always work single crochets in the front loops of the stitch, unless otherwise specified. By working in only the front loops, the single crochets will stack up straighter than if you worked them in both loops.
Stitch Markers
Use a stitch marker (like a bobby pin) to keep track of the beginning of your rounds. Place it in the first stitch of the round.
Staggered Rounds
Staggered rounds offset the pattern's increases or decreases, preventing the pinwheel look and making it more circular. For example, [4 sc, inc] x6 can become staggered by making it 2 sc, inc, [4 sc, inc] x5, 2 sc. This splits the even single crochets at the beginning of the round.
Closing
Closing a piece involves threading your yarn needle with the yarn end and putting it through each of the front loops of the last round's single crochets (usually 6). Pull tight to create a mini magic circle, then put the needle through the center and out through the piece. Tie your knot and stuff ends back into the piece.
Whip Stitch
This usually means the finished piece is folded flat with the last single crochet or yarn end at the edge of the piece. Thread your yarn needle with the yarn end, and using only the front loops, use a 'zigzag' or whip stitch to close the opening.
Pattern
Head
Starts off with the nose in your accent color and changes to your main color:
- RND 1: 6 sc in MC (6 sts)
- RND 2: 6 inc (12 sts)
- RND 3: [sc, inc] x6 (18 sts)
- RND 4: CC to main color, sl st, 16 sc (18 sts)
- RND 5: sc, inc, [2 sc, inc] x5, sc (24 sts)
- RND 6: sc rnd (24 sts)
- RND 7: [3 sc, inc] x6 (30 sts)
- RND 8: 2 sc, inc, [4 sc, inc] x5, 2 sc (36 sts)
- RND 9: 2 sc, dec, [4 sc, dec] x5, 2 sc (30 sts)
Place eyes between RNDs 5 and 6, approximately 9 stitches apart.
- RND 10: [3 sc, dec] x6 (24 sts)
- RND 11: sc, dec, [2 sc, dec] x5, dec (18 sts)
Begin stuffing the head.
- RND 12: [sc, dec] x6 (12 sts)
- RND 13: 6 dec (6 sts)
Fully stuff the head and close.
Horn
Using horn color:
- RND 1: MC 3 sc (3 sts)
- RND 2: 3 inc (6 sts)
- RND 3-4: Two rounds of sc (6 sts)
Use a dowel to stuff the yarn end into the horn, which is the only stuffing it should need. Use the other yarn end to attach to the center of the head, starting between RNDs 6 and 7.
Mane Parts
The mane consists of four parts; create all four before sewing them together. Part one has a longer length of yarn left over for attaching the entire mane to the head. Remember to leave a little extra length on the starting yarn end, as you’ll be using it to secure the pieces together.
Mane Part 1
Using hair color:
- RND 1: 6 sc in MC (6 sts)
- RND 2: 6 inc (12 sts)
- RND 3: [sc, inc] x6 (18 sts)
- RND 4: sc rnd (18 sts)
- RND 5: [sc, dec] x6 (12 sts)
For the curl: ch 4 to 6, +1, turn and 2 sc in each stitch, sl st back into the next stitch of Mane part 1.
Mane Part 2
This and the next three parts are done in a chain round where sc’s are worked on both sides of the chain:
Using hair color:
- RND 1: Ch 4 + 1, turn, 4 sc, rotate, 4 sc (8 sts)
- RND 2: [inc, sc] x4 (12 sts)
- RND 3: sc rnd (12 sts)
- RND 4: [sc, dec] x4 (6 sts)
Thread the yarn end through the yarn needle and attach to Mane part 1 using a whip stitch across 3 stitches of both Parts 1 and 2. Tie the yarn ends of part 1 (beginning yarn end) and part 2 (ending yarn end) together, and stuff the ends into part 1.
Mane Part 3
Using hair color:
- RND 1: Ch 4 + 1, turn, 4 sc, rotate, 4 sc (8 sts)
- RND 2: sc rnd (8 sts)
- RND 3: [sc, dec] (4 sts)
Thread the yarn end through the yarn needle and attach to Mane part 2 using a whip stitch across 3 stitches of both Parts 2 and 3. Tie the yarn ends of part 2 (beginning yarn end) and part 3 (ending yarn end) together, and stuff the ends into part 2.
Mane Part 4
Using hair color:
- RND 1: Ch 3 + 1, turn, 3 sc, rotate, 3 sc (6 sts)
- RND 2: sc rnd (6 sts)
Thread the yarn end through the yarn needle and attach to Mane part 3 using a whip stitch across 3 stitches of both Parts 3 and 4. Tie the yarn ends of part 3 (beginning yarn end) and part 4 (ending yarn end) together, and stuff the ends into part 3. Stuff part 4's beginning yarn end into part 4.
Using the yarn end from Mane part 1, start attaching it to the head. Place directly behind the horn, and begin sewing down all the parts of the mane so it goes down the back of the head, ending between RNDs 11 and 12. Sew back up the other side until you reach the curl. Style the curl as you desire, typically attaching 2 stitches of the chain to the head for a perfect iron curler look.
Ears (x2)
Using the main color:
- RND 1: 4 sc in MC (4 sts)
- RND 2: [sc, inc] x2 (6 sts)
- RND 3: sc rnd (6 sts)
Whip stitch the opening closed and attach to the head between RNDs 9 and 10, ensuring they are approximately six stitches apart.
Body
The body, including the neck, is created using hdc to create a curve for the neck:
Using the main color:
- RND 1: 6 sc in MC (6 sts)
- RND 2: 6 inc (12 sts)
- RND 3: [sc, inc] x6 (18 sts)
- RND 4: sc, inc, [2 sc, inc] x5, sc (24 sts)
- RND 5-9: 4 rounds of sc (24 sts)
- RND 10: 6 dec, 12 sc (18 sts)
- RND 11: 6 dec, 6 sc (12 sts)
- RND 12: 4 sl st, 7 hdc (12 sts)
Attach to the head between RNDs 12 and 13, right below the mane. The front of the neck should be sewn between RNDs 7 and 8.
Front Legs (x2)
Starting with accent color for hooves and then changing to the main color:
- Starting with accent color:
- RND 1: 6 sc in MC (6 sts)
- RND 2: sc rnd in b. Lps only (6 sts)
- RND 3: CC to main color, sl st, 4 sc (6 sts)
- RND 4-6: Three sc rounds (6 sts)
Using a dowel, stuff the yarn ends into the legs. Attach to the body within RNDs 6-8, with one stitch between them.
Back Legs (x2)
Again, starting with the accent color and changing to the main color:
- Starting with accent color:
- RND 1: 6 sc in MC (6 sts)
- RND 2: sc rnd in b. Lps only (6 sts)
- RND 3: CC to main color, sl st, 4 sc (6 sts)
- RND 4-5: Two sc rounds (6 sts)
Using a dowel, stuff the yarn ends into the legs. Attach to the body within RNDs 1-3, with two to three stitches between them.
Tail
A small tail for your small pony:
Using hair color:
- RND 1: 4 sc in MC (4 sts)
- RND 2: [sc, inc] x2 (6 sts)
- RND 3: sc rnd (6 sts)
- RND 4: 6 inc (12 sts)
- RND 5: sc rnd (12 sts)
- RND 6: 6 dec (6 sts)
Stuff and attach to the body within RNDs 4-6.
And now, your baby unicorn is complete!
- Funny Pictures
-
 Hilarious Memes for Those Bored to Tears
-
 Weekly Treat of Funniest Parenting Memes for Good Laugh out Loud Right Now
-
 Really Funny Pics to End These Weekend Perfectly
- Recipes
-
 Crispy Baked Avocado Fries
-
 Scrambled Chickpea and Spinach Pitas
-
 Cinnamon Pancakes
- Lifehacks
-
 Crochet Basics: Aligned Cobble Stitch
-
 Brick Stitch Crochet Tutorial
-
 Crochet Basics: Wattle Stitch
- Crochet Ideas
-
 Crochet Snorlax Plushie Doll
-
 Crochet Beautiful Penguin Toy
-
 Crochet Tiny Snowman
- DIY
-
 DIY Santa Craft For Kids
-
 Paper Plate Angel Craft
-
 Upcycled Mason Jar Chicken Vase
- Knitting Ideas
-
 Knitted Bridger Cowl
-
 Knitted Keepsake Bag
-
 Knitted Cutie Cupcake Dolls