Crochet Unicorn Keychain Amigurumi Tutorial

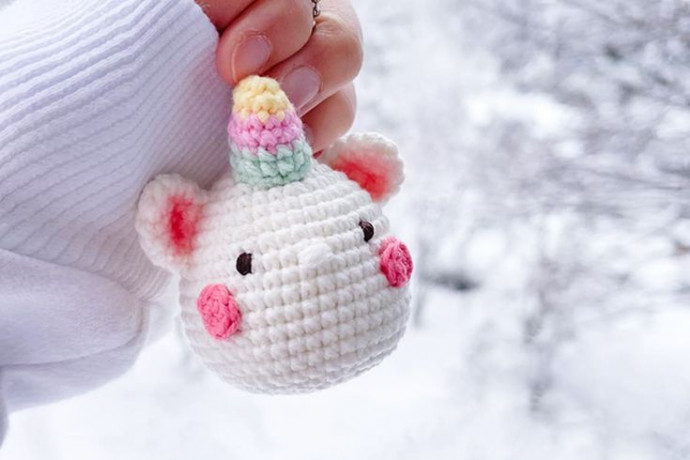
Bring some magical charm to your everyday essentials with a Crochet Unicorn Keychain Amigurumi! This adorable and whimsical accessory is the perfect way to add a touch of enchantment to your keys or bag. Handcrafted with love and attention to detail, the cute unicorn design is sure to bring a smile to your face every time you see it. Whether you're a seasoned crocheter or just starting out, this delightful keychain is a fun and rewarding project that will make a wonderful gift for yourself or a friend. So why not sprinkle a little bit of magic into your life with a Crochet Unicorn Keychain Amigurumi today?
Materials
- 2.25 mm crochet hook
- Alize cotton gold yarns colors: (062) cream, (187) light yellow, (487) light green, (382) pastel pink, and (518) rosa
- Drops safran colors (68) brown
- Fiberfill stuffing
- Stitch marker
- Needle
- Wooden stick to help fill and shape the amigurumi
- Pins
- Metal jump rings (2 pieces) and 1 bead chain (10 cm)
- Jewelry assembly pliers
Abbreviations
- Sc – single crochet
- Ch – chain stitch
- Slst – slip stitch
- St – stitch
- Hdc – half double crochet
- Dc – double crochet
- BLO – back loops only
- Inc – increase
- Dec – decrease
Finished Size
7 cm (2.75 in) tall*
7 cm (2.75 in) wide*
* Using the same yarns and hook size indicated is this pattern.
Skill Level
Easy
Head and Body Instructions
Cream yarn color
- Rnd 1. sc 6 in magic ring (6)
- Rnd 2. inc in each st around (12)
- Rnd 3. (sc 1, inc in the next) x 6 (18)
- Rnd 4. (sc 2, inc in the next) x 6 (24)
- Rnd 5. (sc 3, inc in the next) x 6 (30)
- Rnd 6. (sc 4, inc in the next) x 6 (36)
- Rnd 7. sc in each stitch around (36)
- Rnd 8. (sc 5, inc in the next) x 6 (42)
- Rnd 9-16. sc in each stitch around (42)
- Rnd 17. (sc 5, dec in the next) x 6 (36)
- Rnd 18. (sc 4, dec in the next) x 6 (30)
- Rnd 19. (sc 3, dec in the next) x 6 (24)
- Stuff with fiberfill with the help of a wood stick.
- Rnd 20. (sc 2, dec in the next) x 6 (18)
- Rnd 21. (sc 1, dec in the next) x 6 (12)
- Rnd 22. (dec) x 6 (6)
- Invisible fasten off.
Ears and Cheeks Instructions
Let’s crochet the ears and cheeks of the amigurumi pattern.
Ears (Make 2)
Cream yarn color
- Rnd 1. sc 6 in magic ring (6)
- Rnd 2. (sc 1, inc in the next) x 3 (9)
- Rnd 3. (sc 2, inc in the next) x 3 (12)
- Rnd 4. sc in each st around (12)
- Rnd 5. (sc 2, dec in the next) (9)
With a brush, apply a little rouge makeup on the inside of the ears. Fasten off, leaving a tail for sewing.
Cheeks (Make 2)
Pink yarn color
- Rnd 1. sc 6 in a magic ring (6)
- Slst in the first sc
- Invisible fasten off, leaving a tail for sewing.
Let’s crochet the colorful horn of the Amigurumi unicorn pattern. You can crochet the horn part using the color yarn you want.
Horn Instructions
Light yellow, pink and green yarn colors
- Rnd 1. Start with yellow yarn and make 6 sc in a magic ring (6)
- Rnd 2. (sc 1, inc in the next) x 3 (9)
- Rnd 3. Change to pink yarn and sc in each stitch around (9)
- Rnd 4. (sc 2, inc in the next) x 3 (12)
- Rnd 5. Change to green yarn and sc in each stitch around
- Rnd 6. (sc 3, inc in the next) x 3 (15)
- Stuff with fiberfill
- Fasten off, leaving a tail for sewing.
Assembly Instructions
- With brown yarn, embroider the eyes on the 09th row of the head, with the distance of 8 stitches between them.
- With the same color yarn as the head, embroider the nose between rows 09 and 10, in the center of the eyes.
- Sew cheeks between rows 10 and 12 with 7 stitches apart. (Align with the eyes)
- Sew the ears between rows 05/09, approximately 5 stitches away from eyes.
- Using small pliers, place the metal jump rings on top of the head and attach the head chain.
- Sew the horn to the top of the head, slightly angled towards the forehead.
- Funny Pictures
-
 Hilarious Memes for Those Bored to Tears
-
 Weekly Treat of Funniest Parenting Memes for Good Laugh out Loud Right Now
-
 Really Funny Pics to End These Weekend Perfectly
- Recipes
-
 Crispy Baked Avocado Fries
-
 Scrambled Chickpea and Spinach Pitas
-
 Cinnamon Pancakes
- Lifehacks
-
 Crochet Basics: Aligned Cobble Stitch
-
 Brick Stitch Crochet Tutorial
-
 Crochet Basics: Wattle Stitch
- Crochet Ideas
-
 Crochet Snorlax Plushie Doll
-
 Crochet Beautiful Penguin Toy
-
 Crochet Tiny Snowman
- DIY
-
 DIY Santa Craft For Kids
-
 Paper Plate Angel Craft
-
 Upcycled Mason Jar Chicken Vase
- Knitting Ideas
-
 Knitted Bridger Cowl
-
 Knitted Keepsake Bag
-
 Knitted Cutie Cupcake Dolls