Crochet Vola the Bunny Rabbit: A Fun and Adorable Project

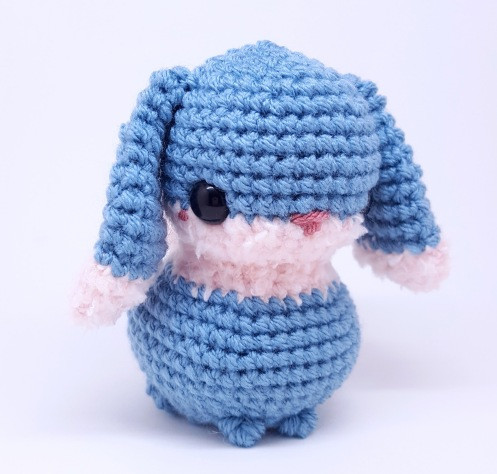
Crochet Vola the Bunny Rabbit is an adorable and fun project to bring to life. With its soft yarn and detailed instructions, creating Vola will surely bring a smile to your face. From its fluffy tail to its floppy ears, this crochet bunny is perfect for cuddling or gifting to a fellow bunny lover. Get your crochet hooks ready and prepare for a delightful crafting experience with Vola the Bunny Rabbit!
Materials
2.25 mm crochet hook
Worsted weight yarn, main color
Bee Cloud 9 or the equivalent to a fur yarn and a light weight yarn of similar color, fluff yarn
12 mm safety eyes
Yarn needle
Fiber fill
Yarn of the pink variety for nose and blush
Stitch markers
Abbreviations
MC = Magic circle
Sc = single crochet
St = stitch
Sl st = slip stitch
Rnd = round
Sc rnd = single crochet in each stitch of the rnd
CC = yarn color change, counts as first stitch of the rnd and is followed by a sl st
Inc = increase
Dec = decrease
[…] = repeat instructions within brackets as specified
Techniques
Magic Circle
Essential to the start of most amigurumi.
Invisible Decrease
Good for preventing gaps and giving a more uniform look to your sc’s.
Working in Front Loops
For my patterns, I always work sc’s in the front loops of the stitch, unless otherwise specified. By working in only the front loops, the sc’s will stack up straighter than if you worked them in both loops.
Stitch Markers
I use a stitch marker (bobby pin) for keeping track of the beginning of my rounds; I place it in the first stitch of the round.
Staggered Rounds
Staggered rounds offset the patterns' inc’s or dec’s so you don’t get that pinwheel look and it is more of a circle instead of a hexagon. For example, [4 sc, inc] x6 is an even inc round that can be a staggered round, so it would become, 2 sc, inc, [4 sc, inc] x5, 2 sc; the even sc’s are split at the beginning of the round.
Close
Closing a piece is threading your yarn needle with the yarn end and putting it through each of the front loops of the last round’s sc’s, usually 6, and pulling tight. It should look like a mini magic circle, then put the needle through the center of it and out through the piece. Tie your knot and stuff ends back into the piece.
Whip Stitch
Usually means the finished piece is folded flat with the last sc or yarn end at the edge of the piece. Thread yarn needle with yarn end, and again with only the front loops, 'zigzag,' or whip stitch the opening closed.
Pattern
Starting with the Head
The head and body are one piece and you start off making the head in your main color. Rnd 11 is the color change to the fluff yarn which is your fur yarn and lightweight yarn together.
Main Color
RND 1: 6 sc in MC (6 sts)
RND 2: 6 inc (12 sts)
RND 3: [sc, inc] x6 (18 sts)
RND 4: sc, inc, [2 sc, inc] x5, sc (24 sts)
RND 5: [3 sc, inc] x6 (30 sts)
RND 6: 2 sc, inc, [4 sc, inc] x5, 2 sc (36 sts)
RND 7-11: Five sc rnds (36 sts)
RND 12: CC to fluff yarn, sl st, 34 sc (36 sts)
RND 13: 2 sc, inc, [4 sc, dec] x5, 2 sc (30 sts)
RND 14: [3 sc, dec] x6 (24 sts)
RND 15: 6 sc, 6 dec, 6 sc (18 sts)
Place eyes between rnds 11 and 12, 10 sts apart, and then fully stuff the head.
Continue with Rounds
RND 16: sc, inc, [2 sc, inc] x5, sc (24 sts)
RND 17: [3 sc, inc] x6 (30 sts)
RND 18: CC to main color, sl st, inc, [4 sc, inc] x5, 2 sc (36 sts)
RND 19: [sc, inc] x3, 24 sc, [sc, inc] x3 (42 sts)
RND 20: 3 sc, inc, [6 sc, inc] x5, 3 sc (48 sts)
RND 21-23: Three sc rnds (48 sts)
RND 24: 3 sc, dec, [6 sc, dec] x5, 3 sc (42 sts)
RND 25: [5 sc, dec] x6 (36 sts)
RND 26: 2 sc, dec, [4 sc, dec] x5, 2 sc (30 sts)
Make sure the head is fully stuffed and partially stuff the body, then move on to making the base.
Base
Just a circle to sew into the bottom of the body to give the bunny a flat base to sit on.
Base Rounds
RND 1: MC 6 sc (6 sts)
RND 2: 6 inc (12 sts)
RND 3: [sc, inc] x6 (18 sts)
RND 4: sc, inc, [2 sc, inc] x5, sc (24 sts)
RND 5: [3 sc, inc] x6 (30 sts)
Insert the base into the body; the stitches should line up together, thread the yarn needle with the base’s yarn end and begin whip stitching the base and body together. Stuff more as you go. Tie in both yarn ends for the base and body.
Ears (x2)
The ears start off with the fluff yarn and change to main color at rnd 5.
Start with fluff yarn
RND 1: MC 6 sc (6 sts)
RND 2: 6 inc (12 sts)
RND 3: sc rnd (12 sts)
RND 4: [sc, inc] x6 (18 sts)
RND 5: CC to main color, sl st, 16 sc (18 sts)
RND 6: Two sc rnds (18 sts)
RND 7: 2 sc, dec, [4 sc, dec] x2, 2 sc (15 sts)
RND 8: sc rnd (15 sts)
RND 9: [3 sc, dec] x3 (12 sts)
RND 10: sc rnd (12 sts)
RND 11: sc, dec, [2 sc, dec] x2, sc (9 sts)
RND 12-13: Two sc rnds (9 sts)
Thread yarn needle with the yarn end and whip stitch the opening closed and then attach to the head between rnds 6 and 7, (looking from the front) around 14 sts apart.
Tail
Done completely with fluff yarn.
With fluff yarn
RND 1: MC 6 sc (6 sts)
RND 2: 6 inc (12 sts)
RND 3: [sc, inc] x6 (18 sts)
RND 4: [2 sc, inc] x6 (24 sts)
RND 5: sc rnd (24 sts)
RND 6: [2 sc, dec] x6 (18 sts)
RND 7: [sc, dec] x6 (12 sts)
Stuff and attach to the body. The position of the tail is completely personal preference (I kind of liked the lower tail myself).
Back Feet
Done in a chain round, where sc’s are worked into both sides of a chain to start the rnd off in an oval shape.
Main Color Back Feet Rounds
RND 1: ch 6+1, turn, 6 sc, rotate, 6 sc,
Before cutting the yarn, sl st into next st. Attach to the body following along the seam of the base and body.
Front Feet
In main color
Cut a length of yarn and thread it through the yarn needle. Working in the ‘seam’ of the base and body, find the center and start looping the yarn through a stitch. Keep building it up till it resembles a paw. Skip a few stitches and begin working the next one. Weave in ends.
Nose and Blush
In accent pink color, thread yarn needle, count four stitches in from the eye and insert the needle (leave enough yarn at the end for tying in later), skip two stitches, poke the needle through, pull yarn through, insert the needle back into the first hole, skip one stitch, move one row down, poke the needle through, pull yarn through, insert needle up one row and over the pink accent yarn, skip a stitch and poke needle through (left side of nose), pull yarn through, insert the needle back into the first hole, (optional blush if opting out just tie in ends) poke needle out near the eye for blush, skip stitch, and insert hook, repeat for the other side. Tie in ends.
- Funny Pictures
-
 Cute Cat Memes That Will Make Your Day Brighter
-
 Spot-on and Funny Memes About Introverts Struggles
-
 Top Wonderful Cat Memes on Their Way to Better Your Day
- Recipes
-
 Creamy Old Fashioned Rice Pudding
-
 Russian Tea Cakes (Snowball Cookies)
-
 Rigatoni with Sausage, Tomatoes, and Zucchini
- Lifehacks
-
 How to Crochet a Harlequin Stitch
-
 Removing The Toughest Stains
-
 Crochet Basics: Crumpled Griddle Stitch
- Crochet Ideas
-
 Crochet Christmas Tree
-
 Crochet Goblet of Fire
-
 Crochet Adorable Ammonite
- DIY
-
 DIY Snowman Wreath
-
 Mini Santa Sleigh Ornament
-
 Crochet Gingerbread House Blanket
- Knitting Ideas
-
 Knitted Easter Bunny
-
 Knitted Mobile Phone/Glasses Case
-
 Knitted Cabled Wallet