Crochet Buttercup Amigurumi: A Step-by-Step Tutorial

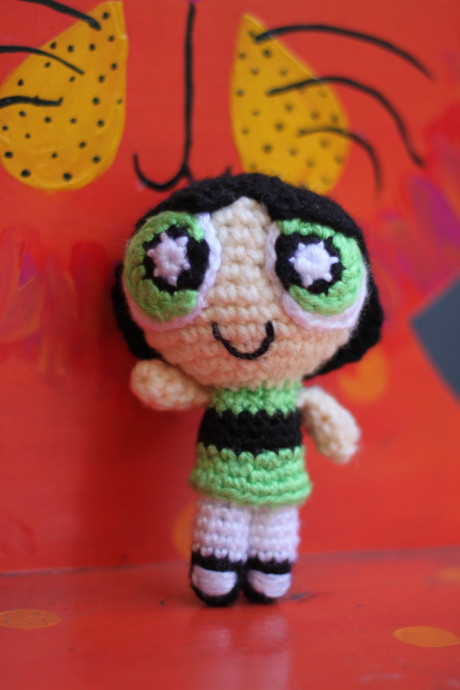
Buttercup from the Powerpuff Girls is an iconic character known for her tough and fearless personality. When you crochet a Buttercup amigurumi, you can capture her spunky attitude and green color scheme perfectly. The process of creating this crochet Buttercup is not only fun but also a great way to show your love for this beloved cartoon character. With a bit of yarn and some crochet hooks, you can bring Buttercup to life in your own unique way. So grab your materials and get ready to crochet your very own tough and adorable Buttercup to add a touch of nostalgia to your collection!
Materials Needed
- Worsted weight yarn in skin tone color, lime green, black, and white.
- G Hook
- E Hook (only the legs are done with this hook)
- Tapestry needle
Eyes (Make 2)
RND 1: With white yarn, 6 sc in magic loop. Switch to black yarn, sl st in first sc, ch 1.
RND 2: 2 sc in each st, switch to green yarn, sl st in first sc, ch 1. (12 sts)
RND 3: Hdc and dc in same st, dc in next st. *Dc twice in next st, dc in next st* Repeat from * 2 times. Hdc and sc in next st, sl st in next st. Bind off, leaving long tail for sewing.
Now, start a whole new circle.
RND 1: With white yarn magic loop 6 sc, sl st in first st, ch 1.
RND 2: 2 sc in each sc, sl st in first sc, ch 1 (12 sts).
RND 3: 1 sc in first sc, 2 sc in next around (18 sts) sl st to close, ch 1.
RND 4: 2 sc in next two sc, 2 sc in next sc around (24 sts) sl st to close, bind off. Sew iris and pupil to white.
Head
RND 1: With skin color, 6 sc in magic loop.
RND 2: 2 sc in each st around (12 sts).
RND 3: *Sc 1, 2 sc in next st* repeat 6 times (18 sts).
RND 4: *Sc 2, 2 sc in next st* repeat 6 times (24 sts).
RND 5: *Sc 3, 2 sc in next st* repeat 6 times (30 sts).
RND 6-RND 7: Sc around (30 sts).
RND 8: *Sc 4, 2 sc in next st* repeat 6 times (36 sts).
RND 9: *Sc 4, dec 1* repeat 6 times (30 sts).
RND 10-RND 11: Sc around (30 sts).
RND 12: *Sc 3, dec 1* repeat 6 times (24 sts).
RND 13: *Sc 2, dec 1* repeat 6 times (18 sts).
At this point, attach eyes, embroider mouth, and stuff with fiberfill.
RND 14: *Sc 1, dec 1* repeat 6 times (12 sts).
RND 15: Sc in every other stitch. (6 sts)
Bind off, weave in ends.
Dress
With green yarn, chain 16. Join into ring with sl st in first ch.
RND 1-RND 2: Sc around (16 sts). Switch to black yarn with invisible color change.
RND 3-RND 5: Sc around (16 sts). Switch back to green yarn with invisible color change.
RND 6: Sc 7, 2 sc in next sc twice (18 sts).
RND 7-RND 8: Sc around, sl st to close, bind off leaving tail for sewing (18 sts).
Make a green circle to sew inside the dress (you will attach the legs to this circle).
RND 1: With green yarn, 4 sc in magic loop. Sl st to close, ch 1.
RND 2: 2 sc in each sc, sl st to close, ch 1 (8 sts).
RND 3: 1 sc in first sc, 2 sc in next sc around, sl st to close, bind off (12 sts).
Stuff the dress 3/4 of the way, place circle inside dress, and sew it in place. You want it to only be 3/4 stuffed so that the legs look like they're coming out of the dress.
Arms (Make 2)
RND 1: 6 sc in magic loop.
RND 2: Sc around (6 sts).
RND 3: Sc 2 together, sc 1, sc 2 together, sc 1 (4 sts).
Sc around until desired length is reached, about 1.25". Bind off, leave tail for sewing.
Legs (Make 2)
RND 1: 5 sc in magic loop.
RND 2: 2 sc in each st around (10 sts).
RND 3-RND 4: Sc around (10 sts).
At this point, embroider stocking peep hole in shoe.
Pick up stitch and switch to white yarn.
RND 5-RND 10: Sc around (10 sts).
Bind off, leaving tail for sewing. Stuff and attach to dress.
Hair
RND 1: With black yarn, 6 sc in magic loop.
RND 2: 2 sc in each st around (12 sts).
RND 3: *Sc 1, 2 sc in next st* repeat 6 times (18 sts).
RND 4: *Sc 2, 2 sc in next st* repeat 6 times (24 sts).
RND 5: *Sc 3, 2 sc in next st* repeat 6 times (30 sts).
RND 6: *Sc 4, 2 sc in next st* repeat 6 times (36 sts).
RND 7: *Sc 5, 2 sc in next st* repeat 6 times (42 sts).
RND 8: Sc around to 42nd st, ch 1, turn (42 sts).
RND 9: Sc around back to 1st st, ch 1, turn (42 sts). This is how you will continue to shape the bangs for the next 3 rows (RND 10-RND 12).
Now you will start shaping the rest of the hair.
RND 13-RND 14: Sc around, stop when there are 8 sts left, ch 1, turn. You have now completed the bangs and will continue to make the longer part of the bob (24 sts).
RND 14-RND 18: Sc to end of row, ch 1, turn (24 sts).
RND 19: Sc in next 4 sts, sc 2 together across, ch 1, turn (18 sts).
RND 20: Sc across, ch 1, turn (18 sts).
RND 21: Sc in next 3 sts, sc 2 together across, bind off, leave a long tail for sewing (12 sts).
You should now have a little, black hair helmet. Sew it onto Buttercup's hair, being sure to position it correctly. Once it's sewn on, fold up the bottom corners from front to back and sew them together to make the bob have more of that flipped appearance.
If anyone can think of a better way to make the hair, please let me know what you did! I am still not 100% satisfied with mine. Also, I forgot to write this down as I was making it, so I tried to figure out what I did by staring real hard at the hair on the doll. If you see any horrible mistakes, or if something seems impossible, please let me know! I want to share patterns that are actually easy to use. ;)
Sew all the body parts together, and you have a Powerpuff Girl!
- Funny Pictures
-
 These are the Pics That Simply Describe Your Life
-
 Hilariously Accurate Parenting Memes That Show the Other Side of Parenthood
-
 Great Pics That Just Depict Our Lives
- Recipes
-
 Strawberry Banana Bread
-
 Baked Beans and Hot Dogs with Biscuit Topping
-
 Roasted Rosemary Lemon Chicken Breasts
- Lifehacks
-
 Crochet Tutorial: Flower Puff Stitch
-
 8 Basic Crochet Tips
-
 7 Crochet Tips And Tricks
- Crochet Ideas
-
 Crochet Snorlax Plushie Doll
-
 Crochet Cat in 1 Row
-
 Crochet Beautiful Penguin Toy
- DIY
-
 Popsicle Stick and Jingle Bell Christmas Tree Ornament
-
 Upcycled Mason Jar Chicken Vase
-
 Crochet Namaste Stephanie Doll
- Knitting Ideas
-
 Knitted Keepsake Bag
-
 Knitted Textured Heart Dishcloth
-
 Knitted Snowfall Dishcloth