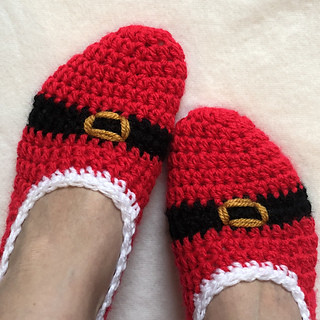
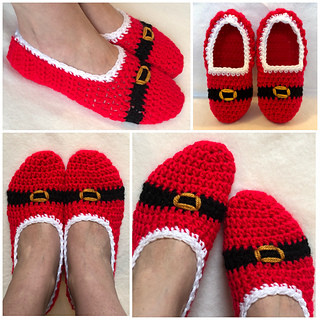
How to Crochet Slipper Socks: A Step-by-Step Guide

You’ll Need:
Worsted weight yarn / Aran weight wool;
Crochet hook 5 mm.
Size:
S (6 and smaller), M (6-10), L (10 and larger)
Instructions
In red yarn, working in the round, starting with the toe:
Expansion Rounds:
Round 1 (S/M/L): Make a magic circle and ch2, dc x 12 in circle, join, pull circle closed. [12]
Round 2 (S/M/L): ch1, *hdc x 2, 2hdc* 4 times, join. [16]
Round 3 (S/M/L): ch1, *hdc x 3, 2hdc* 4 times, join. [20]
Round 4 (M/L): ch1, *hdc x 3, 2hdc* 5 times, join. [25]
Round 5 (L): ch1, *hdc x 4, 2hdc* 5 times, join. [30]
This completes the expansion rounds for the slipper sock – the next rounds will be keeping with this stitch count and include the black ‘belt’ rounds at the front of the sock.
Small Size Instructions:
Rounds 4-5: ch1, hdc x 20, join. [20]
Rounds 6-7: in black yarn, ch1, hdc x 20, join. [20] (To create the ‘belt’)
Rounds 8-9: in red yarn, ch1, hdc x 20, join. [20]
Medium Size Instructions:
Rounds 5-6: ch1, hdc x 25, join. [25]
Rounds 7-8: in black yarn, ch1, hdc x 25, join. [25] (To create the ‘belt’)
Rounds 9-11: in red yarn, ch1, hdc x 25, join. [25]
Large Size Instructions:
Rounds 6-7: ch1, hdc x 30, join. [30]
Rounds 8-9: in black yarn, ch1, hdc x 30, join. [30] (To create the ‘belt’)
Rounds 10-13: in red yarn, ch1, hdc x 25, join. [30]
Working in Rows
For all sizes, now you will be working in rows. Do not turn work; continue working ‘right side’.
Row Instructions:
Row 10/12/14: ch1, hdc in same stitch, hdc x 13/17/21. [S=14, M=18, L=22]
Row 11/13/15: ch1 and turn work, hdc in 2nd ch from hook, hdc x 13/17/21. [S=14, M=18, L=22]
Repeat the last row until you reach the desired length for your foot size. As you want the slipper sock to be snug, I’d suggest that the slipper be at least 2-3 cm shorter than the length of your foot. If in doubt, go a little smaller rather than larger – the slipper will stretch on the foot when worn, and you don’t want them falling off!
Joining at the Heel
Turn the slipper and fold it so the last row you crocheted is in half, matching up your stitches evenly.
You can either choose to slip stitch down from the top to the bottom of the heel, or alternatively you can use a tapestry needle to get a smooth join with a mattress stitch.
To slip stitch join, ch1 and slip stitch evenly down your stitches to the base of the heel.
To mattress stitch join, cut your yarn leaving a long tail and bind off. Use the yarn tail to complete the mattress stitch join down the length of the heel to the base.
Cut yarn and weave in ends.
Upper Trim in White Yarn
Working in the round again:
Round 1: Join yarn to middle stitch at the back and ch1, sc in the same stitch and then sc evenly around the top of the slipper sock and join with a sl. st. to your first sc. (There should be 1 stitch per row down each side.)
Round 2: ch1, sc2tog, sc2tog, then sc around the rest of the stitches again until you reach the last 4 stitches, then sc2tog, sc2tog and slip stitch to join. (The decreases at the back of the heel help keep the slipper on your foot.)
Cut yarn and weave in ends.
That’s the basic slipper part done.
Decoration: Adding the Buckle
Now on to the buckle decoration!
With yellow or gold yarn, sew on a buckle design in the centre of the black rows on the front part of the slipper. Weave in ends.
- Funny Pictures
-
 Hilarious Memes for Those Bored to Tears
-
 Weekly Treat of Funniest Parenting Memes for Good Laugh out Loud Right Now
-
 Really Funny Pics to End These Weekend Perfectly
- Recipes
-
 Crispy Baked Avocado Fries
-
 Scrambled Chickpea and Spinach Pitas
-
 Cinnamon Pancakes
- Lifehacks
-
 Crochet Basics: Aligned Cobble Stitch
-
 Brick Stitch Crochet Tutorial
-
 Crochet Basics: Wattle Stitch
- Crochet Ideas
-
 Crochet Snorlax Plushie Doll
-
 Crochet Beautiful Penguin Toy
-
 Crochet Tiny Snowman
- DIY
-
 DIY Santa Craft For Kids
-
 Paper Plate Angel Craft
-
 Upcycled Mason Jar Chicken Vase
- Knitting Ideas
-
 Knitted Bridger Cowl
-
 Knitted Keepsake Bag
-
 Knitted Cutie Cupcake Dolls
Thank you for sharing this pattern!
You're welcome!