Crochet Spring Rings Potholder: A Delightful DIY Project

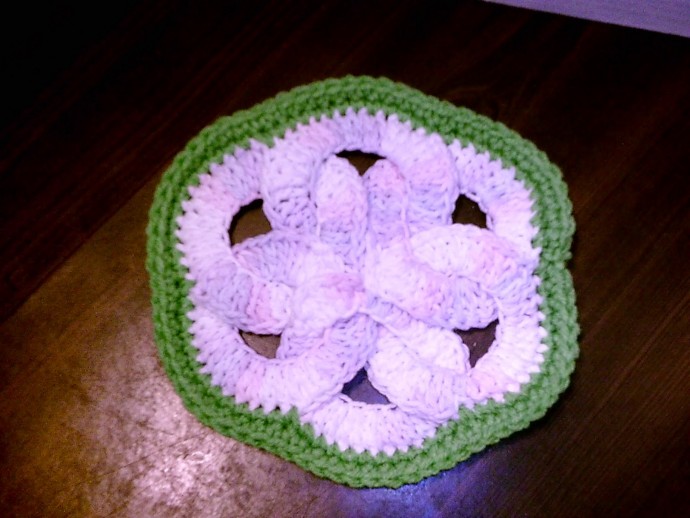
If you're looking to add a touch of charm and practicality to your kitchen, the Crochet Spring Rings Potholder is a fantastic choice! This delightful potholder combines both functionality and style, making it a perfect accessory for your cooking adventures. With its unique design featuring spring ring motifs, this potholder not only protects your hands from hot surfaces but also adds a pop of springtime cheer to your kitchen decor. Handcrafted with love and attention to detail, the Crochet Spring Rings Potholder is sure to become a favorite in your kitchen arsenal. So go ahead and crochet yourself a little piece of joy for those culinary moments that warm both your heart and your home!
I used an H hook and cotton yarn. If just using for decoration, you can use any kind of yarn you like.
Materials and Tools
- H Hook
- Cotton Yarn (or any yarn for decorative purposes)
Instructions for Crocheting the Rings
Rings
1st Ring
Chain 18, slip stitch to beginning. Chain 2, 2 double crochet in each chain around. Slip stitch to beginning. Leave tail for sewing.
2nd Ring
Chain 18, put tail of chain through the first ring. Slip stitch to beginning. Rings joined. Chain 2, 2 double crochet in each chain around. Slip stitch to beginning. Fasten off and weave in ends.
3rd to 5th Rings
Repeat the same process as the 2nd ring.
6th Ring
Chain 18, put tail through the 1st and 5th rings to join all the rings together. Chain 2, 2 double crochet in each chain around. Slip stitch to beginning. Fasten off and leave tail for sewing.
Assemble the Potholder
Take the tails from the 1st and 6th rings and sew the middle of all rings together to close the circle in the middle and join all the rings.
Adding the Border
1st Round of Border
Attach yarn to the 1st ring and single crochet in 10 stitches across the top. Single crochet in the 11th stitch of the 1st ring and a stitch in the 2nd ring together. Continue the following:
- Single crochet 10 stitches across the top of the 2nd ring.
- Single crochet in the 11th stitch of the 2nd ring and a stitch in the 3rd ring together.
- Single crochet 10 stitches across the top of the 3rd ring.
- Single crochet in the 11th stitch of the 3rd ring and a stitch in the 4th ring together.
- Single crochet 10 stitches across the top of the 4th ring.
- Single crochet in the 11th stitch of the 4th ring and a stitch in the 5th ring together.
- Single crochet 10 stitches across the top of the 5th ring.
- Single crochet in the 11th stitch of the 5th ring and a stitch in the 6th ring together.
- Single crochet 10 stitches across the top of the 6th ring.
Slip stitch to the beginning.
2nd Round of Border
Single crochet in each stitch around. Slip stitch to the beginning. Fasten off and weave in ends.
- Funny Pictures
-
 Hilarious Memes for Those Bored to Tears
-
 Weekly Treat of Funniest Parenting Memes for Good Laugh out Loud Right Now
-
 Really Funny Pics to End These Weekend Perfectly
- Recipes
-
 Crispy Baked Avocado Fries
-
 Scrambled Chickpea and Spinach Pitas
-
 Cinnamon Pancakes
- Lifehacks
-
 Crochet Basics: Aligned Cobble Stitch
-
 Brick Stitch Crochet Tutorial
-
 Crochet Basics: Wattle Stitch
- Crochet Ideas
-
 Crochet Snorlax Plushie Doll
-
 Crochet Beautiful Penguin Toy
-
 Crochet Tiny Snowman
- DIY
-
 DIY Santa Craft For Kids
-
 Paper Plate Angel Craft
-
 Upcycled Mason Jar Chicken Vase
- Knitting Ideas
-
 Knitted Bridger Cowl
-
 Knitted Keepsake Bag
-
 Knitted Cutie Cupcake Dolls