Crochet Daisy Head Wall Hanging: A Whimsical Floral Decor Item

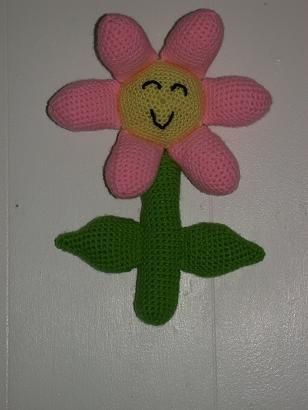
Looking for a charming way to spruce up your space? The Crochet Daisy Head Wall Hanging is here to spread some floral cheer! With its whimsical design and sunny vibes, this delightful piece adds a sweet touch to any room. Handcrafted with love and attention to detail, each crochet daisy blooms with pastel petals and a joyful spirit. Whether hung in your bedroom, living room, or home office, this wall hanging is sure to brighten your day and bring a smile to your face. Embrace the beauty of nature indoors with this adorable Crochet Daisy Head Wall Hanging - a cute and crafty addition to your decor that radiates warmth and happiness.
Materials
- Size "G" hook
- Yarn needle
- Fiber-fill
- Small amount of black yarn
- Pink or other pastel color worsted weight yarn for petals
- Yellow and green worsted weight yarn
Notes
dec - (decrease) - draw up a loop in each of the next 2 stitches, yarn over, draw through all loops on hook.
Pattern
Petals
(make 6) with pink, ch 2
Rnd 1: 6 sc in 2nd ch from hook, join with sl st
Rnd 2: ch 1, (sc, 2 sc in next st) around, join with sl st; 9 sc
Rnd 3: ch 1, (2 sc, 2 sc in next st) around, join with sl st; 12 sc
Rnd 4: ch 1, (3 sc, 2 sc in next st) around, join with sl st; 15 sc
Rnd 5: ch 1, (4 sc, 2 sc in next st) around, join with sl st; 18 sc
Rnd 6: ch 1, (5 sc, 2 sc in next st) around, join with sl st; 21 sc
Rnd 7-11: ch 1, sc around, join with sl st
Rnd 12: ch 1, (5 sc, dec) around, join with sl st; 18 sc
Rnd 13-15: ch 1, sc around, join with sl st
Finish off.
Flower Center
(make 2) with yellow, ch 2
Rnd 1: 6 sc in 2nd ch from hook, join with sl st
Rnd 2: ch 1, (2 sc in each st) around, join with sl st; 12 sc
Rnd 3: ch 1, (sc, 2 sc in next st) around, join with sl st; 18 sc
Rnd 4: ch 1, (2 sc, 2 sc in next st) around, join with sl st; 24 sc
Rnd 5: ch 1, (3 sc, 2 sc in next st) around, join with sl st; 30 sc
Rnd 6: ch 1, (4 sc, 2 sc in next st) around, join with sl st; 36 sc
Rnd 7: ch 1, (5 sc, 2 sc in next st) around, join with sl st; 42 sc
Rnd 8: ch 1, (6 sc, 2 sc in next st) around, join with sl st; 48 sc
Rnd 9: ch 1, (7 sc, 2 sc in next st) around, join with sl st; 54 sc
Rnd 10-11: ch 1, sc around, join with sl st
Finish off.
Leaves
(make 2) with green, ch 2
Rnd 1: 4 sc in 2nd ch from hook, join with sl st
Rnd 2: ch 1, (sc, 2 sc in next st) 2x, join with sl st; 6 sc
Rnd 3: ch 1, (2 sc, 2 sc in next st) 2x, join with sl st; 8 sc
Rnd 4: ch 1, (3 sc, 2 sc in next st) 2x, join with sl st; 10 sc
Rnd 5: ch 1, (4 sc, 2 sc in next st) 2x, join with sl st; 12 sc
Rnd 6: ch 1, * 4 sc, (2 sc in next st) 2x, repeat from * around, join with sl st; 16 sc
Rnd 7: ch 1, (5 sc, 2 sc in next st, sc, 2 sc in next st) 2x, join with sl st; 20 sc
Rnd 8: ch 1, (7 sc, 2 sc in next st, 2 sc, 2 sc in next st) 2x, join with sl st; 24 sc
Rnd 9-12: ch 1, sc around, join with sl st
Rnd 13: ch 1, (4 sc, dec) around, join with sl st; 20 sc
Rnd 14: ch 1, sc around, join with sl st
Rnd 15: ch 1, (3 sc, dec) around, join with sl st; 16 sc
Rnd 16: ch 1, sc around, join with sl st
Finish off.
Stem
With green, ch 2
Rnd 1: 6 sc in 2nd ch from hook, join with sl st
Rnd 2: ch 1, (2 sc in each st) around, join with sl st; 12 sc
Rnd 3: ch 1, (sc, 2 sc in next st) around, join with sl st; 18 sc
Rnd 4-33: ch 1, sc around, join with sl st
Finish off.
Finishing and Assembly
Using photos as a guide, embroider a face on one flower center with black yarn. Holding wrong sides together, sew flower centers together with yellow yarn, stuffing lightly before closing the seam. Stuff flower petals lightly and attach to the center using pink yarn. Using green yarn, attach the stem to the bottom of the flower center on the back. Still using green, attach leaves to the stem.
Attach a hanger of your choosing or simply insert a hook into a stitch for hanging.
- Funny Pictures
-
 Hilarious Memes for Those Bored to Tears
-
 Weekly Treat of Funniest Parenting Memes for Good Laugh out Loud Right Now
-
 Really Funny Pics to End These Weekend Perfectly
- Recipes
-
 Crispy Baked Avocado Fries
-
 Scrambled Chickpea and Spinach Pitas
-
 Cinnamon Pancakes
- Lifehacks
-
 Crochet Basics: Aligned Cobble Stitch
-
 Brick Stitch Crochet Tutorial
-
 Crochet Basics: Wattle Stitch
- Crochet Ideas
-
 Crochet Snorlax Plushie Doll
-
 Crochet Beautiful Penguin Toy
-
 Crochet Tiny Snowman
- DIY
-
 DIY Santa Craft For Kids
-
 Paper Plate Angel Craft
-
 Upcycled Mason Jar Chicken Vase
- Knitting Ideas
-
 Knitted Bridger Cowl
-
 Knitted Keepsake Bag
-
 Knitted Cutie Cupcake Dolls