DIY Crochet Wall Hanging Sconce for Cozy Home Decor

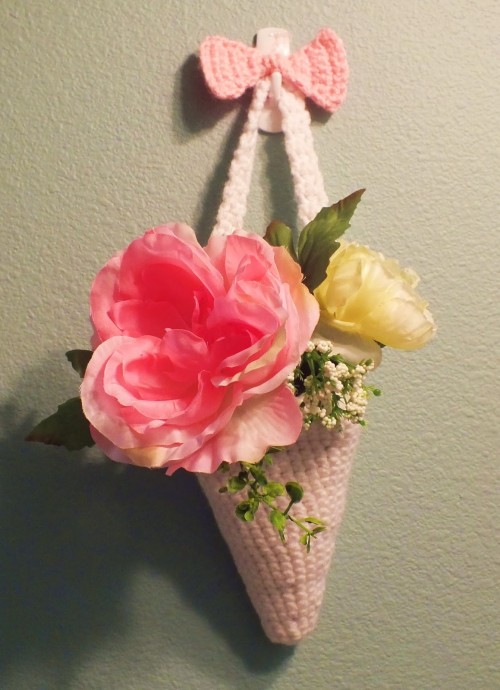
Looking to add a touch of charm to your home decor? A Crochet Wall Hanging Sconce could be just the thing you need! This unique and cozy piece combines the warmth of crochet with the functionality of a sconce, creating a soft and inviting ambiance in any room. Whether you hang it in your living room, bedroom, or even your office, this delightful sconce will surely catch the eye of your guests and bring a smile to your face every time you see it. With its handmade feel and timeless design, the Crochet Wall Hanging Sconce is a lovely addition to any space that is sure to spark conversations and spread warmth throughout your home.
Materials Used to Make Sconces
To create your Crochet Wall Hanging Sconce, you will need the following materials:
- G Hook
- Yarns in any color
- Needle & thread
Instructions to Create the Sconce
Starting the Base
Ch 2
Row 1: wk 6sc in the 2nd ch st - 6sts
Row 2: wk 2sc in each st - 12sts
Rows 3-4: 1sc in each st around - 12sts
Row 5: wk 1sc, 2sc in the next st, repeat - 18sts
Rows 6-8: 1sc in each st around - 18sts
Row 9: wk 1sc in the next 2 sts, 2sc in the next, repeat - 24sts
Rows 10-12: 1sc in each st around - 24sts
Row 13: wk 1sc in the next 3 sts, 2sc in the next, repeat - 30sts
Rows 14-17: 1sc in each st - 30sts
Row 18: wk 1sc in the next 4 sts, 2sc in the next, repeat - 36sts
Rows 19-21: 1sc in each st around - 36sts
Row 22: wk 1sc in the next 5sts, 2sc in the next, repeat - 42sts
Rows 23-28: 1sc in each st around, FO - 42sts
Creating the Handle
To Make the Handle
Ch 3
wk 1sc in 2sts, ch 1 and turn
Repeat this for about 30 rows or so. You want it to have a little space above whatever you decide to hang. When sewing the handle on, make sure that they hang right. Pin each side and fill it with whatever you'll be hanging, adjust and sew in place.
Making the Bow
To Make the Bow
Ch 9
Row 1: wk 1sc in 8 sts, ch 1 and turn.
Row 2: wk 1dec, 1sc in 4 sts, 1dec, ch 1 and turn.
Row 3: 1sc in the next 6 sts, ch 1 and turn.
Row 4: wk 1dec, 1sc in next 2 sts, 1dec, ch 1 and turn.
Row 5: 1sc in the next 4 sts, ch 1 and turn.
Row 6: wk 1dec, 1dec, ch 1 and turn.
Row 7: wk 2sc in the 1st st, 2sc in the next, ch and turn.
Row 8: 1sc in 4 sts, ch 1 and turn.
Row 9: 2sc in the 1st st, 1sc in the next 2 sts, 2sc in the last, ch 1 and turn.
Row 10: 1sc in 6 sts, ch 1 and turn.
Row 11: wk 2sc in the 1st st, 1sc in 4 sts, 2sc in the last, ch 1 and turn.
Row 12: 1sc in 8 sts, and FO.
Finishing Touches for the Bow
To Make the Center of the Bow
Ch 3
wk 1sc in the next 2 sts
Do this until it fits around the center of the bow, sew in place. Pinch it together so it fits snug. Sew it on the handle. I made two bows for the yellow sconce because the yarn was very light and it kept curling. I just sewed the two together and made my center a little longer to fit around both bows.
- Funny Pictures
-
 Hilarious Memes for Those Bored to Tears
-
 Weekly Treat of Funniest Parenting Memes for Good Laugh out Loud Right Now
-
 Really Funny Pics to End These Weekend Perfectly
- Recipes
-
 Crispy Baked Avocado Fries
-
 Scrambled Chickpea and Spinach Pitas
-
 Cinnamon Pancakes
- Lifehacks
-
 Crochet Basics: Aligned Cobble Stitch
-
 Brick Stitch Crochet Tutorial
-
 Crochet Basics: Wattle Stitch
- Crochet Ideas
-
 Crochet Snorlax Plushie Doll
-
 Crochet Beautiful Penguin Toy
-
 Crochet Tiny Snowman
- DIY
-
 DIY Santa Craft For Kids
-
 Paper Plate Angel Craft
-
 Upcycled Mason Jar Chicken Vase
- Knitting Ideas
-
 Knitted Bridger Cowl
-
 Knitted Keepsake Bag
-
 Knitted Cutie Cupcake Dolls