Crochet Lacet Trellis Bookmark Tutorial

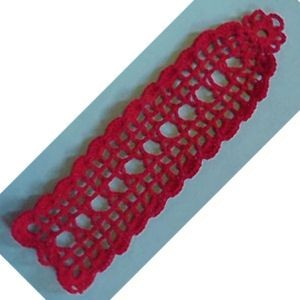
If you're looking for a creative and charming way to bookmark your favorite novels, the Crochet Lacet Trellis Bookmark is the perfect choice! With its delicate lace design and intricate details, this handmade treasure is sure to add a touch of elegance to your reading adventures. Whether you're diving into a classic novel or exploring the pages of a thrilling mystery, this charming bookmark will be your faithful companion, keeping your place in style. Crafted with love and attention to detail, the Crochet Lacet Trellis Bookmark is not just a practical accessory but also a piece of art that will make your reading experience even more special. So go ahead, treat yourself to this lovely bookmark and let your reading journey blossom with beauty and uniqueness!
Materials Needed
- Small amount of size 10 crochet cotton. Southmaid in red was used in the example.
- Size 7 steel crochet hook.
- Tapestry needle for weaving in ends.
Specifications
- Thread Thickness: 10 thread
- Gauge: 10 sc = 1"
- Finished Size: 8" x 2½"
- Skill Level: Beginner to intermediate
Instructions
Starting Round
Ch6, join with a slst to the first ch to form a ring. Ch1. 17 sc in the ring. Join with a slst, ch1.
Working in Rows
Row 1
Ch5. Dc in the same st as slst. Ch2. Sk next sc. Dc, ch2, dc in next sc. Ch2. Dc, ch2, dc in next sc. Ch5, turn.
Row 2
Dc in the next dc. Ch2. Dc in next dc. Ch2. Sc in next ch2 sp. Ch2. Dc in next dc. Ch2. Dc in next dc. Ch2. Dc in 3rd ch of ch5. Ch5, turn.
Row 3
Dc in the next dc. Ch2. Dc in next dc. Ch5. Dc in next dc. Ch2. Dc in next dc. Ch2. Dc in 3rd ch of ch5. Ch5, turn.
Row 4
Dc in the next dc. Ch2. Dc in next dc. Ch2. Sc in next ch5 sp. Ch2. Dc in next dc. Ch2. Dc in 3rd ch of ch5. Ch5, turn.
Row 5-24
Repeat Rows 3 and 4 consecutively. You will end with Row 4.
Perimeter of Bookmark
Treat each row as a ch3 space and treat the top 2 corners as ch5 corner spaces.
Ch3. 5 dc in the first ch5 corner space. Sc in the next ch3 space. (5 dc in the next ch3 space. Sc in the next ch3 space. Eleven times)
Final Steps
Now you will work on the starting ring. Sc in the first unworked sc. Ch5. Sk next sc. Sc in the next sc. Ch5. Sk next sc. Sc in the next sc. Dc in the next sc. Ch5. Dc in the next dc. Sc in the next sc. Ch5. Sk next sc. Sc in the next sc. Ch5. Sk next sc. Sc in the next sc.
You should now be at the other side. Sc in the first ch3 space of the right-hand side of the bookmark. (5 dc in the next ch3 space. Sc in the next ch3 space. Eleven times) 5 dc, ch2, 5 dc in the next ch5 corner space. Sc in the next ch2 space. Sk next ch2 space. 2 dc, ch3, 2 dc in next sc. Sk next ch2 space. Sc in next ch2 space. 5 dc in the next ch5 corner space. Ch2. Join with slst to the top of ch3.
Fasten off and weave all ends into the back of the work.
- Funny Pictures
-
 These are the Pics That Simply Describe Your Life
-
 Hilariously Accurate Parenting Memes That Show the Other Side of Parenthood
-
 Great Pics That Just Depict Our Lives
- Recipes
-
 Crispy Baked Avocado Fries
-
 Baked Beans and Hot Dogs with Biscuit Topping
-
 Roasted Rosemary Lemon Chicken Breasts
- Lifehacks
-
 Crochet Basics: Twisted Fringe
-
 7 Crochet Tips And Tricks
-
 How To Work Crochet Into Denim
- Crochet Ideas
-
 Crochet Snorlax Plushie Doll
-
 Crochet Cat in 1 Row
-
 Crochet Beautiful Penguin Toy
- DIY
-
 Popsicle Stick and Jingle Bell Christmas Tree Ornament
-
 Upcycled Mason Jar Chicken Vase
-
 Crochet Namaste Stephanie Doll
- Knitting Ideas
-
 Knitted Keepsake Bag
-
 Knitted Textured Heart Dishcloth
-
 Knitted Snowfall Dishcloth