Crochet the Frosty Trellis Scarf

Introduction
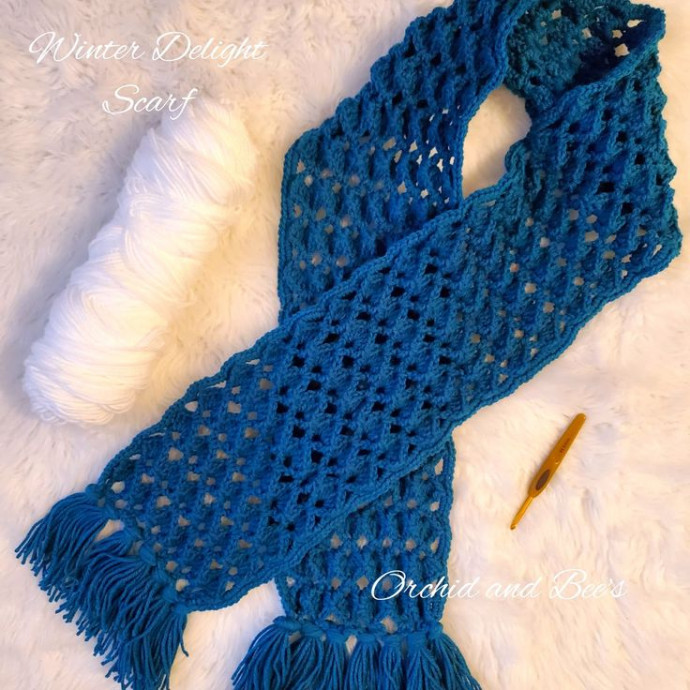
If you're looking for a fun and creative project to work on, why not try crocheting the Frosty Trellis Scarf? This charming scarf pattern combines intricate stitches with a cozy design, perfect for keeping you warm during the winter months. With a frosty color palette, this scarf adds a touch of elegance to any outfit. Whether you're a seasoned crocheter or a beginner looking to learn a new skill, this project is a great way to showcase your creativity and style. So grab your crochet hook and yarn, and let's get stitching on this delightful Frosty Trellis Scarf!
Pattern Details
Ok, let's get to the details of this pattern now! The original scarf in the cover photo of this post is approximately 7 inches wide and 70 inches long without the fringe and 79 inches long with the fringe.
You can easily go up or down a hook size if you want it larger or smaller, as well as adjust the number of rows or beginning chains via the info in the gauge section. The gauge info is as follows:
- Multiples of 4 + 1
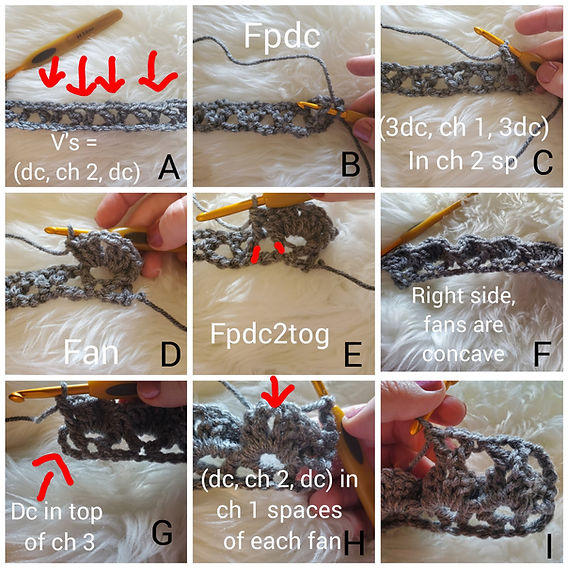
- Each additional ch 4 adds 1 more fan (see stitch key) to the row which adds approximately one more inch to the width (you can also view the fans in Box D & F on the last page).
- Two rows (rows 2 & 3) are the repeat rows and equal approximately an inch and a half in length.
Size Adjustments
As I briefly mentioned above, I have also included the details for if you want to try this as a shawl and/or even a baby blanket by simply adjusting the beginning chain for the width and then work as many rows as desired for the length you need. To achieve each size you will adjust the beginning chain as follows:
- Small - 28 in x 80 in (ch 117)
- Medium - 40 in x 80 in (ch 165)
- Large - 45 in x 80 in (ch 185)
- XL/Wrap - 54 in x 80 in (ch 221)
- Crib Blanket - 54 in x 36 in (ch 221)
After row 3, you will repeat rows 2 & 3 until you reach the desired length if you do not want to go to 80 inches.
Materials Needed
This is a pattern for a confident beginner/intermediate crocheter and it is written in American standard terms. For the materials, you will need the following:
- Yarn: Worsted Weight 4 (I used Loops and Threads Impeccable Brite Sky Blue)
- Approximately 8 oz or 570 to 600 yards
- Hook - H 5 mm
- Scissors
Stitch Key
- Sc - single crochet
- Ch - chain
- Sl st - slip stitch
- Dc - double crochet
- Sk - skip a stitch
- ( ) - do all in same st
- St # - do stitch in the next number of stitches
- * * - repeat *to*
- Fpdc - front post double crochet
- Fpdc2Tog - front post double crochet two stitches together
- Fan - (3dc, ch 1, 3dc)
- V - (dc, ch 2, dc)
Crochet Pattern Instructions
Note: Use boxes in the photo grid below Round 80 in the instructions below for assistance with this pattern.
Begin: Chain 29
Row 1: (Dc in the 6th ch from the hook, ch 2, dc in the same ch sp), sk 3, *(dc, ch 2, dc) all in the same stitch, sk 3*, repeat across, sk 2, dc in the last ch, ch 3. (6 V’s see stitch key for assistance) and/or see Box A
Row 2: Turn, Fpdc (see Box B), *(3dc, ch 1, 3dc) all in the ch 2 space (see Box C), fpdc2tog (see Box E)*, repeat across, fpdc in the last dc, dc in top of ch 3 (see Box G), ch 3. (6 Fans see stitch key for assistance) (see Box D)
Row 3: Turn, *(dc, ch 2, dc) in ch 1 space of each fan (see Box H & I)*, repeat across, dc in top of ch 3 (see Box G), ch 3. (6 V’s)
Row 4 - 79: Repeat Row 2 & 3 (after the last dc in row 79 only ch 1 instead of ch 3)
Note: will be switching to a round here.
Note: If you want to make the scarf longer or reach one of the shawl lengths, you can add additional repeat rows of 2 & 3 here before proceeding to the finishing Round 80.
Round 80: Turn, sc around all 4 edges of the scarf, sl st to join to the first sc, fasten off.
Adding Fringe
How I Added Fringe
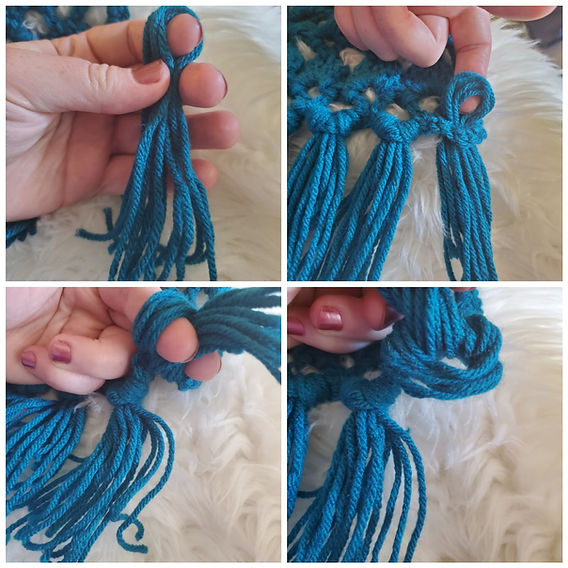
Cut yarn into double the length that you want your fringe to be. I cut mine approximately 12 inches in length and I made 7 sets with 22 pieces each. You can make as many or as few as you desire.
I then folded my yarn in half and formed a loop. With the wrong side of the scarf facing me (the fans will be convex, the right side will be concave as shown in Box F), I pushed the loop through the underside of the scarf.
Then I took the loose ends of the yarn and pulled it through the loop and pulled tight.
- Funny Pictures
-
 These are the Pics That Simply Describe Your Life
-
 Hilariously Accurate Parenting Memes That Show the Other Side of Parenthood
-
 Great Pics That Just Depict Our Lives
- Recipes
-
 Crispy Baked Avocado Fries
-
 Baked Beans and Hot Dogs with Biscuit Topping
-
 Roasted Rosemary Lemon Chicken Breasts
- Lifehacks
-
 Crochet Basics: Twisted Fringe
-
 7 Crochet Tips And Tricks
-
 How To Work Crochet Into Denim
- Crochet Ideas
-
 Crochet Snorlax Plushie Doll
-
 Crochet Cat in 1 Row
-
 Crochet Beautiful Penguin Toy
- DIY
-
 Popsicle Stick and Jingle Bell Christmas Tree Ornament
-
 Upcycled Mason Jar Chicken Vase
-
 Crochet Namaste Stephanie Doll
- Knitting Ideas
-
 Knitted Keepsake Bag
-
 Knitted Textured Heart Dishcloth
-
 Knitted Snowfall Dishcloth