Crochet Open Lace Angel: A Delightful Craft Project

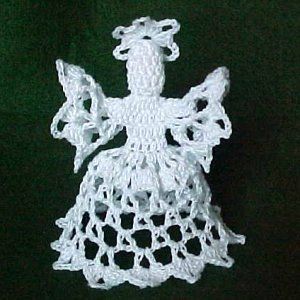
The Crochet Open Lace Angel is a delightful project that combines intricate stitches with a touch of elegance. This charming creation is perfect for adding a festive touch to your home decor or gifting to a loved one. With its intricate open lace design, the angel exudes a sense of grace and beauty that will surely make it a standout piece in any room. Whether you're an experienced crocheter looking for a new challenge or a beginner eager to learn something new, this pattern is a joy to work on and will result in a stunning finished product. So grab your crochet hook and some yarn, and let's create some magic with this enchanting Crochet Open Lace Angel!
Materials Needed
- Size 10 crochet cotton in White. Southmaid was used in the example.
- Size 7 steel crochet hook.
- Tapestry Needle for weaving in ends.
- Fabric Stiffener, optional.
- Hot Glue.
- Ornament Hanger.
Yarn Specifications
Yarn Thickness: 10 thread
Gauge: 10 sc = 1"
Finished Size: 4"h x 4"w
Skill Level: Beginner
Instructions
RND 1: Ch2. 6sc in 2nd ch from hook. Join w/slst to first sc.
RND 2: Ch2. Hdc in same st as slst. 2 hdc in each st around. Join w/slst to top of ch2.
RND 3-4: Ch2. Hdc in each st around. Join w/slst to top of ch2.
RND 5: Ch2. Yo, insert hook in next st. Pull up a lp, yo, pull through 2 lps on hook, insert hook in next st, pull up a lp, yo, draw through all lps on hook. Dec made. Dec all the way around so you end up with 6 sts around. Join w/slst to top of ch2.
RND 6: Ch3. 2dc in same st as slst. 3dc in each st around. Join w/slst to top of ch3. (18 sts) Now is the best time to stuff the head.
RND 7: Ch3. Dc in each of the next 2 dc. 3dc in each of the next 3 dc. Dc in each of the next 6 dc. 3dc in each of the next 3 dc. Dc in each of the next 3 dc. Join w/slst to top of ch3.
RND 8: Ch3. Dc in each of the next 2 dc. Sk 9 dc. Dc in each of the next 6 dc. Sk 9 dc. Dc in each of the last 3 dc. Join w/slst to top of ch3.
RND 9: Ch3. Dc in each dc around. Join w/slst to top of ch3.
RND 10: Ch5. Dc in same st as slst. ch2. *Dc, ch2, dc in next dc. Ch2. Rep from * around. Join w/slst to 3rd ch of ch5.
RND 11: Slst into the first ch2 sp. Ch5. Dc in same sp. 3dc in next ch2 sp. *Dc, ch5, dc in next ch2 sp. 3dc in next ch2 sp. Rep from * around. Join w/slst to 3rd ch of ch5.
RND 12: Slst into the next ch2 sp. Ch5. Dc in same sp. Ch3. *Dc, ch2, dc in next ch2 sp. Ch3. Rep from * around. Join w/slst to 3rd ch of ch5.
RND 13-16: Slst in each of the next 2 chs. Slst into the next dc. Slst into the next 2 chs. Ch5. Dc in same ch3 sp. Ch3. *Dc, ch2, dc in next ch3 sp. Ch3. Rep from * around. Join w/slst to 3rd ch of ch5.
RND 17: Slst into the next ch2 sp. Ch3, 2dc, ch5, 3dc in same sp. Sc in next ch3 sp. *3dc, ch5, 3dc in next ch2 sp. Sc in next ch3 sp. Rep from * around. Join w/slst to top of ch3. Fasten off.
Wings
Wings RND 1: Work both sides the same. Join thread to next unworked dc on round 7. Ch5. Dc in same st. Ch3. Sk 1 st. *Dc, ch2, dc in next st. Ch3. Sk 1 st. Rep from * 3 times more. Join w/slst to 3rd ch of ch5.
Wings RND 2: Slst in next 2 chs. Slst in next dc. Slst in next 2 chs. slst into the ch3 sp. Ch5. Dc in same sp. Ch3. *Dc, ch5, dc in next ch3 sp. Ch3. Rep from * around. Join w/slst to 3rd ch of ch5.
Wings RND 3: Slst into the next ch2 sp. Ch3, 2dc, ch5, 3dc in same sp. Sc in next ch3 sp. *3dc, ch5, 3dc in next ch2 sp. Sc in next ch3 sp. Rep from * around. Join w/slst to top of ch3. Fasten off & weave ends into back of work. Repeat Wings 1-3 on other side.
Halo
Halo: Ch6. Join w/slst to first ch to form ring. Ch3. 2dc in ring. Ch5. *3dc, ch5. Rep from * 4 times more. Join w/slst to top of ch3. Fasten off. Weave ends into back of work.
Finishing
Stiffen halo. Stiffen skirt and wings of angel. When dry, hot glue halo to back of head. You can skip the step of stiffening if you want to and just glue the halo to the back of head if you prefer a soft, pliable effect. Attach hanger to top of head.
- Funny Pictures
-
 Hilarious Memes for Those Bored to Tears
-
 Weekly Treat of Funniest Parenting Memes for Good Laugh out Loud Right Now
-
 Really Funny Pics to End These Weekend Perfectly
- Recipes
-
 Crispy Baked Avocado Fries
-
 Scrambled Chickpea and Spinach Pitas
-
 Cinnamon Pancakes
- Lifehacks
-
 Crochet Basics: Aligned Cobble Stitch
-
 Brick Stitch Crochet Tutorial
-
 Crochet Basics: Wattle Stitch
- Crochet Ideas
-
 Crochet Snorlax Plushie Doll
-
 Crochet Beautiful Penguin Toy
-
 Crochet Tiny Snowman
- DIY
-
 DIY Santa Craft For Kids
-
 Paper Plate Angel Craft
-
 Upcycled Mason Jar Chicken Vase
- Knitting Ideas
-
 Knitted Bridger Cowl
-
 Knitted Keepsake Bag
-
 Knitted Cutie Cupcake Dolls