Crochet Beaded Oval Frame Fridgie

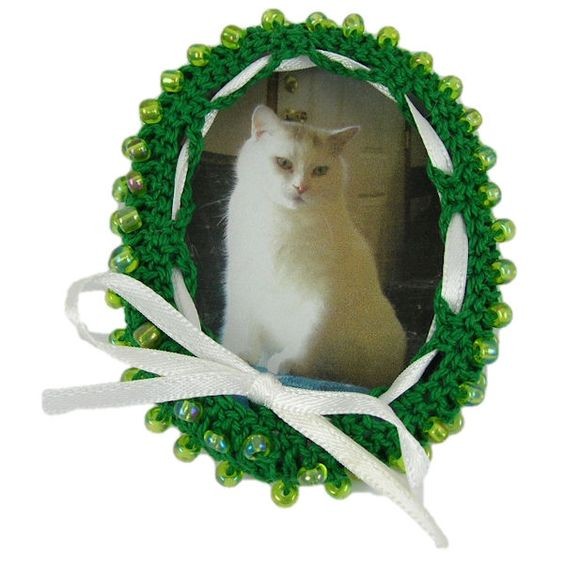
Oh, the Crochet Beaded Oval Frame Fridgie is a delightful little creation that adds a touch of charm to any space! This unique piece is not only practical for holding notes or photos on the fridge but also brings a handmade touch to your home décor. With its lovely oval shape and intricate beaded design, it's sure to catch the eye of anyone who passes by. Whether you're a crochet enthusiast looking for a fun project or someone who appreciates the beauty of handmade items, this fridgie is a wonderful addition to any home. So go ahead, add a little bit of whimsy and creativity to your kitchen with the Crochet Beaded Oval Frame Fridgie!
Materials Needed
- Size 10 crochet cotton in green
- 64 E Beads of desired color
- 1 lid from an oval Crystal Light Container
- Size 7 steel crochet hook
- Scrap piece of paper
- Stamp pad
- Magnet Tape
- 24" 1/8" wide white satin ribbon
- Wallet Sized Picture for frame
Project Details
Yarn Thickness: 10 thread
Gauge: 8 dc = 1"
Finished Size: approx. 2½" x 3¼"
Skill Level: Intermediate
Special Stitch
Beaded Double Crochet (beaded dc): Yo, insert hook in st indicated, yo, pull up a loop, yo, pull through 2 loops on hook, bring up a bead, yo, pull through last 2 loops on hook.
Instructions
Preparation
String all beads onto thread.
Round Instructions
RND 1: Ch 12. 2 dc in 4th ch from hook. Dc in each of the next 7 chs. 3 dc in last ch. 3 dc in same last ch but on the other side to turn corner. Dc in each of the next 7 sts. 3 dc in last st. Join w/slst to top of ch 3. (26 dc)
RND 2: Ch 3, dc in same st as slst. 2 dc in each of the next 2 dc. Dc in each of the next 7 dc. 2 dc in each of the next 6 dc. Dc in each of the next 7 dc. 2 dc in each of the next 3 dc. Join w/slst to top of ch 3. (38 dc)
RND 3: Ch 3, dc in same st as slst. Dc in next dc. 2 dc in next dc, dc in next dc, twice. Dc in each of the next 7 dc. 2 dc in next dc, dc in next dc, 6 times. Dc in each of the next 7 dc. 2 dc in next dc, dc in next dc, 3 times. Join w/slst to top of ch 3. (50 dc)
RND 4: Ch 3, dc in same st as slst. Dc in each of the next 2 dc. 2 dc in next dc, dc in each of the next 2 dc, twice. 2 dc in next dc. Dc in each of the next 6 dc. 2 dc in next dc, dc in each of the next 2 dc, 6 times. 2 dc in next dc. Dc in each of the next 6 dc. 2 dc in next dc, dc in each of the next 2 dc, 3 times. Join w/slst to top of ch 3. (64 dc)
RND 5: Ch 1, sc in same st as slst and in each dc around. Join w/slst to first sc.
RND 6: Ch 3. Working in back lp only for this round. Beaded dc in next st. *Dc in next st. Beaded dc in next st. Rep from * around. Join w/slst to top of ch 3. (64 dc)
RND 7: Ch 1, pull up a bead, ch 2. Dc in next st. *Beaded dc in next st. Dc in next st. Rep from * around. Join w/slst to top of ch 3. (64 dc)
RND 8: Ch 1, sc in same st as slst. Sc in next st. Ch 2. Sk 2 sts. *Sc in each of the next 2 sts. Ch 2. Sk 2 sts. Rep from * around. Join w/slst to first sc. Fasten off and weave all ends into back of work. Weave ribbon through last round.
Assembly Steps
Step 1
Use stamp pad & press top of lid into pad and press onto piece of paper to make a template.
Step 2
Cut out template making sure to cut on the inside of the lines.
Step 3
Use template and trace onto picture for inside of frame.
Step 4
Put picture inside of lid.
Step 5
Place lid inside crochet work pulling edges up over the rim of lid.
Step 6
Gather up ribbon and tie into a bow. Trim ends of ribbon.
- Funny Pictures
-
 Hilarious Memes for Those Bored to Tears
-
 Weekly Treat of Funniest Parenting Memes for Good Laugh out Loud Right Now
-
 Really Funny Pics to End These Weekend Perfectly
- Recipes
-
 Crispy Baked Avocado Fries
-
 Baked Beans and Hot Dogs with Biscuit Topping
-
 Roasted Rosemary Lemon Chicken Breasts
- Lifehacks
-
 Crochet Basics: Twisted Fringe
-
 7 Crochet Tips And Tricks
-
 How To Work Crochet Into Denim
- Crochet Ideas
-
 Crochet Snorlax Plushie Doll
-
 Crochet Cat in 1 Row
-
 Crochet Beautiful Penguin Toy
- DIY
-
 Popsicle Stick and Jingle Bell Christmas Tree Ornament
-
 DIY Santa Craft For Kids
-
 Paper Plate Angel Craft
- Knitting Ideas
-
 Knitted Bridger Cowl
-
 Knitted Keepsake Bag
-
 Knitted Cutie Cupcake Dolls