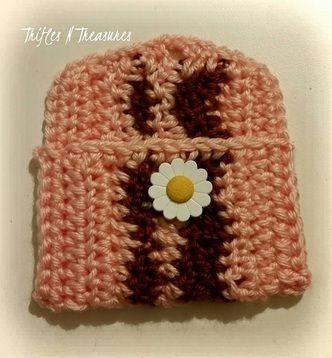
Crochet Little Ripples Gift Card Envelope

Introduction
The Crochet Little Ripples Gift Card Envelope is a delightful and practical way to add a personal touch to your gift-giving. With its charming design and intricate crochet work, this envelope is perfect for making any gift extra special. The ripple pattern gives it a unique and stylish look that will surely impress the recipient. Not only is this envelope adorable, but it's also a sustainable option that can be reused many times over. Whether you're giving a gift card for a birthday, holiday, or any special occasion, this handmade envelope adds an extra layer of warmth and thoughtfulness to your present. It's a small but significant detail that shows you care.
Materials Used
- Light worsted weight yarn (Models created in Caron Simply Soft) in 2 colors
- Size G/6 (4.25mm) crochet hook
- 1 button
- Needle and thread
Size and Gauge
Finished models measure approximately 4" wide, and 2.75" tall, when closed.
Gauge: 8 hdc sts = 2"
5 hdc rows = 2"
Stitches Used/Abbreviations
- Ch - chain
- Sc - single crochet
- Hdc - half double crochet
- Dc - double crochet
- Sl st - slip stitch
Instructions
Row Instructions
Row 1: With Color A, ch 26. Hdc in 2nd ch from hook, and each remaining ch. (25 sts)
Row 2: ch 1, TURN. *Sc in next st. Hdc in next st. Dc in next st. Hdc in next st. Sc in next st*. Repeat (*) across. (25 sts) Fasten off Color A. Join Color B.
Row 3: ch 1, TURN. *Dc in next sc. Hdc in next hdc. Sc in next dc. Hdc in next hdc. Dc in next sc*. Repeat (*) across. (25 sts)
Row 4: ch 1, TURN. *Sc in next dc. Hdc in next hdc. Dc in next sc. Hdc in next hdc. Sc in next dc*. Repeat (*) across. (25 sts) Fasten off Color B. Join Color A.
Row 5: ch 1, TURN. *Dc in next sc. Hdc in next hdc. Sc in next dc. Hdc in next hdc. Dc in next sc*. Repeat (*) across. (25 sts) Fasten off Color A. Join Color B.
Row 6: ch 1, TURN. *Sc in next dc. Hdc in next hdc. Dc in next sc. Hdc in next hdc. Sc in next dc*. Repeat (*) across. (25 sts) Fasten off Color B. Join Color A.
Row 7: ch 1, TURN. *Dc in next sc. Hdc in next hdc. Sc in next dc. Hdc in next hdc. Dc in next sc*. Repeat (*) across. (25 sts)
Rows 8-9: ch 1, TURN. Hdc in each st across. (25 sts) DO NOT FASTEN OFF.
Edge Finishing
ch 1. With right side facing you, turn piece to work down the 1st short side. Sc in each st across. Work 2 sc in corner. Sc in each st across long side. Work 2 sc in corner.
On next short side, work these stitches as evenly across as you can: Sc in next st. Hdc in each of the next 2 sts. Dc in each of the next 2 sts. Ch 2 (creates buttonhole). Dc in each of the next 2 sts. Hdc in each of the next 2 sts. Sc in next st. Work 2 sc in corner.
Sc in each st across last long edge. Join. Fasten off. Weave in ends.
Assembly
Fold the bottom section up, about 2" from the edge. (This is the short straight side) Join yarn in the bottom corner, where the edges meet, and sl st the sides closed.
Sew a button on the center front of the bottom portion for closure.


