Crochet Cozy Alpine Plant Pot Cover Guide

Transform Your Plant Pots
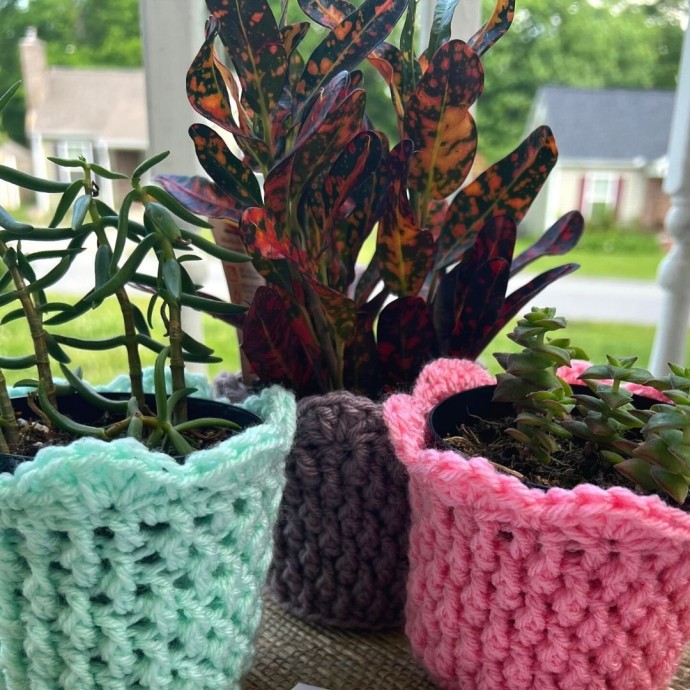
Transform your plain plant pots into stylish decor pieces with the Crochet Cozy Alpine Plant Pot Cover. This handmade cover adds a touch of warmth and charm to any room, giving your plants a cozy home to thrive in. The intricate crochet design creates a cozy alpine feel, perfect for adding a rustic and natural element to your indoor garden. Made with love and care, this plant pot cover is not only functional but also a beautiful addition to your home decor. Whether you're a plant lover looking to elevate your greenery or a crochet enthusiast seeking a new project, the Crochet Cozy Alpine Plant Pot Cover is the perfect choice. The soft yarn used in the cover provides a gentle cushion for your plants, protecting them from harsh surfaces and adding a touch of softness to your space. With its unique design and handmade quality, this plant pot cover is sure to be a conversation starter and a beloved piece in your home. Add a touch of handmade charm to your indoor garden with the Crochet Cozy Alpine Plant Pot Cover today.
Skill Level
Advance Beginner
Materials
Yarn
: Brava Worsted Mini skein from We Crochet- 50 yards of worsted weight yarn
Hook
: H/6 – 5.00 mmAdditional Supplies
- Yarn needle
- Scissors
- 4” Plant Pot – Mine was the ones that house plants are sold in at Walmart.
Gauge
Base: 6 Rounds = 3” diameter
Stitch used to obtain gauge = sc in the round
(Use Rounds 1-6)
Finished Size
4” plant pot cover (Referring to the diameter at the top of the Pot)
Stitch Abbreviations
(US Terminology)
- BLO – Back Loop Only
- ch – Chain
- Dc – Double Crochet
- Fpdc – Front Post Double Crochet
- mc – Magic Circle
- sc – Single Crochet
- sl st – Slip Stitch
- sk – Skip
Special Stitches
Alpine Stitch: Traditionally, a 4-row repeat pattern where rows of dc and fpdc stitches are alternated with rows of sc stitches to create a beautiful textured diamond shape pattern on one side and a flat defined pattern on the other side. Because of the way this pattern is written in the round, the sc rows have been omitted and work alternating rows of dc/fpdc and fpdc/dc. As a rule of thumb (but not always), if the stitch below is a dc, then work a fpdc. If the stitch below is a fpdc, then work a dc.
Pattern Notes
- US Terminology
- This pattern is worked in the round, joining to the first st of each round with a sl st.
- When a round begins with ch 1, the ch does not count as a st, so work the following in the 1st st.
- When a round begins with ch 3, it counts as a st, so work the following in the next st.
- Stitches between *asterisks* are repeated around.
- Stitches between [brackets] are worked as many times as directed.
- Stitches between (parenthesis) are made in the same stitch.
- Stitches, separated by commas, are made in the next stitch.
- Repeat Rows 8 & 9 more or fewer times to create a taller or shorter cover.
- If you prefer to make a different size:
- Wider/Skinnier pot: Add/subtract increased rounds at the base
- Taller/Shorter pot: Add/subtract rounds up the sides. Tip: Before the round with the sc in BLO, make sure the base matches the size of the base of your pot.
- The pots used for my prototypes had a base about 1” smaller than the top of the pot, but the dc stitches up the sides allowed the cover to fit my little Walmart pots perfectly.
- I reused a plastic sour cream container lid and placed it inside my plant pot cover before adding the plant so it catches excess water and does not ruin the cover.
Instructions
Make a mc.
Round 1: Ch 1, work 6 sc in mc, sl st to 1st ch to join. (6)
Round 2: Ch 1, 2 sc in 1st and in every st around, sl st to join. (12)
Round 3: Ch 1, *2 sc in 1st st, sc in next,* repeat around, sl st to join. (18)
Round 4: Ch 1, *2 sc in 1st st, sc in next 2*, repeat around, sl st to join. (24)
Round 5: Ch 1, *2 sc in 1st, sc in next 3*, repeat around, sl st to join. (30)
Round 6: Ch 1, *2 sc in 1st, dc, sc in next 4*, repeat around, sl st to join. (36)
Round 7: Ch 1, *sc in BLO, ch 1, sk next*, repeat around, sl st to join. (36)
Round 8: Ch 1, fpdc in 1st, dc, *fpdc, dc*, repeat around, sl st to join. (18 dc, 18 fpdc)
Round 9: Ch 3, fpdc in next, *dc, fpdc*, repeat around, sl st to join. (18 dc, 18 fpdc)
Rounds 10-14: Repeat Rounds 8-9 twice, then end with row 8 again.
Round 15: Ch 1, *sc into first st, sk next, 5 dc into next, sk next,* repeat around the top. Sl st into starting st. (May need to skip an extra stitch to make the final shell work out.)
Fasten off.
Weave in ends.
- Funny Pictures
-
 Hilarious Memes for Those Bored to Tears
-
 Weekly Treat of Funniest Parenting Memes for Good Laugh out Loud Right Now
-
 Really Funny Pics to End These Weekend Perfectly
- Recipes
-
 Crispy Baked Avocado Fries
-
 Scrambled Chickpea and Spinach Pitas
-
 Cinnamon Pancakes
- Lifehacks
-
 Crochet Basics: Aligned Cobble Stitch
-
 Brick Stitch Crochet Tutorial
-
 Crochet Basics: Wattle Stitch
- Crochet Ideas
-
 Crochet Snorlax Plushie Doll
-
 Crochet Beautiful Penguin Toy
-
 Crochet Tiny Snowman
- DIY
-
 DIY Santa Craft For Kids
-
 Paper Plate Angel Craft
-
 Upcycled Mason Jar Chicken Vase
- Knitting Ideas
-
 Knitted Bridger Cowl
-
 Knitted Keepsake Bag
-
 Knitted Cutie Cupcake Dolls