How to Create a Stunning Crochet Hanging Plant

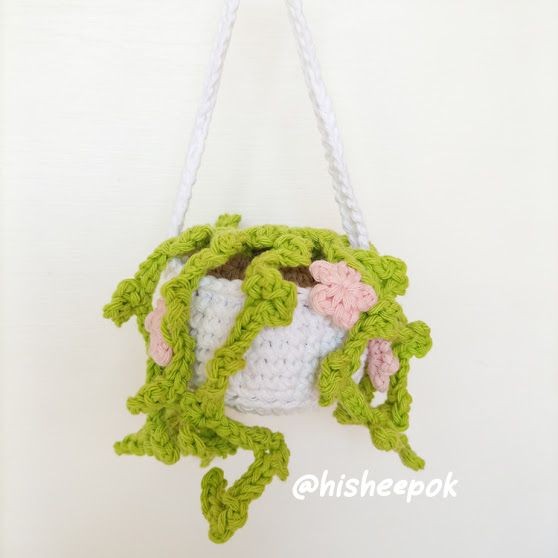
Elevate your indoor gardening game with a stunning Crochet Hanging Plant! This unique and eye-catching piece of decor will add a touch of elegance and charm to any space. Handcrafted with love and attention to detail, each crochet plant is meticulously made using high-quality yarn, ensuring durability and longevity. The Crochet Hanging Plant is not only a beautiful addition to your home, but it also offers a practical solution for those with limited floor space. Hang it near a window or from the ceiling to create a captivating display of greenery that will instantly breathe life into your living room, bedroom, or even your office.
I used a 3 mm crochet hook to make my plant, so it is small, but I think it would look really nice with a bigger hook and yarn. You can also have the flowers in different shades and make it colorful or use whatever color combination you like.
Let's grow!
Abbreviations Explained
R: round
mr: magic ring
ch: chain
sl st: slip stitch
sc: single crochet
hdc: half double crochet
dc: double crochet
inc: increase
dec: decrease
**: repeat to the end of round
(...) x...: repeat the inside of parentheses according to the indicated number, example: (...) x2
[...] total stitches at the end of round
Instructions to Create Your Crochet Hanging Plant
Soil
R1: 8 sc in mr, sl st to first st
R2: 1 ch, *sc inc* sl st to first st [16]
R3: 1 ch, *1 sc, sc inc* sl st to first st [24]
R4: 1 ch, *2 sc, sc inc* sl st to first st [32]
R5: 1 ch, *3 sc, sc inc* sl st to first st [40]
Break yarn.
Flowers
You'll make as many as you want to put on your vines. I made five.
In a mr: (3 ch, sl st) x5
Cut the yarn, secure and hide the ends.
Vines and Leaves
To start, insert the hook into a space between rounds 2-3 into what would be the post of a stitch of the soil, grab the green yarn and pull through. Now, we are going to chain up; how many chains will depend on the length of the vine you want.
I made 33 chains. We will work up the chains placing a sl st into each ch, going from the end to the beginning of the chain, but we'll place some leaves on the way up.
I've made smaller leaves and bigger leaves:
- For the smaller ones: chain 2, sl st into the same ch you made the last sl st, chain 2 once more and sl st into the same ch you made the last sl st.
- For the bigger leaves: chain 2, sl st into the same ch you made the last sl st, chain 2 again, sl st into the same ch you made the last sl st, chain 2 once more and sl st into the same ch you made the last sl st.
You can make leaves wherever you want; it could be every certain amount of stitches or just random.
Once you worked up the vine chain, you'll make a sc into the soil (keep a loose tension when working this sc). Insert the hook through a stitch between R2-3 of soil (not too far away so it doesn't scrunch), yarn over, pull through, yarn over, pull through two loops.
When we want to add a flower, just insert the hook into the flower (can be wherever) and into the vine chain, yarn over, pull through all loops to complete a sl st and continue up the vine.
Make your vines of different lengths by adding or subtracting chains. Make some vines with only leaves and add flowers to some.
Once you went around and are close to the first vine again, make your last vine in a space between R1-2. This will cover a little of that space in the center so it doesn't look so empty. You could also keep working vines if you'd like to have some more.
When you have finished the vines, grab the loose ends and pull them through to the bottom of the soil; make a knot.
Pot Base
Close every round with a sl st on the first st of the round and start every round on the same st as sl st.
R1: 10 hdc in mr
R2: 2 ch, *hdc inc* sl st to first st [20]
R3: 2 ch, *1 hdc, hdc inc* sl st to first st [30]
R4: 2 ch, *2 hdc, hdc inc* sl st to first st [40]
R5: 1 ch, back loop only 40 sc [40]
Rest of Pot
We'll work in a spiral from here on.
R6-10: 40 sc [40]
Don't cut the yarn.
Joining the Pot and Soil
Attach the soil to the pot by working sc all around. To do this, insert the hook through the stitch of the pot and then through the stitch of the soil and complete a sc. Stuff before you finish attaching the soil. To make the hanging loop, don't cut the yarn.
For the Loops
Count 19 stitches from the last sc you made and mark it, chain 45 (or the length you'd like) and sl st into the marked stitch, then sl st into the following st and chain 45 again. Place a sl st into the st before the very first chain.
Hide any loose end.
- Funny Pictures
-
 Hilarious Memes for Those Bored to Tears
-
 Weekly Treat of Funniest Parenting Memes for Good Laugh out Loud Right Now
-
 Really Funny Pics to End These Weekend Perfectly
- Recipes
-
 Crispy Baked Avocado Fries
-
 Scrambled Chickpea and Spinach Pitas
-
 Cinnamon Pancakes
- Lifehacks
-
 Crochet Basics: Aligned Cobble Stitch
-
 Brick Stitch Crochet Tutorial
-
 Crochet Basics: Wattle Stitch
- Crochet Ideas
-
 Crochet Snorlax Plushie Doll
-
 Crochet Beautiful Penguin Toy
-
 Crochet Tiny Snowman
- DIY
-
 DIY Santa Craft For Kids
-
 Paper Plate Angel Craft
-
 Upcycled Mason Jar Chicken Vase
- Knitting Ideas
-
 Knitted Bridger Cowl
-
 Knitted Keepsake Bag
-
 Knitted Cutie Cupcake Dolls