Crochet Kitty Love Blankie Pattern Instructions

Create a Cozy and Adorable Blanket
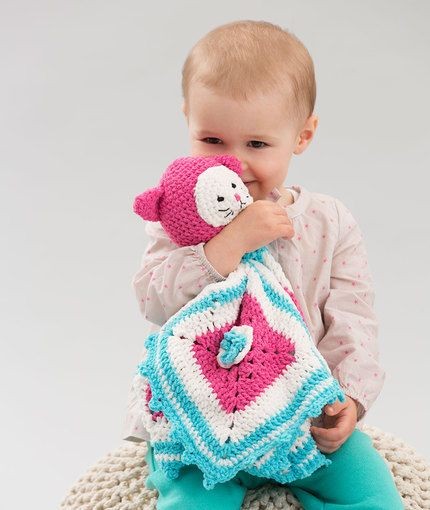
Create a cozy and adorable blanket for your little one with the Crochet Kitty Love Blankie pattern. This charming design features a sweet kitty motif that is sure to delight any child. Using soft yarn in pastel colors, you can crochet a snuggly blanket that will keep your baby warm and comforted. The pattern includes detailed instructions and helpful tips to guide you through the process, making it a fun and rewarding project for crocheters of all skill levels. Whether you are making it as a gift for a baby shower or for your own child, the Crochet Kitty Love Blankie is a wonderful project that will be cherished for years to come. The finished blanket is not only practical but also serves as a lovely keepsake that captures the love and care put into each stitch. With its charming design and soft texture, this blanket is sure to become a favorite for naptime, cuddles, and playtime. Get started on your own Crochet Kitty Love Blankie today and create a special handmade treasure that will be treasured for generations.
Skill Level
Skill Level: Easy
Required Supplies
- RED HEART Cutie Pie: 1 ball each 703 Tulip A, 10 Cotton B, and 503 Splash C
- Susan Bates Crochet Hook: 4mm [US G-6]
- Yarn needle
- Stitch marker
Additional Supplies Needed
- Black embroidery floss
- Polyester fiberfill
Oh so soft and cuddly, our Kitty Love is attached to a carry-along blankie with chenille yarn in pretty colors to please baby. It’s the perfect size and is quick to make for the next baby shower.
Gauge / Tension
GAUGE: Gauge is not critical for this project.
Blanket measures 17” x 17” (43 x 43 cm).
Notes
- Blanket is made from 4 squares worked in joined rounds with the right side facing, then sewn together. Flowers are worked in joined rounds and sewn to the center of each square.
- Kitty is made separately in continuous (spiral) rounds and sewn to the center of the blanket. Work tightly to ensure that stuffing does not show through stitches. Do not overstuff and stretch stitches so that stuffing is visible.
Special Stitch
sc2tog = [Insert hook in the next stitch, yarn over, and pull up a loop] twice, yarn over and draw through all 3 loops on hook.
Special Technique
Join with sc = Place a slip knot on hook, insert hook in indicated stitch, yarn over, and draw up a loop, yarn over and draw through both loops on the hook.
Blanket
Square (Make 4)
With A, ch 4, join with a slip st in the first ch to form a ring.
Round 1 (Right Side)
Ch 3 (counts as the first dc here and throughout), 2 dc in the ring, [ch 2, 3 dc in the ring] 3 times, ch 2; join with a slip st in top of beg ch—12 dc and 4 ch-2 spaces.
Round 2
Slip st in next 2 dc, slip st in the first ch-2 space, ch 3, (2 dc, ch 2, 3 dc) in the same space, (3 dc, ch 2, 3 dc) in each ch-2 space around; join with a slip st in top of beg ch—eight 3-dc groups and 4 ch-2 spaces.
Round 3
Slip st in the next 2 dc, slip st in the first ch-2 space, ch 3, (2 dc, ch 2, 3 dc) in the same space, 3 dc in the space between the next two 3-dc groups, *(3 dc, ch 2, 3 dc) in the next ch-2 space, 3 dc in the space between the next two 3-dc groups; repeat from * twice; join with a slip st in top of beg ch—36 dc and 4 ch-2 spaces.
Round 4
Ch 3, *dc in each dc to the next ch-2 space, (2 dc, ch 2, 2 dc) in the next ch-2 space; repeat from * 3 times, dc in remaining dc; join with a slip st in top of beg ch—52 dc and 4 ch-2 spaces. Fasten off.
Round 5
With the right side facing, join B with a slip st in the same st as join; repeat Round 4—68 dc and 4 ch-2 spaces.
Round 6
Repeat Round 4—84 dc and 4 ch-2 spaces. Fasten off.
Round 7
With the right side facing, join C with a slip st in the same st as join; repeat Round 4—100 dc and 4 ch-2 spaces. Fasten off.
Round 8
With the right side facing, join B with sc in any ch–2 space, 2 sc in the same space (corner made), *sc in each dc across to the next ch-2 space, 3 sc in the next ch-2 space (corner made); repeat from * twice; sc in each remaining dc; join with a slip st in the first sc—100 sc and four 3-sc corners. Fasten off.
Flower (Make 4)
With B, ch 3.
Round 1 (Right Side)
Work 10 hdc in the 3rd ch from the hook (beginning ch does not count as a st); join in the back loop of the first hdc—10 hdc.
Round 2
Ch 1, working in back loops only, (hdc, dc) in the same st as join, (dc, hdc) in the next hdc (petal made), *ch 1, (slip st, ch 1, hdc, dc) in the next hdc, (dc, hdc) in the next back loop (petal made), repeat from * 3 more times, ch 1; join with a slip st in the first ch—5 petals.
Round 3
With the right side facing, join C with a slip st in any unworked front loop, working in front loops only, repeat Round 2.
Fasten off leaving a long tail for sewing.
Sew to the center of the square.
Border
With B, wrong sides held together, and working in inside loops, sew squares together.
Round 1 (Right Side)
With the right side facing, join C with sc in any st, sc in each st around working 3 sc in the center st of each corner; join with a slip st in the first sc—228 sc.
Round 2
Ch 1, sc in the same st as join, sc in the next 5 st, *ch 3, hdc in the 3rd ch from the hook, sc in the next 6 sc; repeat from * around; join with a slip st in the first sc. Fasten off.
Kitty
Head
Beginning at the top of the head, with A, ch 2.
Round 1 (Right Side)
Work 6 sc in 2nd ch from hook—6 sc. Place marker for the beginning of the round and move marker up as each round is completed.
Round 2
Work 2 sc in each sc around—12 sc.
Round 3
*Sc in the next sc, 2 sc in the next sc; repeat from * around—18 sc.
Round 4
*Sc in the next 2 sc, 2 sc in the next sc; repeat from * around—24 sc.
Round 5
*Sc in the next 3 sc, 2 sc in the next sc; repeat from * around—30 sc.
Round 6
Sc in each sc around.
Round 7
*Sc in the next 4 sc, 2 sc in the next sc; repeat from * around—36 sc.
Round 8
Sc in each sc around.
Round 9
*Sc in the next 5 sc, 2 sc in the next sc; repeat from * around—42 sc.
Rounds 10–18
Sc in each sc around.
Round 19
*Sc2tog; repeat from * around—21 sc.
Round 20
Sc in each sc around; join with a slip st in the first sc. Fasten off, leaving a long tail for sewing. Do not close the end. Stuff firmly with fiberfill.
Ear (Make 2)
With A, ch 2.
Round 1 (Right Side)
Work 6 sc in 2nd ch from hook—6 sc. Place marker for the beginning of the round and move marker up as each round is completed.
Round 2
*Sc in the next 2 sc, 2 sc in the next sc; repeat from * around—8 sc.
Round 3
*Sc in the next 3 sc, 2 sc in the next sc; repeat from * around—10 sc.
Round 4
Sc in each sc around.
Round 5
*Sc in the next 4 sc, 2 sc in the next sc; repeat from * around—12 sc.
Round 6
*Sc in the next 5 sc, 2 sc in the next sc; repeat from * around—14 sc.
Round 7
*Sc in the next 6 sc, 2 sc in the next sc; repeat from * around—16 sc. Fasten off, leaving a long tail for sewing.
Hold the bottom edge flat and weave the tail across, pulling slightly to curl the ear. Using a photograph as a guide, sew the ears in place.
Face
With B, ch 2.
Rounds 1–4
Work same as Rounds 1–4 of head—24 sc.
Round 5
Sc in the next sc, 2 sc in the next sc, *sc in the next 3 sc, 2 sc in the next sc; repeat from * 4 times, sc in the last 2 sc—30 sc. Fasten off, leaving a long tail for sewing.
With embroidery floss and using a photograph as a guide for placement, embroider satin stitches for eyes, straight stitches for the mouth, and whiskers. With A, embroider satin stitches for the nose. Sew the face on the front of the head.
Sew the open edge of the head to the center of the blanket.
Collar
With C, ch 25.
Row 1
Dc in the 4th ch from the hook, 2 dc in each ch across, turn—44 dc.
Row 2
Ch 1, skip the first dc, *3 hdc in the next dc, [skip the next dc, slip st in the next dc] twice; repeat from * around. Fasten off leaving a long end for sewing. Sew around the neck.
Finishing
Weave in ends.
Abbreviations
- A, B, C = Color A, Color B, Color C, etc.;
- ch = chain;
- dc = double crochet;
- hdc = half double crochet;
- sc = single crochet;
- st(s) = stitch(es);
- ( ) = work directions in parentheses into the same st;
- [ ] = work directions in brackets the number of times specified;
- * = repeat whatever follows the * as indicated.
- Funny Pictures
-
 Hilarious Memes for Those Bored to Tears
-
 Weekly Treat of Funniest Parenting Memes for Good Laugh out Loud Right Now
-
 Really Funny Pics to End These Weekend Perfectly
- Recipes
-
 Crispy Baked Avocado Fries
-
 Baked Beans and Hot Dogs with Biscuit Topping
-
 Roasted Rosemary Lemon Chicken Breasts
- Lifehacks
-
 Crochet Basics: Twisted Fringe
-
 7 Crochet Tips And Tricks
-
 How To Work Crochet Into Denim
- Crochet Ideas
-
 Crochet Snorlax Plushie Doll
-
 Crochet Cat in 1 Row
-
 Crochet Beautiful Penguin Toy
- DIY
-
 Popsicle Stick and Jingle Bell Christmas Tree Ornament
-
 DIY Santa Craft For Kids
-
 Paper Plate Angel Craft
- Knitting Ideas
-
 Knitted Bridger Cowl
-
 Knitted Keepsake Bag
-
 Knitted Cutie Cupcake Dolls