Jelly Bean Bunny Crochet Pattern

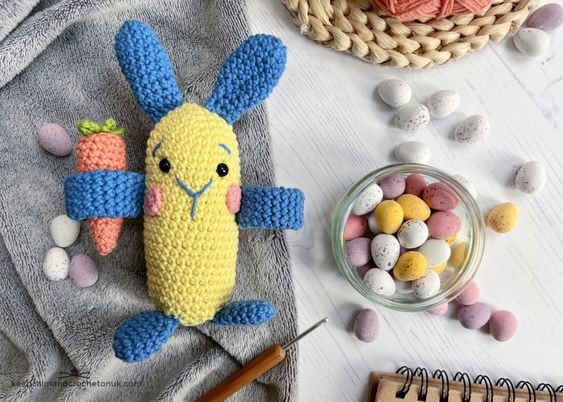
Get ready to embark on a delightful crochet adventure with the charming Jelly Bean Bunny! This adorable amigurumi project is perfect for both beginners and experienced crocheters alike. With its soft and cuddly design, the Jelly Bean Bunny is sure to become a beloved companion for kids and adults alike. Crocheting the Jelly Bean Bunny is not only a fun and relaxing activity, but it also provides a sense of accomplishment as you watch your creation take shape. The pattern is easy to follow, with step-by-step instructions and helpful tips along the way. You'll enjoy working on each part of the bunny, from its floppy ears to its fluffy tail, and finally assembling all the pieces together.
Skill Level
2 – Easy
Materials Needed
Yarn
Rico Designs Ricorumi DK; 8ply / Double Knit / Light Worsted / Light Weight; 25g / 58m; 100% Cotton
- 1 ball 062 Pastel Yellow (A)
- 1 ball 032 Blue (B)
- 1 ball 009 Coral (C)
- 1 ball 068 Papaya (D)
- 1 ball 047 Pistachio (E)
Pattern will work in other hooks and yarns though finished size will be different.
Hook
3.5mm (US size E/4).
You Will Also Need
- Scissors
- A yarn needle
- Stitch markers
- 2 x 6mm black toy safety eyes
Gauge
6dc = 2.5cm / 1 inch
Obtaining the correct gauge is not critical to this project, but if your gauge does not match the gauge stated, then your finished item will be a different size.
Finished Size
15cm / 5.9 inches high
Stitch Guidance
Slip Stitch (sl st)
Insert hook in st indicated, yarn over and draw through all loops.Double Crochet (dc)
Insert hook in st indicated and pull up a loop [two loops on hook], yarn over, pull through both loops on hook.Double Crochet 2 Together (dc2tog)
Invisible double crochet decrease method: Invisible decreasing is a method of removing stitches to shape your fabric without gaps. Insert hook in the FRONT LOOP ONLY of the first stitch indicated and pull up a loop [two loops on hook], insert hook in the FRONT LOOP ONLY of the next st, pull up a loop [three loops on hook], yarn over, pull through three loops on hook; decrease made.Back Loop Only (BLO)
If you hold your piece of crochet in front of you with the Vs of the stitch on top, the part of the V closest to you is the front loop. The part of the V farther away from you on the opposite side is the back loop. When a pattern asks you to crochet into the back loop, insert your hook into the relevant loop and crochet as instructed.
Pattern Notes
Magic Ring
is also known as a Drawstring Ring or Magic Loop and is often used as a start for working amigurumi. If you are not familiar with this technique you could substitute with a ch2 and then work in the second ch from the hook.Working in the Round
: Most of the sections of this pattern are worked in the amigurumi style without joining in continuous rounds. Place the stitch marker in the top of the first st to mark the start of each round.Sewing Seams
: Use mattress stitch to sew the seams.Repeat Instructions
: Repeat the sequence between the square brackets by the number indicated.
Pattern
Cheeks: Make 2
Rnd 1: With YARN C; working into a magic ring, 8 dc. (8 sts)
- Fasten off with a sl st to the next st, leave a long yarn tail for sewing to the Head
Body
Rnd 1: With YARN A; working into a magic ring, 6 dc. (6 sts)
Rnd 2: [2 dc in each st] six times. (12 sts)
Rnd 3: [1 dc in the next st, 2 dc in next st] six times. (18 sts)
Rnd 4: [1 dc in the next 2 sts, 2 dc in next st] six times. (24 sts)
Rnd 5: [1 dc in the next 3 sts, 2 dc in next st] six times. (30 sts)
Rnd 6: [1 dc in the next 4 sts, 2 dc in next st] six times. (36 sts)
Rnds 7 – 26: 1 dc in each st around.
- Add safety eyes between rnds 8-9 approximately 5 sts apart.
- Sew on cheeks approx 8 sts apart over rnds 13 – 15.
- With YARN B embroider a nose mouth and eyebrows using the photos as a guide.
- Stuff the body, continue to stuff as you go.
Rnd 27: [1 dc in the next 4 sts, 1 dc2tog] six times. (30 sts)
Rnd 28: [1 dc in the next 3 sts, 1 dc2tog] six times. (24 sts)
Rnd 29: [1 dc in the next 2 sts, 1 dc2tog] repeat to end. (18 sts)
Rnd 30: [1 dc, dc2tog] repeat to end. (12 sts)
Rnd 31: [dc2tog] repeat to end. (6 sts)
- Fasten off with a sl st to the next st, and using the yarn tail sew up the remaining 6 sts. Weave in ends.
Ears: Make 2
Ears are not stuffed;
Rnd 1: With YARN B; working into a magic ring, 6 dc. (6 sts)
Rnd 2: [2 dc in each st] six times. (12 sts)
Rnds 3 – 9: 1 dc in each st around.
Rnd 10: [1 dc, dc2tog] repeat to end. (8 sts)
Rnds 11 – 12: 1 dc in each st around.
- Fasten off with a sl st to the next st, leave a long yarn tail for sewing to the Head.
Arms: Make 2
Leave a long tail to start; arms are not stuffed;
Rnd 1: With YARN B; ch9, sl st to form a ring, 1 dc in each st around. (9 sts)
Rnds 2 – 22: 1 dc in each st around.
- Fasten off with a sl st to the next st, over sew each end of the strip of crochet you have just made.
- Sew ends together to create a loop so that candy / carrot can be placed in the arm holes.
Feet: Make 2
Rnd 1: With YARN B; working into a magic ring, 6 dc. (6 sts)
Rnd 2: [2 dc in each st] six times. (12 sts)
Rnds 3 – 5: 1 dc in each st around.
Rnd 6: [1 dc, dc2tog] repeat to end. (8 sts)
Rnd 7: 1 dc in each st around.
- Fasten off with a sl st to the next st, leave a long yarn tail for sewing to the Body.
Tail
Rnd 1: With YARN B; working into a magic ring, 6 dc. (6 sts)
Rnd 2: [2 dc in each st] six times. (12 sts)
Rnd 7: 1 dc in each st around.
- Fasten off with a sl st to the next st, leave a long yarn tail for sewing to the Body.
- Stuff with a tiny bit of toy filler.
Carrot Bottom
Rnd 1: With YARN D; working into a magic ring, 6 dc. (6 sts)
Rnd 2: 1 dc in each st around.
Rnd 3: [1 dc in the next 2 sts, 2 dc in next st] six times. (8 sts)
Rnd 4: 1 dc in each st around.
Rnd 5: [1 dc in the next 3 sts, 2 dc in next st] six times. (10 sts)
Rnds 6 – 11: 1 dc in each st around.
Rnd 12: [1 dc in the next 4 sts, 2 dc in next st] six times. (12 sts)
Rnds 13 – 15: 1 dc in each st around.
- Lightly stuff the carrot bottom, continue to stuff as you go.
Rnd 16: Working in BLO; dc2tog. (6 sts)
- Fasten off with a sl st to the next st, and using the yarn tail sew up the remaining 6 sts. Weave in ends.
Carrot Top
Rnd 1: With YARN E; ch7 sl st back to the first ch, [ch6, sl st back to the first ch] three times.
- Fasten off but leave a long yarn tail for sewing to the top of the carrot.
Making Up
Ears: Sew the ears either side of the top of the head over rnds 2 – 5 approximately 2 sts apart.
Arms: Sew arms into place on side of the Body over rnds 15 – 17 creating a loop so that candy / carrot can be placed in the arm holes.
Legs: Making sure that the bunny can stand upright, attach the legs onto the front of the body on rnds 26 approx. 4 sts apart.
Tail: Making sure that the bunny can stand upright, attach tail centrally on the back of the bunny.
Carrot: Attach the top of the carrot to the carrot bottom and add to one of the arm loops.
- Funny Pictures
-
 These are the Pics That Simply Describe Your Life
-
 Hilariously Accurate Parenting Memes That Show the Other Side of Parenthood
-
 Great Pics That Just Depict Our Lives
- Recipes
-
 Crispy Baked Avocado Fries
-
 Baked Beans and Hot Dogs with Biscuit Topping
-
 Roasted Rosemary Lemon Chicken Breasts
- Lifehacks
-
 Crochet Basics: Twisted Fringe
-
 7 Crochet Tips And Tricks
-
 How To Work Crochet Into Denim
- Crochet Ideas
-
 Crochet Snorlax Plushie Doll
-
 Crochet Cat in 1 Row
-
 Crochet Beautiful Penguin Toy
- DIY
-
 Popsicle Stick and Jingle Bell Christmas Tree Ornament
-
 Upcycled Mason Jar Chicken Vase
-
 Crochet Namaste Stephanie Doll
- Knitting Ideas
-
 Knitted Keepsake Bag
-
 Knitted Textured Heart Dishcloth
-
 Knitted Snowfall Dishcloth