Adorable Crochet Hot Chocolate Amigurumi Pattern

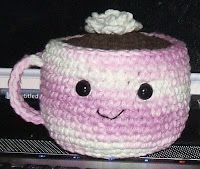
Create your very own adorable crochet hot chocolate amigurumi with this fun and easy-to-follow pattern. This cute little plushie is perfect for any hot chocolate lover or anyone who enjoys cozy winter vibes. Using basic crochet stitches and some brown, white, and pink yarn, you can bring this sweet treat to life in no time. Add some marshmallows or whipped cream on top for an extra touch of cuteness! Whether you're a beginner or an experienced crocheter, this hot chocolate amigurumi is sure to bring a smile to your face. You can customize it with different colors or even add a little face to give it some personality. So grab your crochet hook and yarn, and get ready to make your very own deliciously cute hot chocolate plushie!
Finished size: Approx 4 inches wide (including handle) x 3 inches tall
Materials
(US) size F hook, approx 1 oz worsted weight yarn for main color (MC), small amount brown yarn, scrap of white yarn, (2) 9 mm black animal/amigurumi eyes, small amount embroidery floss (or use small amount of the brown yarn), large handful of fiberfil stuffing, tapestry needle.
Instructions Overview
NOTE: Entire piece is worked in the round without joining unless otherwise noted.
Cup
With MC ch 2
Round 1: 6 sc in 2nd ch from hook
Round 2: 2 sc in each st around
Round 3: 2 sc in next st, sc in next st
Round 4: 2 sc in next st, sc in each of next 2 sts
Round 5: 2 sc in next st, sc in each of next 3 sts
Round 6: 2 sc in next st, sc in each of next 4 sts
Round 7: working in BLO, sc in each st around
Rounds 8-18: working through BOTH loops, sc in each st around, join with sl st at end of round 18, fasten off, weave in ends.
Chocolate
With brown, repeat rounds 1-6 of cup, join with sl st at end of round 6, fasten off, weave in ends.
Handle
With MC and leaving a long tail for sewing, ch 11
Row 1: sc in 2nd ch from hook and in each ch across, do not turn.
Row 2: Working along opposite side of beginning ch, sc in each ch across, fasten off leaving a long tail for sewing.
Whipped Cream
ch 2
Row 1: 6 sc in 2nd ch from hook.
Row 2a: Working in front loops only, (ch 3, sl st, ch 3) in next st, (sl, ch 3, sl st, ch 3) in each remaining st around.
Row 2b: Working behind row 2a and in back loops only, (sl, ch 3, sl st, ch 3) in each st around, join with sl st in the same loop as the first st of row 2b, fasten off leaving a long tail for sewing. (You will have 2 layers with row 2a being the side you will sew to the top of the hot chocolate.)
Assembly
Refer to photo for placement on all assembly instructions.
- Sew handle to side of cup placing the top of the handle along row 16, and the bottom of the handle along row 9.
- For face and referring to the photo for placement, attach safety eyes between rows 14 and 15 (or embroider eyes), and embroider mouth as desired.
- Add stuffing to cup.
- Sew row 1 of whipped cream to center of chocolate leaving loops free so they can be "fluffed up" to look like a swirl of whipped cream.
- Using MC, sew chocolate into place along the backs of the stitches, on the inside of the cup, on row 18.
Variations
Variation One
For a cup of coffee, leave off the whipped cream and finish as directed as for hot chocolate.
Variation Two
For a cup of tea, use light brown yarn for "tea," and with white make a tag as follows:
ch 6
Row 1: sc in 2nd ch from hook and in each ch across, ch 1, turn.
Rows 2-3: sc in each st across, ch 1, turn.
Row 4: sc in each st across, turn (do not ch).
Row 5: sl st in each of next 2 sts, fasten off leaving long tail for attaching tag.
To attach tag, referring to the picture for placement, sew tag to "tea," leaving a 2 inch string for the hang tag.
- Funny Pictures
-
 Cute Cat Memes That Will Make Your Day Brighter
-
 Spot-on and Funny Memes About Introverts Struggles
-
 Top Wonderful Cat Memes on Their Way to Better Your Day
- Recipes
-
 Creamy Old Fashioned Rice Pudding
-
 Russian Tea Cakes (Snowball Cookies)
-
 Rigatoni with Sausage, Tomatoes, and Zucchini
- Lifehacks
-
 How to Crochet a Harlequin Stitch
-
 Removing The Toughest Stains
-
 Crochet Basics: Crumpled Griddle Stitch
- Crochet Ideas
-
 Crochet Christmas Tree
-
 Crochet Goblet of Fire
-
 Crochet Adorable Ammonite
- DIY
-
 DIY Snowman Wreath
-
 Mini Santa Sleigh Ornament
-
 Crochet Gingerbread House Blanket
- Knitting Ideas
-
 Knitted Easter Bunny
-
 Knitted Mobile Phone/Glasses Case
-
 Knitted Cabled Wallet