Create Your Own Charming Crochet Shrug

Create Your Own Charming Shrug with Crochet! Dive into the world of crochet and craft a delightful shrug that will add a touch of elegance to any outfit. Whether you're a beginner or an experienced crocheter, this project is perfect for anyone looking to showcase their skills and create a unique piece for their wardrobe. With just a few simple stitches and some beautiful yarn, you can bring your vision to life and make a statement with your handmade creation. Whether you prefer a classic design or something more modern and trendy, crochet allows you to customize every detail to make your shrug truly one-of-a-kind. So grab your crochet hook, pick out your favorite colors, and get ready to crochet your way to a fabulous new addition to your wardrobe!
Materials Needed for This Easy Crochet Shrug Pattern
Yarn – any 4 ply, #2 Fine weight yarn would be perfect. I made mine using Hobbii Cotton Kings.
Hook and Other Materials
- US size G (4 mm) Crochet Hook
- Yarn needle
Gauge
20 sts over 10 rows = 10 cm /4” square made in dc.
Adjust hook size if necessary, to obtain gauge.
Crochet Shrug Pattern Notes
- Please kindly read through the pattern before starting.
- Similar #2 weight yarn can be substituted; please check the gauge.
- Chains at the beginning of the rows do count as a stitch.
Skill Level – Beginner
Terms – US Terminology
Stitches Abbreviations
Chain(s) – ch(s)
Single Crochet – sc
Double Crochet – dc
Sizes and Color Options for the Crochet Shrug
Sizes/Color – XS (S, M, L, XL, 2Xl, 3XL, 4XL, 5XL)
Bust: 30 (34, 38, 42, 46, 50, 54, 58, 62)”
Length (Shoulder to under bust) – 12 (12, 14, 14, 14, 16, 16, 18, 18)”
Neckline Opening – 14 (16, 22, 25, 28, 28, 28, 28, 28)”
Armhole Depth – 24 (24, 28, 28, 28, 32, 32, 36, 36)”
Sleeve Length (Shoulder to Elbow) – 14”
Total Length (across both Elbows) – 43 (45, 47, 49, 51, 51, 51, 51, 51)”
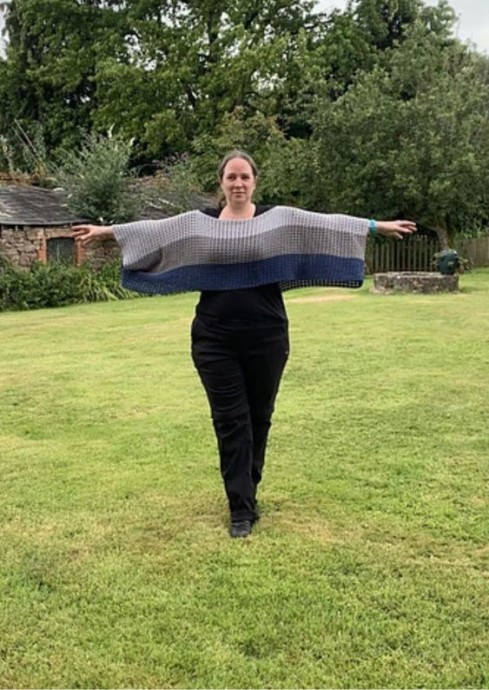
The modeled garment is shown in Medium.
Construction Notes
- This Shrug is worked in rows.
- Both panels (front and back) are made in one piece with a neck opening made midway.
- The lower part of the shrug is then seamed together on either side, leaving the middle open.
Adjustments/Fittings for the Easy Crochet Shrug Pattern
Length: Increase or decrease the repeat rows on the front panel before splitting for the neckline, and replicate this on the back panel.
The starting chain should be the final length across your elbows.
For a longer sleeve – Increase your starting chains.
I can’t wait to see your makes from my easy crochet shrug pattern.
Instructions for the Easy Crochet Shrug
Section 1: Front Panel
Chain 247 (259, 271, 283, 295, 295, 295, 295, 295)
Row 1: Dc in 3rd ch from hook, *ch 2, skip next 2 ch, dc in next 2 chs, rep from * to end, turn. 124 (130, 136, 142, 148, 148, 148, 148, 148) dc 61 (64, 67, 70, 73, 73, 73, 73, 73) ch 2 sps.
Row 2: Ch 1, sc in next st, *ch 2, skip next ch sp, sc in next 2 sts, rep from * to end. turn. 124 (130, 136, 142, 148, 148, 148, 148, 148) sc
61 (64, 67, 70, 73, 73, 73, 73, 73) ch 2 sps.
Row 3: Ch 3, dc in next st, *ch 2, skip next ch sp, dc in next 2 sts, rep from * to end, turn. 124 (130, 136, 142, 148, 148, 148, 148, 148) dc
61 (64, 67, 70, 73, 73, 73, 73, 73) ch 2 sps.
Rows 4 – 48 (48, 56, 56, 56, 64, 64, 72, 72): Rep Row 2 and 3.
End with Row 2.
For Tall Ladies, you might increase the number of repeats.
Section 2: Back Panel
Shape neckline
On either side, count 26th ch sp, place stitch marker on next st. Adjust the Chain space for a better Neckline fitting.
Row 1: Ch 3, dc in next st, *ch 2, skip next ch sp, dc in next 2 sts, rep from * till first st marker, ch 38 (50, 62, 74, 86, 86, 86, 86, 86), skip next 9 (12, 15, 18, 21, 21, 21, 21, 21) ch sps, dc in next stitch with the second marker, dc in next st, rep from * to end. 52 ch-2 sp, 100 dc.
Row 2: Ch 1, sc in next st, *ch 2, skip next ch sp, sc in next 2 sts, rep from * to end, turn. 124 (130, 136, 142, 148, 148, 148, 148, 148)
sc 61 (64, 67, 70, 73, 73, 73, 73, 73) ch 2 sps.
Row 3: Ch 3, dc in next st, *ch 2, skip next ch sp, dc in next 2 sts, rep from * to end, turn. 124 (130, 136, 142, 148, 148, 148, 148, 148)
dc, 61 (64, 67, 70, 73, 73, 73, 73, 73) ch 2 sps.
Rows 4 – 49 (49, 57, 57, 57, 65, 65, 73, 73):
Rep Rows 2 and 3.
End with Row 3.
Assembly Instructions
To assemble –
• Fold Lengthwise, with the front panel over the back panel.
• Place a stitch marker on the 22nd ch sp on either side of the lower end of a shrug. You can adjust the placement of your stitch markers for a better fit around your torso.
• Using a darning needle, sew both panels together from the edge till the first stitch marker.
Or, sc over both layers.
• Repeat on the other side.
• Sew in ends
• Block to measurements.
- Funny Pictures
-
 Hilarious Memes for Those Bored to Tears
-
 Weekly Treat of Funniest Parenting Memes for Good Laugh out Loud Right Now
-
 Really Funny Pics to End These Weekend Perfectly
- Recipes
-
 Crispy Baked Avocado Fries
-
 Scrambled Chickpea and Spinach Pitas
-
 Cinnamon Pancakes
- Lifehacks
-
 Crochet Basics: Aligned Cobble Stitch
-
 Brick Stitch Crochet Tutorial
-
 Crochet Basics: Wattle Stitch
- Crochet Ideas
-
 Crochet Snorlax Plushie Doll
-
 Crochet Beautiful Penguin Toy
-
 Crochet Tiny Snowman
- DIY
-
 DIY Santa Craft For Kids
-
 Paper Plate Angel Craft
-
 Upcycled Mason Jar Chicken Vase
- Knitting Ideas
-
 Knitted Bridger Cowl
-
 Knitted Keepsake Bag
-
 Knitted Cutie Cupcake Dolls