Crochet Loopy Treat Bags: A Creative Pattern for All Skill Levels

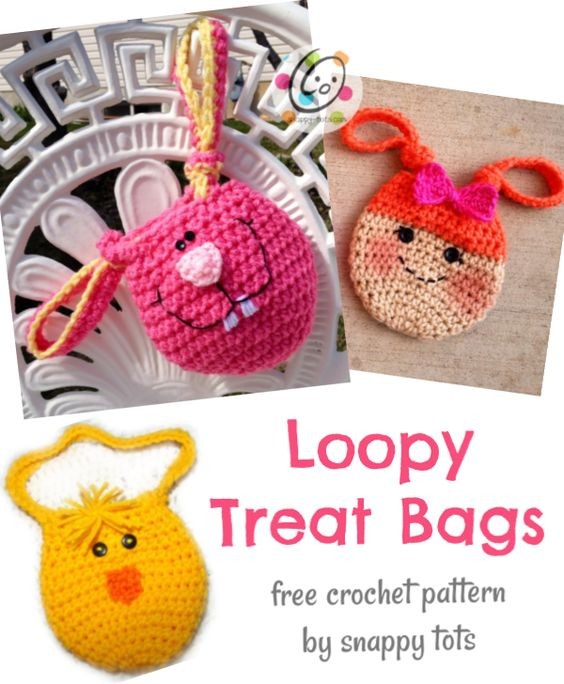
Create your very own unique treat bags with a fun and stylish twist by trying out the Crochet Loopy Treat Bags pattern. This pattern allows you to showcase your crochet skills while also creating a practical and adorable accessory. The loopy design adds a playful touch to the bags, making them perfect for storing small treats or gifts for special occasions. Whether you're a beginner or an experienced crocheter, this pattern is a great way to add a personal touch to your gift-giving. These treat bags are not only great for holding candies or small gifts, but they can also be used as decorative accents in your home. Whether you're making them for yourself or as gifts for friends and family, these Crochet Loopy Treat Bags are sure to be a hit.
Materials and Details
- Small amounts of worsted weight cotton or acrylic yarn
- Crochet Hook: H (5mm)
- Miscellaneous: yarn needle, 2 small black buttons, black embroidery floss, black sewing thread, sewing needle
- Size: 5.5” x 5.5” (measured flat)
Directions – Bunny Version
RND 1: With an H hook and pink yarn, start with a magic loop of 12 hdc (or preferred method for starting a circle of 12 hdc sts), do not join. Place marker and work in continuous rounds. (12sts)
RND 2: 2 hdc in each st to end of round. (24 sts)
RND 3: Hdc in each st to end of round. (24 sts)
RND 4: *hdc 3, 2 hdc in next st* repeat to end of round. (30 sts)
RND 5: *hdc 4, 2 hdc in next st* repeat to end of round. (36 sts)
RND 6-9: Hdc in each st to end of round.
RND 10: *hdc 4, hdc 2tog* repeat to end of round. (30 sts)
RND 11: Hdc in each st to end of round.
RND 12: *hdc 3, hdc 2tog* repeat to end of round. (24 sts)
RND 13: Hdc in each st to end of round. Sc in next st.
Handles and Ears
RND 14: This step starts the handles/ears. Ch 40, sk 4 sts of rim (from round 12). Make sure ch is not twisted, sl st in next 2 sts.
RND 15: Ch 1, turn. Working in “ch 40” (handle), sc in each ch across, sl st in next 2 sts of rim.
RND 16: Change to lt yellow, ch 1, turn, sc in each st on handle. Change to pink.
RND 17: Sl st in next st on rim, sc 5. Change to yellow. Ch 40, sk 4 sts (from round 12). Make sure ch is not twisted, sl st in next 2 sts. Ch 1, turn. Working in “ch 40” (second handle), sc in each ch across. Change to pink. Sl st in next 2 sts of rim.
RND 18: Ch 1, turn, sc in each st on handle. Sl st in next st on rim, sc 5. Finish off and weave in ends.
Finishing Touches
Tie each handle in a knot, approximately 1” from rim. Do NOT cinch in the top of the bag or it will be hard to fit anything inside. Ears are the perfect size to slip over a wrist.
Facial Features
Nose: Leave approximately 10” in the beginning. This will be used to attach the nose to the bag.
With an H hook and lt pink yarn, ch 5, sc in 2nd ch from hook and across. Ch 1, turn. Sc2tog, sc2tog, ch 1, turn. Sl st in last st, finish off and weave in ends.
Sew nose to bag. See main photo for placement.
Eyes: With black thread and sewing needle, sew buttons in place.
Mouth: With black embroidery floss and needle, stitch mouth in place.
Teeth: With white yarn and yarn needle, stitch teeth in place.
- Funny Pictures
-
 Pics to Get the Excitement Today
-
 Funny Christmas Meme Dump
-
 Funniest Relatable Felines in the Form of Memes
- Recipes
-
 Cappuccino Brownies
-
 Chicken Mushroom Tortellini Bake
-
 Spinach Pie
- Lifehacks
-
 8 Necessary Tips for Baking Bread
-
 Tips & Hacks for Clean Carpets
-
 10 Uses For Old TV Armoires
- Crochet Ideas
-
 Crochet Watermelon Amigurumi
-
 Crochet Shark Applique
-
 Crochet Pineapple Amigurumi
- DIY
-
 Yarn Wrapped Christmas Wreath Ornaments
-
 Egg Carton Snowman Ornament
-
 Stick Peppermint Candy Ornament
- Knitting Ideas
-
 Knitted Star Square Dishcloth
-
 Knitted Free 2025 Year Dishcloth
-
 Knitted Ribbed Adult Hat