Crochet Minion Pencil Case Tutorial

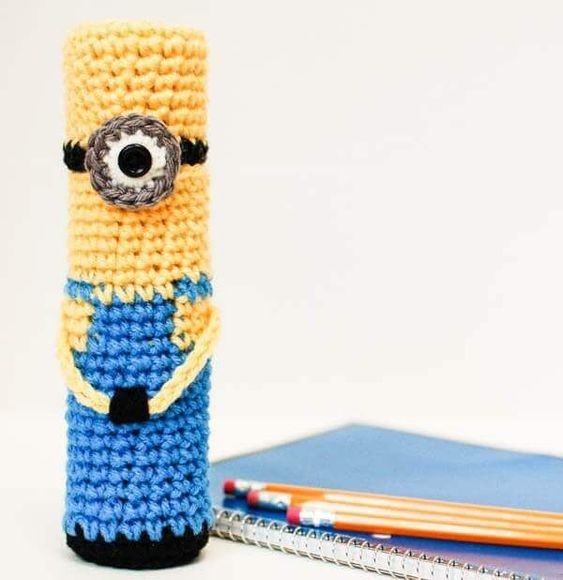
Create your very own Minion-inspired pencil case using the art of crochet! This fun and creative project allows you to customize the size, color, and details of your pencil case to make it truly unique. By following a simple crochet pattern, you can bring your favorite animated character to life in a practical and adorable way. Whether you're a beginner or an experienced crocheter, this project is sure to bring a smile to your face every time you use it. Choose yellow yarn for the main body of the pencil case, add some black yarn for the Minion's goggles, and finish off with a pop of color for the details. This project is a great way to practice your crochet skills while creating something fun and functional. So grab your crochet hook and get ready to make your very own Crochet Minion Pencil Case today!
Materials Needed
Here’s what you need:
- Cardboard paper towel tube
- Worsted weight yarn, small amounts of black, blue, yellow, white, and gray
- G hook
- ½ in. black button
- Tapestry needle, scissors
Abbreviations
Abbreviations, U.S. to U.K.
Special Techniques
Color Change Tip: In the stitch before the color change is to begin, insert hook as usual and pull up a loop, then yarn over with new color and pull through both loops on hook, continue with new color. Carry old color behind stitches unless directed to fasten off.
Preparing the Base
Cut cardboard paper towel tube into two pieces, one piece 6 in. long and the second piece 2 in. long. Discard remaining section.
Bottom Section
With black, make a magic ring.
Round 1: Ch 1 (does not count as st here and throughout), work 6 sc in ring, join — 6 sts.
Round 2: Ch 1, work 2 sc in same st as join and in each st around, join — 12 sts.
Round 3: Ch 1, work 2 sc in same st as join, 1 sc in next, *2 sc in next, 1 sc in next, rep from * around, join — 18 sts.
Round 4: Ch 1, working in back loops only, work 1 sc in same st as join and each st around, join — 18 sts.
Round 5: Join blue, ch 1, work 1 sc in same st as join and each st around, join — 18 sts.
Using the long length of cardboard tube, check your fit. I prefer to then keep the tube placed and continue crocheting around it from here on.
Rounds 6 through 15: Repeat Round 5 — 18 sts.
Round 16: Ch 1, work 1 sc in same st as join, 1 sc into the next st changing to yellow on last yarn over, work 1 sc in each of the next 5 sts changing to blue on last yarn over of fifth st, 1 sc in next 4 sts changing to yellow on last yarn over of 4th st, work 1 sc in each of the next 5 sts changing to blue on last yarn over of fifth st, 1 sc in next 2 sts around, join — 18 sts.
Rounds 17 and 18: Repeat Round 16 — 18 sts.
Round 19: Ch 1, work 1 sc in same st as join and each of the next 6 sts changing to yellow on last yarn over of the sixth st, work 1 sc in each of the next 4 sts changing to blue on last yarn over of fourth st, 1 sc in next 7 sts, join — 18 sts.
Round 20: Join yellow, ch 1, work 1 sc in same st as join and each st around, join — 18 sts.
Rounds 21 through 26: Repeat Round 20 — 18 sts.
Fasten off, leaving a tail of approx. 6 in.
Top Section
Using the smaller length of tube and yellow yarn, repeat Rounds 1 through 10 of bottom.
Round 11: Join black, ch 1, work 1 sc in same st as join and each st around, join — 18 sts.
Fasten off, leaving a tail of approx. 6 in.
Eye Section
With white, make a magic ring but do not close up the hole.
Round 1: Ch 1, work 12 sc in ring, join — 12 sts.
Round 2: Join gray, ch 1, work 1 sc in same st as join and each st around — 12 sts.
The center of the eye (the magic ring) is also the buttonhole. Make sure to test the size with your button. The button should go through easily but without slipping through. Use the tail of your yarn to adjust the size of the ring for your button. Once you get the correct size, use a tapestry needle to weave the tail back and forth through the backs of your stitches to secure it.
Finishing Touches
Line up the joining seams and tails of both parts. Using a tapestry needle and the long tails, sew top and bottom together along 5 sts only forming a hinge on which the top will open. Find the center of your front and sew the button on Round 11 of the top piece. Line up the buttonhole (the eye) with the button and sew the bottom of the eye to the bottom piece. Weave in ends.
To make arms, join yellow to center yellow stitch of Round 17 of bottom, chain 17, join to center yellow stitch at the other side of Round 17. Using a tapestry needle and black yarn, make a few overlay stitches to secure the arms to the front of the case.

- Funny Pictures
-
 Relatable and Funny Memes to Distract You From the Routine
-
 Hilarious Cat Snapchats That Will Leave You With the Biggest Smile
-
 Today’s Top Funny Tweets to Scroll Before Bed
- Recipes
-
 Cappuccino Brownies
-
 Chicken Mushroom Tortellini Bake
-
 Spinach Pie
- Lifehacks
-
 8 Necessary Tips for Baking Bread
-
 Tips & Hacks for Clean Carpets
-
 10 Uses For Old TV Armoires
- Crochet Ideas
-
 Crochet Watermelon Amigurumi
-
 Crochet Flower Hat for your Pet
-
 Crochet Shark Applique
- DIY
-
 Crochet Titus the Barn Owl
-
 Crochet Rainbow Bunny
-
 DIY Washer Ornaments
- Knitting Ideas
-
 Knitted Star Square Dishcloth
-
 Knitted Free 2025 Year Dishcloth
-
 Knitted Ribbed Adult Hat