Create a Reversible Hot Pad Using Crochet Techniques

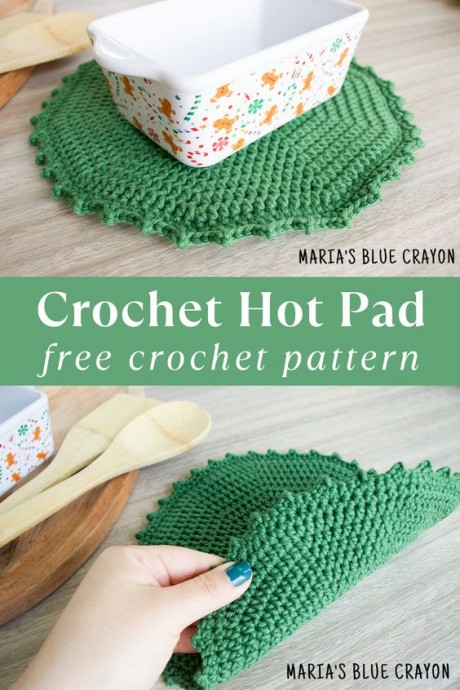
Create a reversible hot pad using the art of crochet. This project involves using a double-sided technique to make a functional and stylish kitchen accessory. By crocheting two separate pieces and then joining them together, you can achieve a hot pad that is not only practical but also visually appealing. Choose complementary colors or patterns to make each side unique, adding a personal touch to your kitchen decor. The texture created by the crochet stitches provides a good grip, preventing slippage and ensuring safety while cooking. This project is a great way to practice your crochet skills while also creating a useful item for your home. Whether you are a beginner or an experienced crocheter, this double-sided hot pad is a fun and rewarding project to take on.
Materials
Dishie Cotton Yarn (1 skein/190 yards)
4.00mm crochet hook
Tapestry needle
Scissors
Crochet Pattern Notes
I used almost an entire skein for this hot pad; you may want to have extra just in case your tension is a bit looser.
The beginning chain does not count as a stitch.
I’m using a modified picot stitch in this pattern, but I will be referring to it as the picot stitch.
Modified picot stitch: sc, ch 2, sc (all in one stitch)
Dimensions: 9” in width
Abbreviations: (US terms)
- Ch = chain
- Sc = single crochet
- Hdc = half double crochet
Crochet Pattern
Round 1: Magic ring, ch 1, 10 hdc in ring, join to first st (10)
Round 2: Ch 1, 2 hdc in each st around, join to first st (20)
Round 3: Ch 1, *hdc in next st, 2 hdc in next st, repeat from * around, join to first st (30)
Round 4: Ch 1, *hdc in next 2 st, 2 hdc in next st, repeat from * around, join to first st (40)
Round 5: Ch 1, *hdc in next 3 st, 2 hdc in next st, repeat from * around, join to first st (50)
Round 6: Ch 1, *hdc in next 4 st, 2 hdc in next st, repeat from * around, join to first st (60)
Round 7: Ch 1, *hdc in next 5 st, 2 hdc in next st, repeat from * around, join to first st (70)
Round 8: Ch 1, *hdc in next 6 st, 2 hdc in next st, repeat from * around, join to first st (80)
Round 9: Ch 1, *hdc in next 7 st, 2 hdc in next st, repeat from * around, join to first st (90)
Round 10: Ch 1, *hdc in next 8 st, 2 hdc in next st, repeat from * around, join to first st (100)
Round 11: Ch 1, *hdc in next 9 st, 2 hdc in next st, repeat from * around, join to first st (110)
Round 12: Ch 1, *hdc in next 10 st, 2 hdc in next st, repeat from * around, join to first st (120)
Fasten off and weave in ends.
Make two circles.
Once both circles are finished, we will crochet them together.
Hold both circles so the ‘right sides’ are facing out.
Insert hook into both circles on the last row and single crochet together. Join to first st of the round
Last row: Ch 1, *sc in next 2 st, picot st, repeat from * around, join to first st
Fasten off and weave in ends.
- Funny Pictures
-
 Hilarious Memes for Those Bored to Tears
-
 Weekly Treat of Funniest Parenting Memes for Good Laugh out Loud Right Now
-
 Really Funny Pics to End These Weekend Perfectly
- Recipes
-
 Crispy Baked Avocado Fries
-
 Scrambled Chickpea and Spinach Pitas
-
 Cinnamon Pancakes
- Lifehacks
-
 Crochet Basics: Aligned Cobble Stitch
-
 Brick Stitch Crochet Tutorial
-
 Crochet Basics: Wattle Stitch
- Crochet Ideas
-
 Crochet Snorlax Plushie Doll
-
 Crochet Beautiful Penguin Toy
-
 Crochet Tiny Snowman
- DIY
-
 DIY Santa Craft For Kids
-
 Paper Plate Angel Craft
-
 Upcycled Mason Jar Chicken Vase
- Knitting Ideas
-
 Knitted Bridger Cowl
-
 Knitted Keepsake Bag
-
 Knitted Cutie Cupcake Dolls