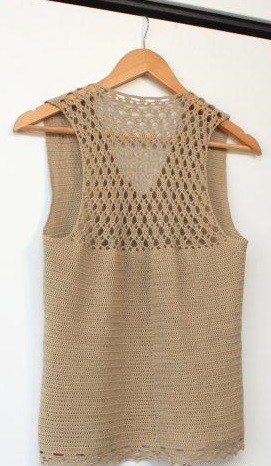
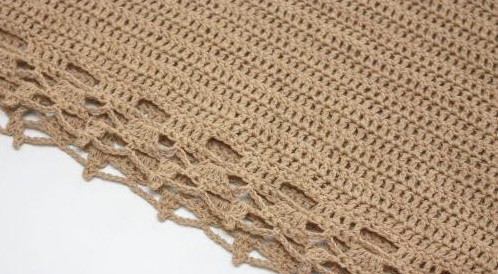
How to Crochet a Stylish Cotton Top


You'll Need:
4 skeins of 100% cotton yarn (280m/50g);
Crochet hooks 1.75 and 2.5 mm;
Markers;
Needle;
Scissors;
Measuring tape.
Instructions
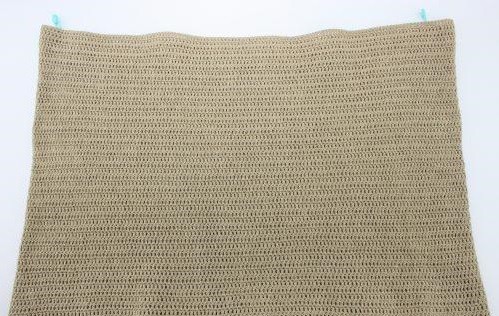
Make 252 chain stitches, including chain stitch increase.
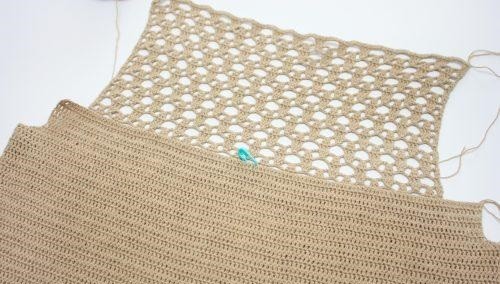
Crochet around, but with turning rows. The seam will go on the back. Pay attention to the odd quantity of stitches when you divide the cloth into front and back, to ensure your seam is in the center, and create a central stitch for the hole in the front.
Crochet 33 cm of the total body, which equals 52 rows. The width of the body is 47 cm when folded.
Divide the stitches of the body in the following way: 127 stitches for the front and 125 stitches for the back.
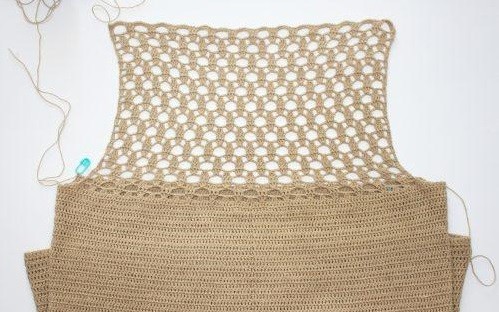
Back
Leave 6 stitches for arm-holes on each side.
125 – 12 = 113 stitches.
The pattern repeat of the back is 8 stitches + 1 auxiliary stitch over 4 rows in height.
113 – 1 = 112 / 8 = 14.
For the arm-hole, from the 6 stitches, do not use 3 stitches from the center of the arm-hole. Create a chamfer from the remaining 3 stitches as follows: slip stitch, single crochet, half double crochet. Thus, 112 / 2 = 56 stitches.
Count 56 + 3 = 59 stitches from the central stitch (seam) on both sides and place markers. Start crocheting from the right side, as the last circle row was worked on the wrong side.
Make 21 cm in height for the arm-hole. Follow up with one more pattern repeat (3.5 cm). The height of the relief back is 24.5 cm.
The last 4th row of the back is to be crocheted with single crochets in every stitch, then cut the yarn.
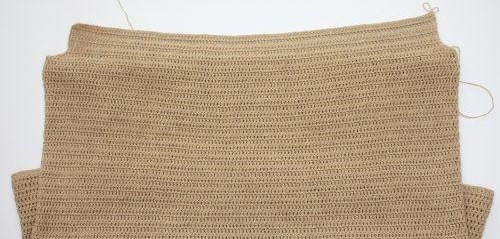
Front
Previously, we left 127 stitches for the front.
Make 6 stitches for each arm-hole. Use them the same way as you did for the back, i.e., do not use 3 stitches from the center of the arm-hole and make a chamfer from the remaining 3 stitches using: slip stitch, single crochet, half double crochet.
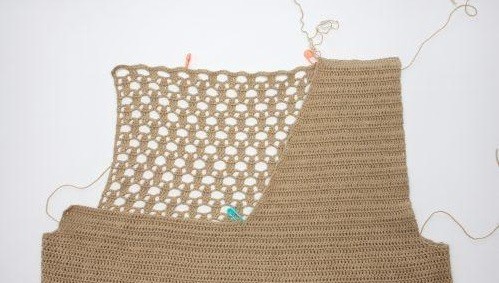
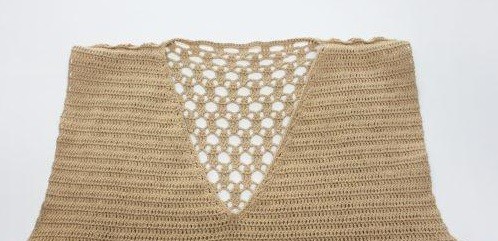
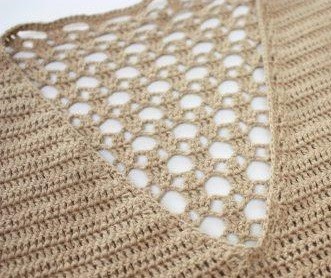
If you want to create a deeper neck-hole, start forming it from the first row. To do this, place a marker on the central stitch, which divides the front in half and isn't crocheted.
If you want the neck-hole to match the tutorial shown, then you need to complete the first 6 rows (115 stitches). Don't forget that you will crochet arm-holes in the first row at the same time. Therefore, in the 1st row, you should have 57 + 57 + 1 (central stitch) + 3 (arm-hole) + 3 (arm-hole) = 121 stitches between the markers. Attach the yarn on the right side. The ornament of the front matches that of the body - turn rows of double crochets.
Then, create the right front with 57 stitches. Make decreases in every row from the neck-hole side.
33 cm = 52 rows.
After making the front, you should have 30 stitches left (57 - 27 = 30).
Do not cut the yarn and proceed to make shoulder seam on the wrong side with slip stitches. The direction is from the neck-hole to the arm-hole. Cut the yarn.
Then, crochet the left front in a similar manner to the right, making decreases from the neck-hole in every row.
Finish the 27th row from the arm-hole side. Create the shoulder seam on the wrong side with slip stitches from the arm-hole to the neck-hole. Do not cut the yarn, fasten the neck-hole.
Neck-Hole Fastening
Since this is done on the right side, neck-hole fastening starts from the back. Make slip stitches in all free stitches. Use single crochets on the fronts, inserting the crochet hook only in part of the edging stitches. Crocheting the angle entails 3 single crochets together.
In this way, return to the left shoulder. Connect carefully, cut the yarn and hide the "tails".
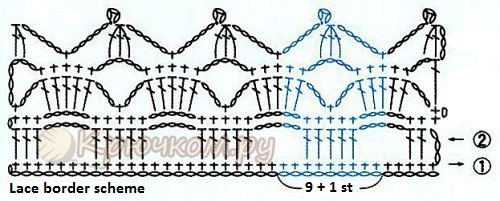
Fastening of Bottom Part
We will use a lace border for the top fastening. The pattern repeat in this case is 9 stitches.
Note: Start crocheting with the wrong side using single crochet to achieve all combinations with double crochets on the right side. Crochet in a circle while turning rows.
- Funny Pictures
-
 Pics to Get the Excitement Today
-
 Funny Christmas Meme Dump
-
 Funniest Relatable Felines in the Form of Memes
- Recipes
-
 Cappuccino Brownies
-
 Chicken Mushroom Tortellini Bake
-
 Spinach Pie
- Lifehacks
-
 8 Necessary Tips for Baking Bread
-
 Tips & Hacks for Clean Carpets
-
 10 Uses For Old TV Armoires
- Crochet Ideas
-
 Crochet Watermelon Amigurumi
-
 Crochet Shark Applique
-
 Crochet Pineapple Amigurumi
- DIY
-
 Yarn Wrapped Christmas Wreath Ornaments
-
 Egg Carton Snowman Ornament
-
 Stick Peppermint Candy Ornament
- Knitting Ideas
-
 Knitted Star Square Dishcloth
-
 Knitted Free 2025 Year Dishcloth
-
 Knitted Belle Finger Puppet
seeing some nice things