Crochet Pattern for 0-3 Months: Materials and Instructions

You’ll Need:
6 skeins of Stylecraft Special Chunky yarn;
Crochet hook 9 mm;
Yarn needle;
Scissors;
Stitch markers;
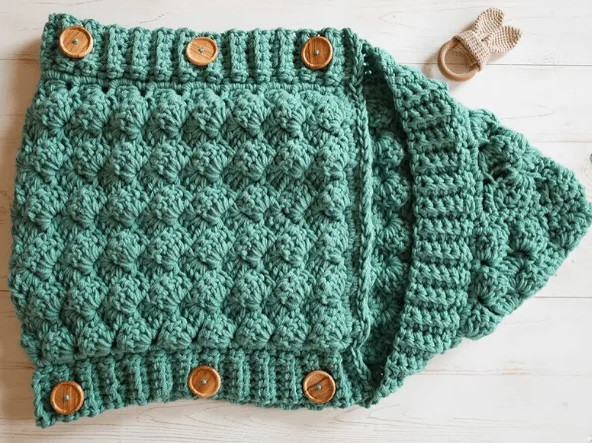
6 wooden buttons about 4 cm.
Size:
0-3 months.
Stitches Control:
2 clusters x 4 rows = 10 x 10 cm.
Instructions
First Row:
ch 25 (33), sc in second chain from hook and in all chains, ch 1, turn (24, 32);Second Row:
* (sc, ch 2, 4 dc) – cluster, in first st, sk next 3 st *, repeat from * to * across, sc in last st, turn;Third Row:
Ch 3, 4 dc in same st as the ch 3, * (sc, ch 2, 4 dc) in next ch 2-space *, repeat from * to * across, sc in last ch 2-space;Fourth to Forty-Sixth Rows:
as the 3rd row.
Edging
Forty-Seventh Row:
ch 3, tr, * dc, hdc, sc 2 * repeat from * to * until the end of row and do not cut yarn.Single crochet evenly around and remember to place 3 single crochet stitches in every corner. Do not single crochet in the top of the even edging row. Cut yarn and leave a long tail for sewing.
Sew the hood inside. This piece is reversible so, just decide which one will be the good side of the fabric.
Place stitch markers on rows 2, 8, and 14 on both sides.
Ribbing
Now you will start your ribbing by attaching the yarn on the top left corner.
First Row:
ch 6, sc in second ch from hook and in next 4 chains, sl st in next 2 stitches of the single crochet row, ch 1 turn (5);Second Row:
sc in blo in each st across, ch 1, turn (5);Third Row:
sc in blo in each st across, sl st in next 2 stitches of the single crochet row, ch 1 turn (5);Repeat 2nd-3rd rows.
Buttonholes
When a sl st on the single crochet row hits a stitch with a stitch marker this is where you will create the buttonholes. Remove stitch markers as you go.
In such a row, the pattern will be sc 2, ch 1, sk 1, sc 2, ch 1, turn.
Fold the piece right side up and place the stitch markers again exactly below the buttonholes and sew the buttons. Remove stitch markers.
please explain «cluster stitch» how to directions