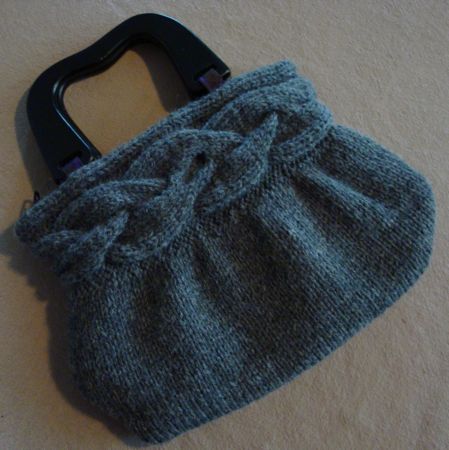
Cable Band Bag Pattern

Finished Measurements
11 inches (at widest point) by 7.5 inches tall (not including handles).
Yarn
Worsted weight, approximately 130 yds—sample knit with one skein of Wool-Ease Oxford Grey.
Gauge
18 stitches per 4 inches.
Needle Size
8 US / 5mm.
Notes
This pattern uses a provisional cast-on and an advanced grafting technique; some experience with grafting (Kitchener stitch) is recommended.
The cable band forms the top of the bag, and then the body of the bag is picked up along the bottom edge of the cable band and worked in the round down from there.
Abbreviations
- st = stitch
- K = knit
- P = purl
- C12F = slip next 6 stitches to cable needle and hold to front of work, knit next 6 stitches from left-hand needle, knit 6 stitches from cable needle
- C12B = slip next 6 stitches to cable needle and hold to back of work, knit next 6 stitches from left-hand needle, knit 6 stitches from cable needle
Pattern
Cable Band
Using provisional cast on, cast on 29 stitches.
Row 1: Knit 4, purl 3, knit 18, purl 4.
Row 2: Knit 4, purl 18, knit 3, purl 4.
Row 3: Knit 4, purl 3, knit 6, C12F, purl 4.
Row 4: Knit 4, purl 18, knit 3, purl 4.
Rows 5–10: Repeat rows 1 and 2.
Row 11: Knit 4, purl 3, C12B, knit 6, purl 4.
Row 12: Knit 4, purl 18, knit 3, purl 4.
Rows 13–16: Repeat rows 1 and 2.
Work these 16 rows 7 times (7 pattern repeats total), then work one more repeat ending with row 13.
Joining the Band Seamlessly
Grafting (Kitchener stitch) is most commonly done on stockinette. For grafting the reverse stockinette sections, there is a slight difference, but it’s not very difficult.
Thread a length of yarn onto a tapestry needle. Hold the needles so that the cast-on stitches are on the back needle and the ending edge of stitches are on the front needle (the right sides of the cable should be facing out, making sure the cable band is not twisted). The “i-cord” side of the band will be to the right side and will be the starting point for grafting.
Set up as usual: go through the first stitch on the front needle purlwise, then go through the first stitch on the back needle knitwise. Go through the first stitch/front needle knitwise and slip it off the needle, then the second stitch/front needle purlwise; go through the first stitch/back needle purlwise and slip it off the needle, then the second stitch/back needle knitwise.
Basic Kitchener Stitch Summary
Front needle: knit, slip, purl. Back needle: purl, slip, knit.
Reverse stockinette section: keep working the front needle the same as for stockinette grafting, but on the back needle, work in the opposite direction for the purl stitches. So, on the back needle, work the last knit stitch purlwise, slip off the needle, then go through the first purl stitch purlwise instead of knitwise. Work the front needle the same as usual—knit, slip, purl—then work the back needle knit, slip, purl.
As soon as you reach the cable section, you’ll start working the back needle in the usual grafting method again (front needle: knit, slip, purl; back needle: purl, slip, knit). When you get to the last section of purl stitches, work just as you did for the previous purl stitches.
So, you always work the front needle the same. On the back needle, you go through the purl stitches in the opposite direction than you’d do if they were knit stitches. It sounds more complicated than it is.
Bag Body
Beginning at the end of the join, pick up 102 stitches (approximately 4 out of every 5 stitches) around the bottom edge of the cable band. Place a marker, join, and work stockinette stitch for about 5 inches. Bind off with a three-needle bind off (or bind off and sew the edge closed).
Turn the bag inside out. Sew diagonally across the bottom corners. Weave in all ends, and turn right side out.
Lining is recommended to add stability. You may use any kind of handle you like; solid wooden handles will hold the shape of the bag, as they will not allow the fabric to pull in when the bag is being carried.


