Noelle Crochet Mittens

Susan
Dec 21, 2019 01:26 AM


Notes:
Mittens are worked from the bottom up, thumb is worked last.
One size fits most.
Finished Measurements
Mittens do stretch for wearing.
Lying Flat
4” Wide
9.5” Tall
Materials:
5.50mm Crochet Hook
150 yards Worsted Weight Yarn (I used Yarn Bee’s WildStreak in Riverstone this is a medium 4 weight yarn but It has a more worsted feel)
Stitch Marker
Yarn Needle
Scissors
Gauge:
In Half Double Crochet In Hidden Loop Using 5.50mm Crochet Hook
14 Sts = 4”
12 Rows = 4”
Abbreviations:
Ch - Chain
SC - Single Crochet
SL ST - Slip Stitch
SC BLO - Single Crochet in the Back Loop Only
SL ST BLO - Slip Stitch int he Back Loop Only
HDC - Half Double Crochet
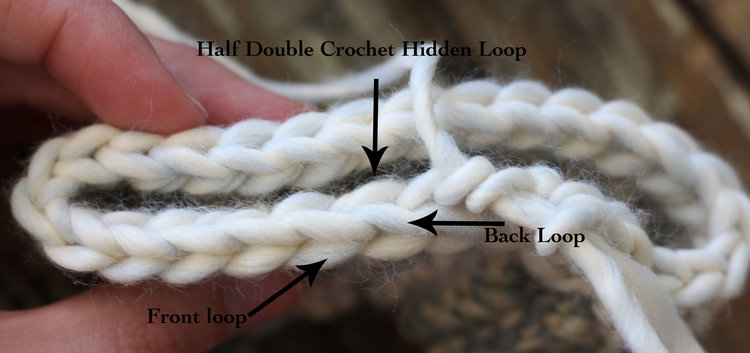
HDC HL - Half Double Crochet into the Hidden Loop (or 3rd Loop)
PM - Place Marker
Sts - Stitches
Sk - Skip
HDCHL-2Tog - Half Double Crochet into the Hidden Loop 2 Stitches Together (Decrease)
Pattern:
The AD FREE Printable PDF for this pattern can be found HERE.
Right Mitten:
Band
Ch7
R1 - Turn, SC across (6)
R2 - Ch1, Turn, SL ST BLO across (6)
R3 - Ch1, Turn, SC BLO across (6)
Repeat rows 2 & 3 for a total of 28 rows.
Do not fasten off, instead (wrong side facing you) slip stitch the last row to the first row to make the band. Flip your work inside out so that the right side is now facing you.
sidesband.jpg
Notes -
Working across the top of the band.
From this point on you will be using a stitch marker to mark the beginning of each round.
Body -
R1 - PM, Ch1, SC into each row around the band (28)
R2 - HDC around (28)
R3 - HDC HL around (28)
Repeat round 3 for a total of 10 rounds.
Thumb Hole
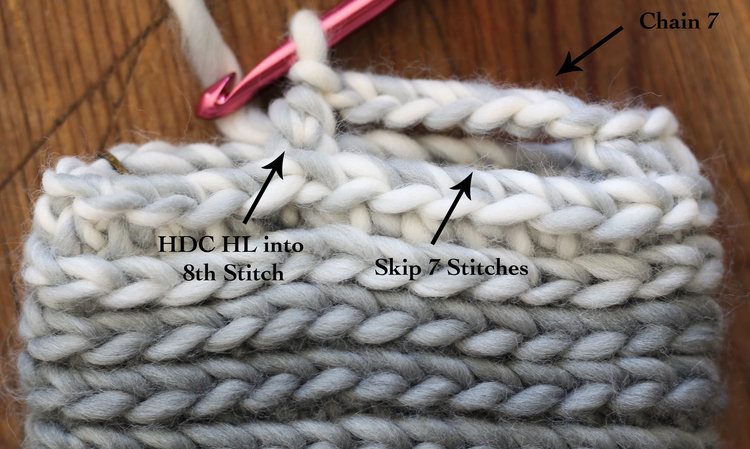
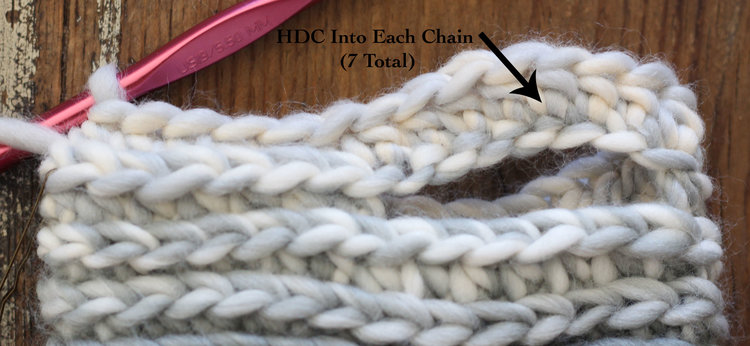
R11 - HDC HL into the next 14 Sts, Ch7, Sk7, HDC into last 7 Sts (28)
R12 - HDC HL around (28)
Repeat round 12 for a total of 18 rounds
Decreasing
R19 - *HDCHL-2Tog, HDC HL into next 7 Sts, repeat from * 3 Times, HDC HL into last (25)
R20 - *HDCHL-2Tog, HDC HL into next 6 Sts, repeat from * 3 Times, HDC HL into last (22)
R21 - *HDCHL-2Tog, HDC HL into next 5 Sts, repeat from * 3 Times, HDC HL into last (19)
R22 - *HDCHL-2Tog, HDC HL into next 4 Sts, repeat from * 3 Times, HDC HL into last (16)
R23 - *HDCHL-2Tog, HDC HL into next 3 Sts, repeat from * 3 Times, HDC HL into last (13)
R24 - *HDCHL-2Tog, HDC HL into next 2 Sts, repeat from * 3 Times, HDC HL into last (10)
Slip Stitch. Fasten off, leaving a long tail.
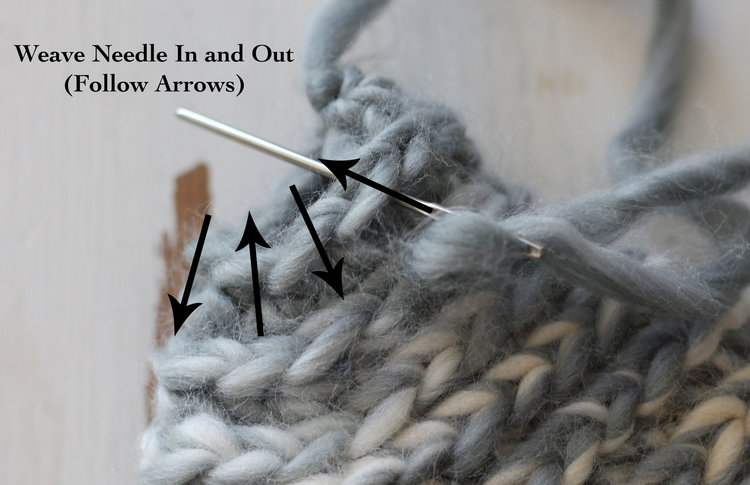
Closing Hole
Using your long tail and yarn needle, weave your needle in and out throughout the last rows stitches. Pull tight to cinch the hole closed. Weave in ends.
Continue on to thumb.
closeupmittens.jpg
Left Mitten:
Band -
Ch7
R1 - Turn, SC across (6)
R2 - Ch1, Turn, SL ST BLO across (6)
R3 - Ch1, Turn, SC BLO across (6)
Repeat rows 2 & 3 for a total of 28 rows.
Do not fasten off, instead (wrong side facing you) slip stitch the last row to the first row to make the band. Flip your work inside out so that the right side is now facing you.
Notes - Working across the top of the band.
From this point on you will be using a stitch marker to mark the beginning of each round.
Body - Working across the top of the band.
From this point on you will be using a stitch marker to mark the beginning of each round.
R1 - PM, Ch1, SC into each row around the band (28)
R2 - HDC around (28)
R3 - HDC HL around (28)
Repeat round 3 for a total of 10 rounds.
Thumb Hole
R11 - HDC HL into the next 7 Sts, Ch7, Sk7, HDC into last 14 Sts (28)
R12 - HDC HL around (28)
Repeat round 12 for a total of 18 rounds
Decreasing
R19 - *HDCHL-2Tog, HDC HL into next 7 Sts, repeat from * 3 Times, HDC HL into last (25)
R20 - *HDCHL-2Tog, HDC HL into next 6 Sts, repeat from * 3 Times, HDC HL into last (22)
R21 - *HDCHL-2Tog, HDC HL into next 5 Sts, repeat from * 3 Times, HDC HL into last (19)
R22 - *HDCHL-2Tog, HDC HL into next 4 Sts, repeat from * 3 Times, HDC HL into last (16)
R23 - *HDCHL-2Tog, HDC HL into next 3 Sts, repeat from * 3 Times, HDC HL into last (13)
R24 - *HDCHL-2Tog, HDC HL into next 2 Sts, repeat from * 3 Times, HDC HL into last (10)
Slip Stitch. Fasten off, leaving a long tail.
Closing Hole
Using your long tail and yarn needle, weave your needle in and out throughout the last rows stitches. Pull tight to cinch the hole closed. Weave in ends.
Thumb:
Attach yarn to the thumb hole.
Note
When decreasing thumb section your work will start to get a little tight and harder to crochet in, power through it!
There will be two holes left on each side of the thumb that will need to be sewn shut at the end.
R1 - HDC HL around (14)
R2 - HDC HL around (14)
R3 - HDCHL-2Tog. HDC into next into the next 5 Sts, HDCHL-2Tog, HDC HL into the last 5 Sts (12)
R4 - HDCHL-2Tog. HDC into next into the next 4 Sts, HDCHL-2Tog, HDC HL into the last 4 Sts (10)
R5 - HDCHL-2Tog. HDC into next into the next 3 Sts, HDCHL-2Tog, HDC HL into the last 3 Sts (8)
R6 - HDCHL-2Tog. HDC into next into the next 2 Sts, HDCHL-2Tog, HDC HL into the last 2 Sts (6)
Slip stitch. Fasten off, leaving a long tail.
Closing Hole
Using your long tail and yarn needle, weave your needle in and out throughout the last rows stitches. Pull tight to cinch the hole closed. Weave in ends.
6 comments
Write a comment

Gracie
Dec 21, 2019 09:16 AM
Like them a lot
Reply

Heidi
Dec 21, 2019 09:24 AM
In my favourite colours
Reply

Annabelle
Dec 21, 2019 09:55 AM
Perfect colours matching
Reply

Anna
Dec 21, 2019 10:29 AM
I like such mittens, but I should leave my hands free for them
Reply

Lexi
Dec 21, 2019 10:37 AM
They are big, but that what I like
Reply
Susan
Dec 22, 2019 11:20 AM
Pleased to help you
Reply