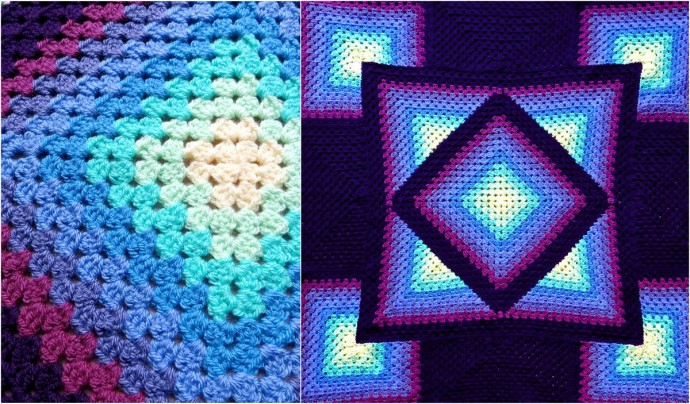
Two-Sided Granny Square Crochet Pattern

You’ll Need:
5 7oz skeins of Red Heart Regular Super Saver yarn;
Crochet hook 5.5 mm.
Instructions
Two Sided
Behind the front and back loops of the Slp st row, you will find 2 threads on the edge. One is slightly longer than the second thread back, and the second is a little behind (closer to your hook hand) than the front one. You will use these for every attachment. This will leave a ridge on both the front and back sides of the piece. You will use the back 2 threads of the Ch1 spaces to anchor the corners at each center side.
One Sided
On the edge, use one center thread and one back loop to attach every row, the two back threads of the center Ch1 will anchor your corner group.
Note: SC’s used at the beginning and end of rows are treated like a Ch1 space. You work around the ‘post’ of the sc like you would a Ch st.
Starting at the center marked Ch st, moving backwards towards the hand holding the hook, SC into the second st from center, (edge of your ‘hook side center cluster’) with your center color. Ch1 and make a corner cluster set in the center marked stitch. (3DC, Ch3, 3DC) Ch1 and sl st to the second st on the other side of center. (outside edge of the cluster on the other side of center.)
Ch 1 and anchor the other side with a slip stitch.
Ch3. Count to second st out from where you attached the sl st and make a SC. (Space for next cluster) Turn Work!
Row Instructions
Row 2: Make 2DC in Ch1 sp. at the base of the ch3. (3DC cluster made).
Make a typical corner cluster set in the corner tip. Make 3DC cluster in the original SC made when you started the color.
Now, to end color, SC into the second stitch up, and tie off. Turn Work!
Row 3: Back on the front to add your next color… Sl st to second st from last used on that side. (1st st of third cluster, hook side) Ch1, make a 3DC cluster in the SC space at end of last color. Continue granny style through the side and around the corner to the other side. Again at the other side, ch1 sl st to second chain from last attachment, Ch3, and SC in second st out from last sl st. (1st st of third cluster on that side) Turn Work.
Each row and set of colors is handled the same way. Continue on till you reach the corners.
At the Corners
Your 8th row will be different. When you come up from connecting the end of the 7th row, you chain 3 and do not attach to the side. Turn and using the space in the last row, continue back down for your 8th row, by completing the cluster you started with the chain 3. At the end of the row, do not tie off, and do not attach… pull out a long stitch and loosely tie it. Leave a slightly long tail and cut. Turn work. With the front facing you, move around forward to the next side. At the end of the 8th row, Ch1 and slp st into the top of the chain 3 of the 8th row of the last side you did, and tie off. Turn work to front again and go forward to the next side. Repeat for each side. At the end, use the long tail of the first section to ch1 and slp st to the last side.
The 9th row will have the center cluster over the corners, and bury the Ch1 space (like you do if you are hiding a tail) and connect the cluster on the corner stitch into the lower color. You will not stitch around it like on the regular granny corners. Go behind the front loop and use two middle ones. This leaves the stitch ridges showing on the inner diamond, so it looks like the inner is sitting on the outer. What color you end your outer square is up to you, but it looks better if you end it with the same color as the inner square.
For each ongoing layer of outer squares, you treat them just like the first. Make your sl st row using the front loops only and make your side connections on these inner loops of the sl st row.
As the squares grow, no 2 side configurations will be alike. You will be using more sets of color bands on each layer, after the first one, or using more rows of each color if you choose. You can use one or two more rows on the outside to finalize the throw. It is all up to you.
Be flexible and have fun with this. Fudge a couple stitches if you have to to make it work out right. Crochet is very forgiving and will not show such adjustments easily.
Line by Line
Begin: Make magic circle,
Row 1 – Ch 3, in Magic Circle… 2DC, *Ch3, 3DC* 3x’s. Ch2, Close Magic Circle. SC to top of Ch3. Chain 3 and turn. (turn every row on inner granny!)
Row 2 – 2DC in Ch2 sp, *3DC, Ch3, 3DC* in next Ch3 space, repeat *-* 2x’s. 3DC around post of SC, Ch3 Slp st to top of Ch3. Tie off. Turn.
Row 3 – Change color, Slp st in any side space and Ch3, 2DC in same sp, *3DC, Ch3, 3DC in next corner*. 3DC in next gap, 3DC Ch3 3DC in next corner. Repeat around to first cluster. Slp st to top of Ch3. Ch3 and turn.
Row 4 – 2DC in same gap, 3DC in each gap, 3DC, Ch3, 3DC in each Corner cluster Ch3 sp. Slp st to top of first Ch3. Tie off.
Row 5 – Change color, Slp st in any middle gap. Ch3, 2DC in same gap. 3DC in every gap, Corner cluster [3DC, Ch3, 3DC] in every Ch3 corner. Slp st to top of first Ch3 in first cluster, Ch3 and turn.
Row 6 – 2DC in same gap. 3DC in each gap, Corner cluster in each Ch3 corner, Slp st to top of first Ch3 and tie off. Turn.
Row 7 – Change color. Slp st in any middle gap, Ch3, 2DC in same gap. 3DC in each gap and Corner cluster in each corner around. Slp st in top of first Ch3, Ch3 and turn.
Row 8 to 10 – repeat rows 6, 7. Do not turn at end of row 10!
Outside of Square
With Slp st on hook, front of the last row is facing you. Slp St in front loop of each DC and loosely in each Chain. > Ch1 in center of each side. >Mark Ch1. Slp st to first Slp st and tie off.
This is the end of the inner Granny square.
Notes:
All row connections:
2-Sided connections are on center 2 threads on edge. See long note above.
1-Sided connections are on center thread behind the Slp st’s and the back loop.
All Outer Sections:
All even rows start and end in SC,
All odd rows, start and end with Ch1.
Row 8 does not connect to inner square.
First Side
Row 1 – Looking at it from the center out… Slp st in 3rd DC of first center cluster, and Ch1. In marked Ch1 sp, *3DC, Ch3, 3DC* (Corner set). Ch1, Slp st to 3rd, DC of cluster on other side of center.
Row 2 – Ch3, SC to middle DC of next cluster out. Turn work. 2DC in Ch1 sp. Corner set in corner Ch3 sp., 3DC in Ch1 sp. SC to middle of next cluster. Tie off. Turn work. See pictures above.
Row 3 – Change color. Slp st to 1st DC of next cluster out, Ch1, 3DC in SC, 3DC in next gap, Corner set, 3DC in next gap, 3DC in SC, Ch1, Slp st to 1st DC of next cluster.
Row 4 – Ch3, SC to last DC of same cluster. Turn work. 2DC in Ch1 sp., 3DC in next 2 gaps, corner set, 3DC in next 2 gaps, 3DC in Ch1 sp. SC to last DC of same cluster. Tie off. Turn work.
Row 5 – Change color. Slp st to middle DC of next cluster. Ch1, 3DC in SC, 3DC in each gap, Corner set, 3DC in each gap, 3DC in SC, Ch1, Slp st to middle DC of next cluster.
Row 6 – Ch3, SC to 1st DC of next cluster. Turn work. 2DC in Ch1 sp., 3DC in next 2 gaps, corner set, 3DC in next 2 gaps, 3DC in Ch1 sp. SC to first DC of next cluster. Tie off. Turn work.
Row 7 – Change color. Tie onto last DC on side. Ch1, 3DC in SC, 3DC in each gap., corner set, 3DC in each gap, 3DC in SC. Ch1, slp st to last DC of side, Ch3 and TURN.
Row 8 – 2DC in Ch1 sp, 3DC in each gap, corner set, 3DC in each gap, 3DC in Ch1 sp. Pull out long loop or secure with a marker. Leave 4-5” tail. Cut. Turn.
2nd – 4th Sections
You have the front facing you. Back up to the next side behind your hook hand (right for right handed, left for left handed).
Same as first, but at end of row 8, you will Ch1 and slp st to 3rd ch of row 8 on last section made.
Now undo long loop on first section row 8 and Ch1 and slp st to top of Ch3 of 4th section, Row 8. Turn work so back of row 8 faces you.
Row 9 – Tie onto any gap before inner square corner and Ch3. 2 more DC in gap, 3DC over Ch1 of Row 8 and through back 2 threads of Ch3 corner of inner square. 3DC in each gap around. Corner clusters in each corner Ch3. Repeat to beginning, Slp st in 3rd Ch of first DC.
Row 10 – Ch3 and turn. 2DC in same gap, 3DC in each gap and corner sets in each corner to end. Slp st into top of Ch3. Do not turn.
Slip Stitch Row
Slp st into front loops of each DC and Ch st. Add extra Ch1 at center of each side and mark it. Slp st into first Slp st. Tie off.
End of second square.
The next layer will not end with the last color at the tips of the square you just completed. But the rows are treated just the same.
Third Square
Rows 1-12 – Do the same as rows 1-6 on last outside corner sets.
You will end tied off rows at Row 12. You will be on your second run, through the color changes. So row 12 will be the end of your 1st color of the second go round. It will begin and end on the middle DC of the ‘second to the last cluster’ on each side.
This is the end of separate sides.
Row 13: Start a couple clusters back. Add 2nd color with a slip st and Ch 3 and work up to the inner corner. @Ch 1, Slp St into the last cluster on inner corner. (EXTRA STEP: Turn work over so you can see the back of the slip stitch, Slp St into the “leg” of the slip st), Ch 2 Ch 1, Slp st into the 1st DC of the last cluster on inner corner. Do EXTRA STEP, Ch 1, 3DC in SC gap.@ [Repeat @to@ at each inner corner.] Cluster in each cluster around and corner set in each corner. Ch 1 and Slp St into top of Ch 3. Chain 3 and turn.
Row 14 – 3DC in each gap, Corner set in each corner, 3DC in Ch 1 sp before inner corner, skip Ch 2 sp. Ch1, 3DC in next Ch 1 sp, and continue on around to beginning. Ch1 and slp st into 3rd Ch on Ch3. Tie off.
Rows 15 to 20 – Just 3 Color changes to go! Add 3rd color anywhere, and finish last 6 rows same as rows 7-10 in inner granny square.
Outside Edge
We are going to finish with a Barred Single crochet. This is one of my own stitches that makes a really nice two-sided edge. We just went through a lot of effort to make this a two-sided project, no need to have a one-sided edge to top it off… is there?
After your slip stitch, at end of row 20, Ch 1 and turn. You need the back side for this edge.
Barred SC:
*Use the side of your hook to drag the feed yarn forward, and go into the top of the next DC. Exaggerate your hooks entry into the stitch by bending the handle all the way down in front. This will force the feed yarn out where you can catch it on the edge of the stitch with your thumb. Grab this, YO, and draw your loop through like normal, let go of the feed line with your thumb, then YO and complete your SC.* So, *to* is… Drag, go in next stitch, bend hook, grab feed, pull loop through, release feed line, YO pull through 2 loops.
Slip stitch to Ch 1 and tie off.
beautiful colors!!! Can't wait to start it! Thank you for sharing!
I wish you good luck!