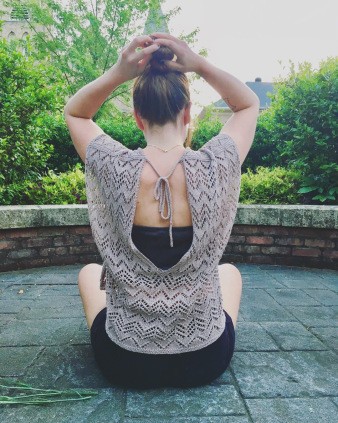
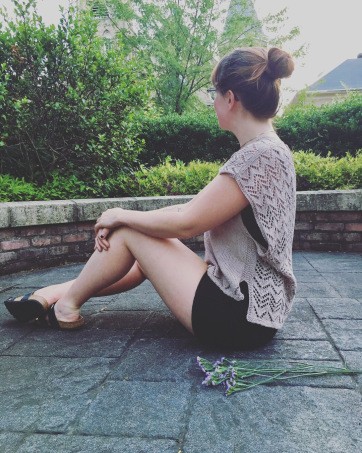
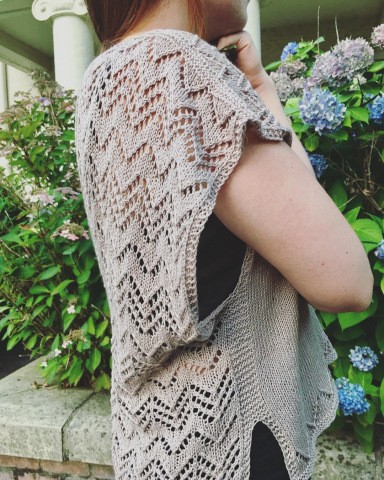
Knitting a Beautiful Lace Sweater


You’ll Need:
4 skeins, Brown Sheep, Cotton Fine
Circle knitting needles 5;
Double-pointed knitting needles 5;
Stitch markers;
Stitch holder.
Stitches Control:
23 sts x 32 rows = 10 x 10 cm.Instructions
Left Front
Cast on 57 stitches using the long tail cast on method (this counts as the first row). Knit 3 rows.
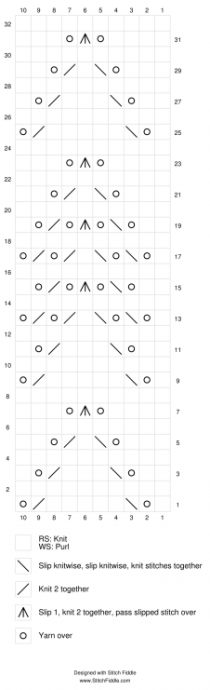
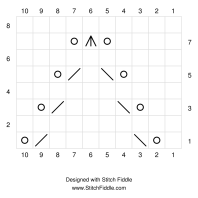
Row 5 (right side): knit 3, place marker, work across Chart A 5 times (50 stitches), knit 1, place marker, knit 3.
Row 6: knit 3, slip marker, purl to marker, slip marker, knit 3.
Row 7: knit 3, slip marker, work across Chart A 5 times (50 stitches), knit 1, slip marker, knit 3.
Row 8: knit 3, slip marker, purl to marker, slip marker, knit 3.
Repeat rows 7 and 8 until Chart A has been worked one time vertically. Then work as follows:
Row 37: knit all stitches.
Row 38: as row 8.
Repeat rows 37 and 38 until the piece measures about 7”. Break yarn and, without removing markers, place stitches on hold to be worked later.
Right Front
Work the same as left front. Don’t break yarn at the end though. You will now work across both pieces to join them together.
Join Fronts
With the right side of the right front facing and leaving markers in place, knit across the piece until there is 1 stitch remaining. With the right side of the left front facing, knit the last stitch from the right front together with the first stitch from the left front. Knit to the end of the row. You should have 113 stitches, with 5 stitches between those 2 markers in the center.
Row 2 (wrong side): knit 3, slip marker, purl to marker, slip marker, knit to marker, slip marker, purl to marker, slip marker, knit 3.
Row 3: knit to the second marker, slip marker, knit 1, SK2PO, knit 1, slip marker, knit to end. You should have 111 stitches.
Row 4: as row 2.
Row 5: knit to the second marker, slip marker, SK2PO, slip marker, knit to end. You should have 109 stitches.
Row 6: as row 2, removing the 2 markers in the center.
Row 7: knit 53, SK2PO (this should be right above the SK2PO you made on row 5), knit to end. You should have 107 stitches.
Row 8: as row 2.
Row 9: knit all stitches.
Row 10: as row 2.
Repeat rows 9 and 10 until piece measures 11”. Break yarn and, without removing markers, place stitches on hold to be worked later.
Right Back
With the right side of the right front facing, pick up 57 stitches from the cast on edge (counts as first row). Knit 3 rows.
Row 5 (right side): knit 3, place marker, work across Chart B 5 times (50 stitches), knit 1, place marker, knit 3.
Row 6: knit 3, slip marker, purl to marker, slip marker, knit 3.
Row 7: knit 3, slip marker, work across Chart B 5 times (50 stitches), knit 1, slip marker, knit 3.
Row 8: knit 3, slip marker, purl to marker, slip marker, knit 3.
Repeat rows 7 and 8 until the piece measures the same length as the front (around 11”). Make a note of which row of the chart you end on. Break yarn and, without removing markers, place stitches on hold to be worked later.
Left Back
With the right side of the left front facing, pick up 57 stitches from the cast on edge. Work the same as the right back piece, ending on the same chart row. Don’t break the yarn at the end though. You will now work across all pieces to join them together.
Body
The back pieces are joined in the same way as the front pieces, except that the piece is now being worked in the round.
Row 1: Working over the left back piece, knit 3, work in pattern to next marker, knit until there is 1 stitch remaining. With the right side of the right back facing, knit the last stitch from the right front together with the first stitch from the right back, knit to marker, work in pattern to next marker, knit to end. With the right side of front facing and continuing with the same strand of yarn, knit 3, knit to next marker, knit 3, place marker (this will indicate the beginning of the round). Join to work in the round. You should have 220 stitches (113 on the back and 107 on the front) and 7 markers. There should be 5 stitches between the 2 markers at the center of the back.
Row 2: slip marker, purl to next marker, slip marker, work in pattern to next marker, slip marker, purl to next marker, slip marker, work in pattern to next marker, slip marker, purl to end of round.
Row 3: slip marker, knit to next marker, slip marker, work in pattern to next marker, slip marker, knit 1, SK2PO, knit 1, slip marker, work in pattern to next marker, slip marker, knit to next marker, slip marker, knit to end of round. You should have 218 stitches (111 on the back and 107 on the front). There should be 3 stitches between the 2 markers at the center of the back.
Row 4: as row 2.
Row 5: slip marker, knit to next marker, slip marker, work in pattern to next marker, slip marker, SK2PO, slip marker, work in pattern to next marker, slip marker, knit to next marker, slip marker, knit to end of round. You should have 216 stitches (109 on the back and 107 on the front). There should be 1 stitch between the 2 markers at the center of the back.
Row 6: as row 2.
Row 7: slip marker, knit to next marker, slip marker, work in pattern until there is 1 stitch remaining before the next marker, SK2PO (removing the 2 markers as you do this), work in pattern to next marker, slip marker, knit to next marker, slip marker, knit to next marker, slip to end of the round. You should have 214 stitches (107 on the back and 107 on the front).
Row 8: slip marker, purl to next marker, slip marker, work in pattern to next marker, slip marker, purl to next marker, slip to the end of round.
Row 9: slip marker, knit to next marker, slip marker, work in pattern to next marker, slip to the next marker, slip to the next marker, slip to the end of the round.
Row 10: as row 8.
Repeat rows 9 and 10 until the piece measures about 5.5” from the underarm, ending with row 8 of Chart B. You will now split the piece in two and begin working flat over the back then the front to create the side vents.
Back Edging
Remove markers and place the 107 front stitches on hold to be worked later. With the right side of the back facing, work over the 107 stitches on the back as follows:
Row 1 (right side): knit 3, place marker, beginning on row 9 of chart work across Chart B 10 times (100 stitches), knit 1, place marker, knit 3.
Row 2: knit 3, slip marker, purl to marker, slip marker, knit 3.
Row 3: knit 3, slip marker, work across Chart B 10 times (100 stitches), knit 1, slip marker, knit 3.
Row 4: knit 3, slip marker, purl to marker, slip marker, knit 3.
Repeat rows 3 and 4 until you’ve worked 24 rows of Chart B, ending on row 8 of the chart. Knit 6 rows. Bind off all stitches.
Front Edging
Place front stitches you have on hold back onto the needles and rejoin yarn.
Row 1 (right side): knit 3, place marker, knit until 3 stitches remain, place marker, knit 3.
Row 2: knit 3, slip marker, purl to marker, slip marker, knit 3.
Row 3: knit 3, slip marker, knit to marker, slip marker, knit 3.
Row 4: knit 3, slip marker, purl to marker, slip marker, knit 3.
Repeat rows 3 and 4, 6 more times. Then work as follows:
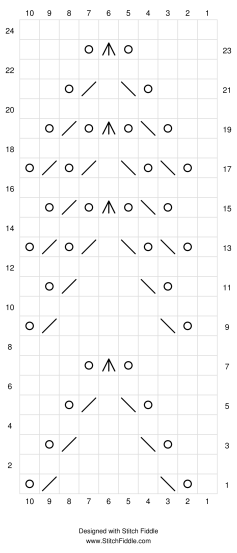
Row 17: knit 3, slip marker, work across Chart C 10 times (100 stitches), knit 1, slip marker, knit 3.
Row 18: knit 3, slip marker, purl to marker, slip marker, knit 3.
Repeat rows 17 and 18 until you’ve worked one repeat of Chart C. Then knit 6 rows and bind off all stitches.
Straps
With the right side of the left shoulder facing and using a double pointed needle, pick up 3 stitches from the neck edge over the seam (where you cast on for the front and picked up stitches for the back). Work in i-cord for 20” or until you just can’t take it anymore. Finish off stitches by knitting 3 together, cutting the yarn, and pulling it through the last stitch. Tuck/weave the yarn inside the cord to hide it. Repeat these steps on the right shoulder.
Finishing
Weave in all your ends and block well to let that lace shine.