Comprehensive Knitting Guide for a Stylish Cardigan


You'll Need:
900g of 100% cotton yarn;
Circle knitting needles 4.5.
Instructions
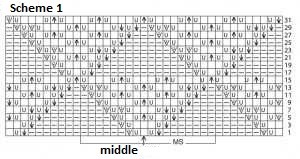
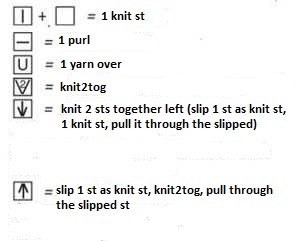
Horizontal pattern repeat is 18 sts and vertical - 32 rows, as you can see on the scheme. There are only right-side odd rows stated on the scheme. But even wrong side rows are made only with purls. Concerning yarn overs, stated on the scheme, they're made as purls. Start the row with the sts before pattern repeat, then repeat pattern repeat needed times, then finish with the sts after the pattern repeat. Work, repeating from 1st to 32nd rows. Stitches control of relief ornament is 15 sts and 25 rows = 10 x 10 cm.
The main thing in making this cardigan is that it's knitted as one whole to arm-holes. Starting from the arm-holes, the details are made separately. That's why you need to cast a lot of sts, so you need circle knitting needles with fishing line. The work is made with turn rows.
Casting On
Cast on 201 sts and knit 5 cm of placket with garter stitch. Then, divide the sts in the following way:
- Slip the 1st selvedge st, knit 9 sts of garter stitch for the placket of the right front;
- Make 181 sts with relief rhombs (see scheme);
- 9 sts of garter stitch (for the left front) finish the row with the last selvedge st.
Knit with this technique for 49 cm after the placket, which is 128 rows. Then, change the division of sts and make the rows in the following way:
- 9 sts of garter stitch;
- 181 sts with relief rhombs, decrease 1 st in the 1st row (there are 180 sts left);
- 9 sts of garter stitch and selvedge st.
Back
As a result, there are 200 sts left on the needles. Transfer 54 sts from each side onto the auxiliary needles, and then start knitting back, using middle 92 sts. Knit 22 cm (66 rows), after which bind off 1 x 8 sts from both sides for forming the shoulder line. Next, bind off 1 x 8 sts in the 4th row. At the same time, when you start making the shoulder chamfer, bind off central 38 sts to create the neck-hole. Then, form both parts of back separately, making roundings along the inner line of neck-hole. Bind off 1 x 3 sts in the 4th row. After knitting 24.5 cm (74 rows), bind off the last 8 sts for shoulders.
Front
Transfer the sts left for the left front on the needles and make the ornament according to the scheme. While making the left front, decrease sts for forming the neck-hole chamfer. For this, rotate the decreases of sts in the 2nd and 4th rows 20 times. This decrease is made by knitting 2 last sts before the placket together. Make the shoulder chamfer on the right side of the left front and repeat the process similar to the back. In the end of making the left front, bind off the last 8 sts of the shoulder. This should be done at the height of the front, which corresponds to the back height. Transfer 10 sts of placket to the auxiliary needle and set aside for a while. Form the second front in a similar and symmetrical manner to the first one.
Sleeves
Cast on 50 sts for one sleeve and make 3 cm of placket with garter stitch. Then, continue knitting with transversal rib, increasing sts at the same time to make the sleeve wider. Increase 1 st in every 10th row from both sides 9 times. After knitting 8 cm (24 rows) from the placket, start making relief rhombs according to the scheme. In the 1st row of the fancy pattern, increase 1 st and allocate the ornament from the center of the work. Make the length of your sleeve 31 cm, then bind off the sts left on the needles.
Assembly
Put the left sts from plackets on the needles and knit 14 cm with garter stitch in order to make the back. Then, leave these sts again and sew the details. After that, make shoulder seams and sew the neck-hole placket to the neck-hole. Finish work with sewing the sleeves.