How to Make a Beautiful Handmade Blanket


You'll Need:
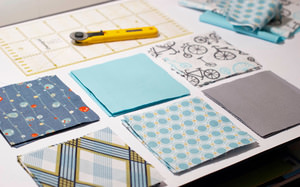
- Fabric of one, two, three or more colors;
- Fabric for base (it won't be seen);
- Holofiber or polyester;
- Threads;
- Needles and pins;
- Scissors;
- Pencil;
- Ruler.
Instructions
The squares for cushions should have a side of at least 8 cm and no more than 40 cm; otherwise, the blanket will not have a beautiful look. The universal calculation, based on the estimated dimensions of the blanket, is as follows: the width of the base fabric should be one and a half cm larger than the size of the material that will be used for sewing the top, that is, the sum of all squares, plus 2 cm for allowances for seams.
The blanket will consist of squares with a side of 17 cm, arranged eight in width and ten in length.
In the diagram, they will alternate with diagonal stripes, from right to left. The first square in the upper right corner will be from fabric No. 1, the next two squares in color from fabric conventionally named No. 2, then again diagonally a strip from fabric No. 1, and the fourth diagonal from color Number 3. You will start again with the diagonal of the squares in this sequence - with colors No. 1, No. 2, No. 1, No. 3.
Repeat this alternation in the diagram for the sizes of the blanket we need. Thus, there will be 80 pieces of squares: 40 from fabric No. 1, and 20 from fabric No. 2 and No. 3. What fabric will be with what number is up to you to decide.
Now proceed to the cutting.
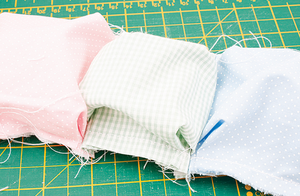
Make a square pattern with the selected side and cut out the desired number of squares from fabric of different colors. Fold according to the scheme the first horizontal strip of squares and sew them together. Iron seams to the right. Collect the next horizontal strip from the squares of the desired colors, and also collect them in a tape, only smoothing the seams to the left. This will then help to sew the strips together so that the seams look beautiful.
Draw the fabric selected for the base into squares with a side of 11 cm. You need to leave 1 cm of seam allowance in length between each row. On the sides, leave allowances of 4-5 cm to make piping to decorate the finished product.
Take a strip sewn from squares and place it on the base so that the drawn stripes coincide with the borders between the squares on the stripes. But the free part of the fabric needs to be folded with two neat oncoming folds or gathered when sewing.
It is better to fix the strips on the base with needles because the appearance of the finished product depends on how exactly all the strips are stitched.
Sew the strip on one side horizontally, and then attach the vertical stripes in exact accordance with those drawn on the basis.
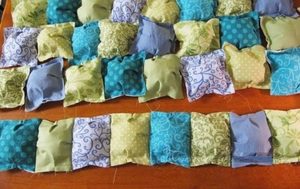
You should get pockets that need to be filled with holofiber. Gently tuck it in, then stitch up the rest of the side. Now proceed with the next strip according to the same pattern to create a beautiful colored blanket.
To finish your blankets and seams faster, you can attach the next strip, closing the remaining incision for stuffing with one seam. Then you need to fix all the intermediate results with needles so that the tapes do not move.
When all the prepared tapes were sewn together, a beautiful product was obtained. It only remained to process the sides on the edging. You can sew the second side to the blanket from the wrong side, with a layer of padding polyester in between to make it even warmer.