

Make a Charming Sarah Sanderson Amigurumi Doll — Free Crochet Pattern (7–8 in)

Introduction
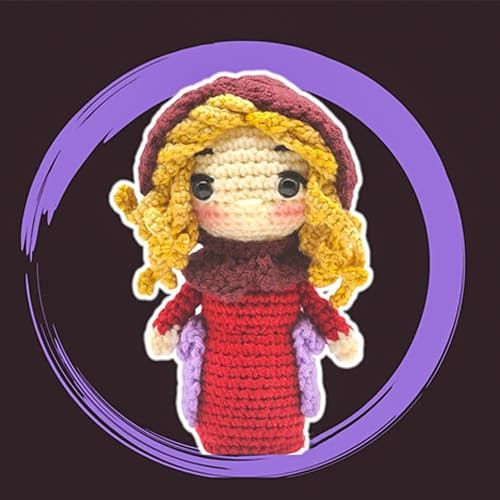
Create a whimsical Sarah Sanderson amigurumi doll with this step-by-step crochet pattern. Designed to produce a finished doll about 7–8 inches (18–20 cm) tall, this project combines simple amigurumi shaping with fun details: a burgundy cape, hood, layered overskirt, and long yellow hair strands. Suitable for crocheters familiar with basic stitches and working in rounds. Read through the entire pattern before you begin and have your materials ready.
Abbreviations
MR: Magic ring
Ch: Chain
BLO: Back loop only
FLO: Front loop only
Fo: Fasten off
Hdc: Half double crochet
Inc: Increase
Dec: Decrease
Rnd: Round
Sc: Single crochet
Slst: Slip stitch
St: Stitch
Materials
- Yarns: Number 4 worsted yarn, 100% acrylic
- Yarn Bee Soft and Sleek
- Stuffing: Poly-fill
- Crochet hook: 3.75mm
- Height: 7-8 inches – 18-20 cm
Head
Start with skin color.
Rnd 1: 6 sc in MR (6)
Rnd 2: 6 inc (12)
Rnd 3: (1 sc, inc) * 6 (18)
Rnd 4: (2 sc, inc) * 6 (24)
Rnd 5: (3 sc, inc) * 6 (30)
Rnd 6: (4 sc, inc) * 6 (36)
Rnd 7-12: 36 sc
Rnd 13: (4 sc, dec) * 6 (30)
Rnd 14: (3 sc, dec) * 6 (24)
Rnd 15: (2 sc, dec) * 6 (18)
Rnd 16: (1 sc, dec) * 6 (12)
Rnd 17: (2 sc, dec) * 3 (9)
Change color to red, continue with body.
Stop and place the 10mm eyes between rounds 10 & 11, 7 st apart.
Don’t forget to stuff.
Body
With red yarn.
Rnd 1-2: 9 sc (9)
Rnd 3: 9 inc (18)
Rnd 4: (1 sc, inc) * 9 (27)
Rnd 5-8: 27 sc (27)
Rnd 9: (1 sc, dec) * 9 (18)
Rnd 10: (1 sc, inc) * 9 (27)
Rnd 11: (8 sc, inc) * 3 (30)
Rnd 12-20: 30 sc
Stuff.
Rnd 21: BLO (3 sc, dec) * 6 (24)
Rnd 22: (2 sc, dec) * 6 (18)
Rnd 23: (1 sc, dec) * 6 (12)
Rnd 24: 6 dec (6) - Fasten off.
Don’t stuff too much at the end so the base remains flat.
Arms (Make 2)
Start with skin color.
Rnd 1: 6 sc in MR (6)
Rnd 2: 6 sc (6)
Change color to red.
Rnd 3: (2 sc, inc) * 3 (9)
Rnd 4-9: 9 sc (9)
Fasten off, leave a long thread to attach to the body.
Upside down FLO of round 21 (with new red thread): 30 sc - fasten off.
Hair
With yellow yarn.
Rnd 1: 6 sc in MR
Rnd 2: 6 inc (12)
Rnd 3: (1 sc, inc) * 6 (18)
Rnd 4: (2 sc, inc) * 6 (24)
Rnd 5: (3 sc, inc) * 6 (30)
Don’t fasten off, continue with the strands.
Strands:
S1-5: 25 ch, 24 sc, slst
S6-16: 25 ch, (start on 3rd ch from hook) 23 hdc, skip 1 st, slst.
S17-19: 25 ch, 24 sc, slst.
S20-21: 25 ch, 24 sc, slst.
Between S1 and S2 (both strands)
S22-23: 25 ch, 24 sc, slst.
Between S2 and S3 (both strands)
S20-23 go in the front, slightly towards one side.
S2-14 go in the back glue/ sew them to the head.
Cape
With burgundy yarn.
Rnd 1: ch 31, 30 sc, ch 2, turn (30)
Rnd 2: (1 dc, 1 dc dec) * 10, ch 1, turn (20)
Rnd 3: 20 sc
Fasten off and leave a long thread.
Hoodie
Start with a new thread at st #5
Rnd 1: ch 2 (doesn’t count as a st), 3 dc, 6 inc dc, 3 dc, ch 2, turn (18)
Rnd 2: (2 dc, 1 inc dc) * 6, ch 2, turn (24)
Rnd 3: (3 dc, 1 inc dc) * 6, ch 2, turn (30)
Rnd 4: (4 dc, 1 inc dc) * 6, ch 2, turn (36)
Rnd 5-8: 36 dc, ch 2, turn (36)
Rnd 9: (4 dc, dc dec) * 6, ch 2, turn (30)
Rnd 10: (3 dc, dc dec) * 6, ch 2, turn (24)
Join both edges with slst - turn inside out.
Overskirt
With light purple yarn.
Rnd 1: ch 25, 23 hdc, ch 2, turn
Rnd 2-6: 23 hdc, ch 2, turn
Rnd 7: BLO - 23 hdc, ch 2, turn
Rnd 8: 23 hdc
Fasten off and leave a long thread.
Fold rounds 7-8 to form that top layer of the overskirt.
Finishing & Assembly
- Place and secure the 10mm safety eyes between rounds 10 and 11, 7 stitches apart, before closing the head.
- Sew the arms to the body using the long thread left from each arm; position them at the sides and stitch securely.
- Attach hair: sew or glue the back strands (S2–S14) and place the front strands (S20–S23) toward one side as indicated in the strand instructions.
- Sew the cape and overskirt to the body, and attach the hoodie/hood as directed (join edges with slst and turn inside out before fitting).
- Stuff firmly but not overly tight to keep the base flat and allow the doll to stand.
- Weave in all loose ends and trim excess threads. Add any facial embroidery or finishing touches as desired.
Enjoy your finished Sarah Sanderson amigurumi — a lovely handmade gift or display piece!