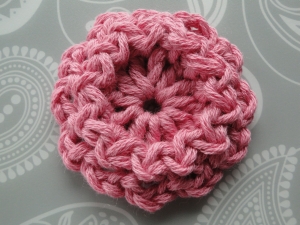
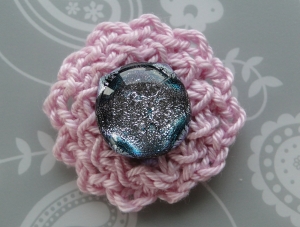
Crochet The Ridge Edge Flower


If you're looking to add a touch of charm to your crochet projects, trying out the Ridge Edge Flower pattern could be a delightful choice! This lovely design creates a textured and intricate look that can elevate any piece you incorporate it into. Whether you're a beginner or a seasoned crocheter, making these flowers is a fun and rewarding experience. The combination of simple stitches and subtle ridges results in a beautiful and eye-catching floral motif that will surely impress. So grab your yarn and hook, and embark on a creative journey to crochet these delightful Ridge Edge Flowers – you're sure to enjoy every stitch!
Materials Required
My Ridge Edge Flower uses a clever little technique of two rounds of slip stitches to create a raised edging, which looks fab with or without a button:
Brown Sheep Cotton Fleece worsted cotton/merino, 4 mm hook. Width 1¾"/4.5 cm
Patons 100% Cotton fingering weight, 3 mm hook. Width: 1¼"/3 cm
Pattern Instructions
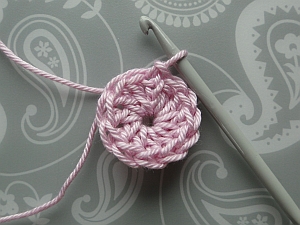
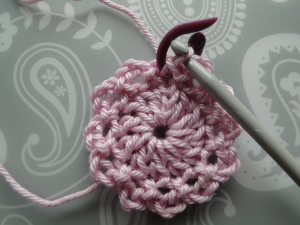
RND 1: Start with a slip knot, ch 4, 11 dc (UK tr) into 4th ch from hook, join with a ss into top of 4 ch.
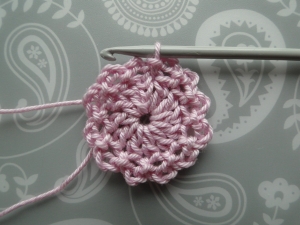
RND 2: (ch 3, ss into next st) 12 times. Work your last ss into the joining ss from the last round.
RND 3: ss into first 3 ch loop. Stitch mark that first loop if you like, to keep track of where you are. Ss into space between your ch 4 and 1st dc (UK tr) of round 1. (ss into next 3 ch loop, ss into next sp between dc (UK tr) stitches of round 1) 11 times.
RND 4: Now ss round again: ss into first 3 ch loop which is stitch marked, ss into first space between ch 4 and 1st dc (UK tr) of round 1. Then ss into next loop, ss into next space, and the same around. Finish with a ss into the 1st 3 ch loop again, tie off, and thread your tail end through to the back of the 3 ch loop and weave in your ends.
The Ridge Edge Flower Photo Tutorial
RND 1: Start with a slip knot, ch 4, 11 dc (UK tr) into 4th ch from hook, join with a ss into top of 4 ch:
RND 2: (ch 3, ss into next st) 12 times. Work your last ss into the joining ss from the last round.
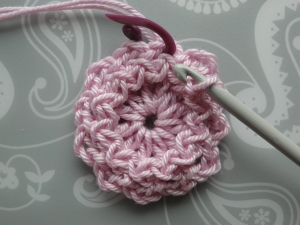
RND 3: ss into first 3 ch loop. Stitch mark that first loop if you like, to keep track of where you are:
Ss down into the space between your ch 4 and 1st dc (UK tr) of round 1.
The dark thread shows you where to slip stitch after you work into the first loop. You need to go right down between the "legs" of the stitches:
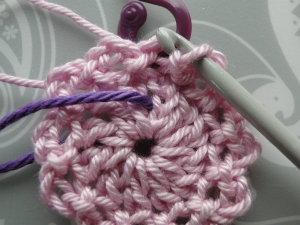
Here's that stitch made:
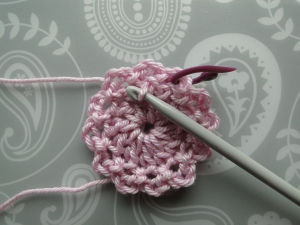
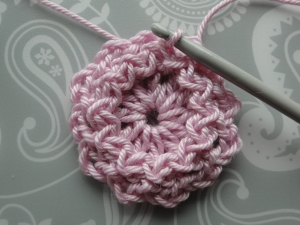
(ss into next 3 ch loop, ss into next sp between dc (UK tr) stitches of round 1) 11 times. I count as I go round - top one, bottom one, top two, bottom two, etc :) Keep your tension nice and even, not too tight with these slip stitches!
Your last ss brings you into the space between your last dc (UK tr) and the beginning 4 ch:
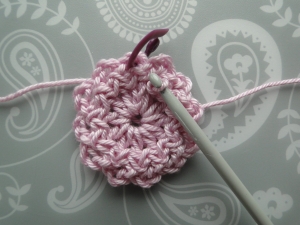
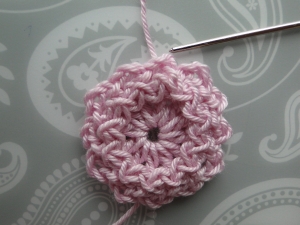
RND 4: Now ss round again in exactly the same way: ss into first 3 ch loop which is stitch marked, ss into first space between ch 4 and 1st dc (UK tr) of round 1.
Finish with a ss into the 1st 3 ch loop:
Tie off, and thread your tail end through to the back of the 3 ch loop:
Weave in your ends, and all is done, at last!